Task 3: Manage State
Step 1: Like Counter
In this step, we will add a like counter to each post. This will allow users to see how many people have liked a post and add to the social interaction of the app. We will use state to keep track of the number of likes and update it when the like button is clicked.
💡 In React, state refers to mutable data that often changes as a result of user interaction. When it changes, the UI must be updated.
Update src/components/post-footer.tsx file as follows:
import { Button } from "@/components/ui/button";
import { ChatBubbleIcon, HeartIcon } from "@radix-ui/react-icons";
import PostActions from "./post-actions";
import { useState } from "react";

function PostFooter() {
  const [likes, setLikes] = useState(0);

  return (
    <div className="flex justify-between mb-2">
      <Button variant="ghost" size="sm" onClick={() => setLikes(likes + 1)}>
        <HeartIcon className="w-5 h-5 opacity-50" />{" "}
        {likes > 0 && <sup>{likes}</sup>}
      </Button>
      <Button variant="ghost" size="sm">
        <ChatBubbleIcon className="w-5 h-5 opacity-50" />
      </Button>
      <PostActions />
    </div>
  );
}

export default PostFooter;
The useState hook is a built-in function in React that allows functional components to manage state. State refers to data that can change over time and affects the behavior and appearance of the component.
When you call useState, it returns an array with two elements: the current state value and a function to update the state. The initial state is provided as an argument to useState.
For example, in the code snippet provided, const [likes, setLikes] = useState(0) initializes the likes state variable with a value of 0. The setLikes function can be used to update the value of likes.
To update the state, you can call the state updater function (setLikes) and pass the new value as an argument. React will then re-render the component with the updated state, causing any changes in the UI that depend on the state to be reflected.
In the example, when the like button is clicked, the setLikes function is called with the new value (likes + 1). This increments the likes state by 1 and triggers a re-render of the component, updating the UI to show the updated like count.
Run the app and experiment with the like button.
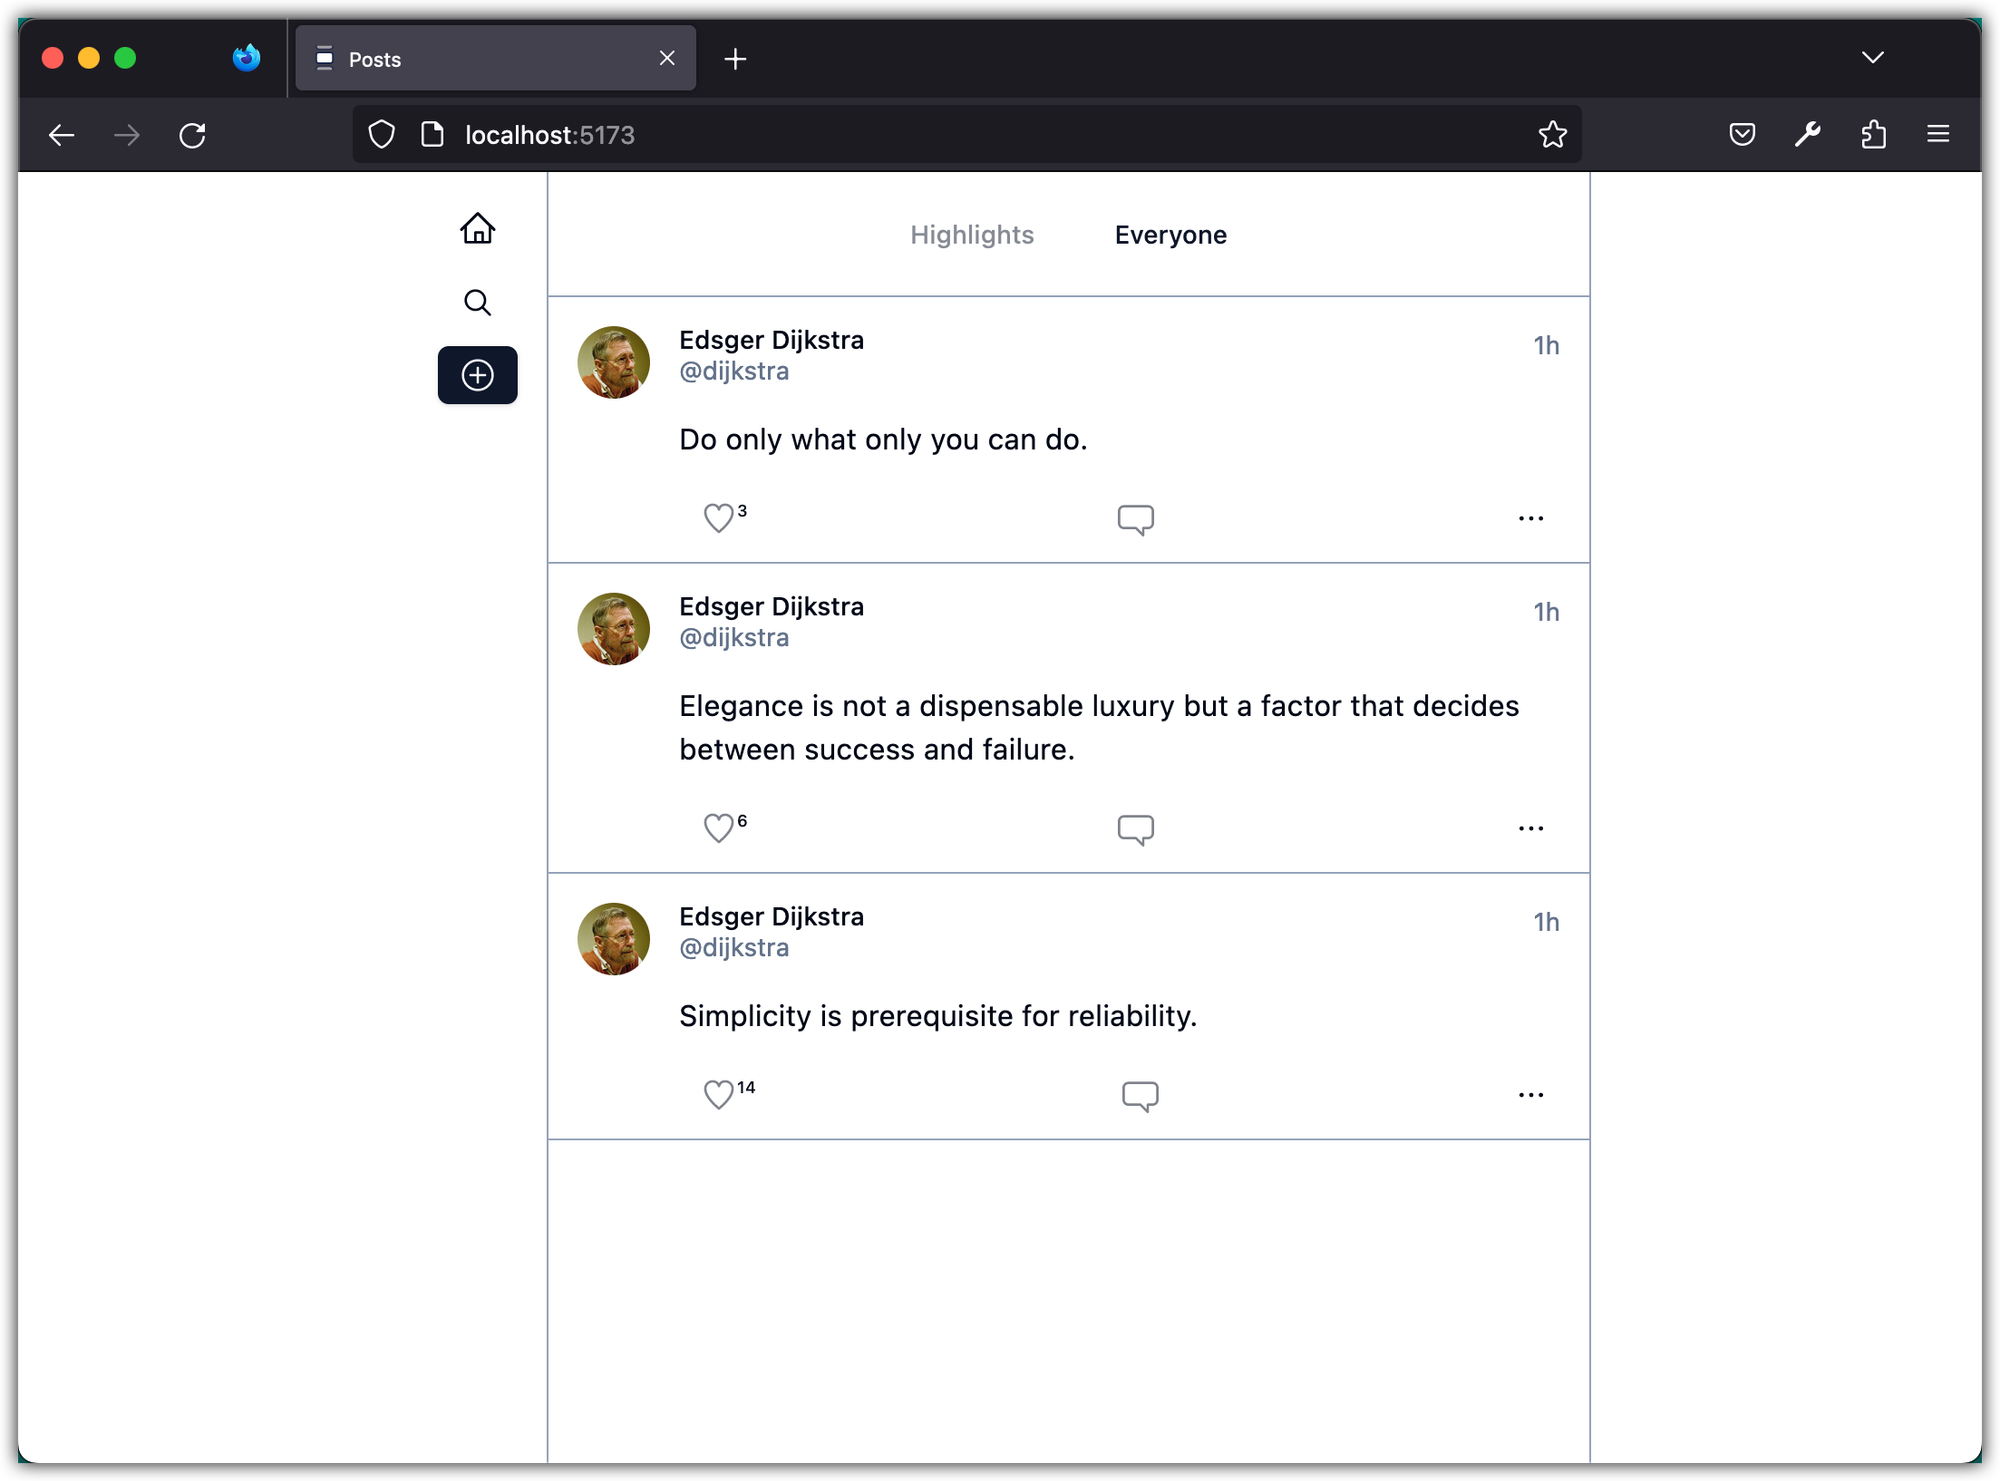
Note that each post has its own counter, independent of other posts. When we refresh the page, this count resets because we're not yet persisting this information. We'll address this issue in future lessons. However, it's worth exploring how we might want to store information about likes in relation to posts for a more sophisticated setup.
At first, we might think: 'We just need to know how many likes each post has, right?' So we could simply add a likes count field to our Post objects that gets incremented every time a user likes the post. This would give us quick and easy access to the like count for each post.
export type Post = {
  id: string;
  content: string;
  image?: string;
	likes: number; // Initialized to 0 for each new post
};
But what if we want our application to do more? For example, what if we want to show users a list of everyone who liked a post when they click on the like count? Or what if we want to highlight posts that the logged-in user has liked? For these features, we need more than just a count - we need to know who specifically liked each post.
We might then think: “Okay, let's add an array of Likes to each Post object, where each Like includes the username and display name of the user who liked the post.” This would give us all the information we need right inside each Post object.
// Let's say, hypothetically, we have a User type like this
export type User = {
  id: string;
  userName: string;
  displayName: string;
};

export type Post = {
  id: string;
  content: string;
  image?: string;
  likes: User[];
};
But this approach comes with its own challenges. What happens if a user changes their username or display name? We'd have to find and update every single post they've liked, which could be hundreds or even thousands of posts! Additionally, we're duplicating the same user information across multiple posts, which is inefficient.
Alternatively, we could keep likes separate from posts and connect them by IDs. This model reduces data redundancy. The user information is stored only once and is linked to likes via user ID. If a user changes their username or display name, it would be updated in a single place. It's easier to find all the posts a specific user has liked, as you would just have to look up the Likes collection using the user ID. Similarly, getting all the likes a post has received would involve a simple query to the Likes collection with the post ID.
export type User = {
  id: string;
  userName: string;
  displayName: string;
};

export type Post = {
  id: string;
  content: string;
  image?: string;
};

export type Like = {
  id: string;
  postId: string;
  userId: string;
};
This approach may not be ideal either. For example, every time we want to show a post, we'll also have to fetch all the likes for that post separately, which could slow us down.
It seems like we're caught between a rock and a hard place, doesn't it? But don't worry - there's a clever solution that gives us the best of both worlds: a hybrid approach. We can minimize redundant data and complex updates while also keeping our data fetching efficient.
In this design, you would add a likeCount field to your Post type that keeps track of the total number of likes a post has. This count would be updated each time a like is added or removed. Meanwhile, you're also maintaining a separate Like type (or table, if we're thinking in relational database terms), which keeps track of who liked what.
export type User = {
  id: string;
  userName: string;
  displayName: string;
};

export type Post = {
  id: string;
  content: string;
  image?: string;
	likeCount: number
};

export type Like = {
  id: string;
  postId: string;
  userId: string;
};
With this approach, getting the like count for a post becomes extremely efficient. You simply read the likeCount field of a Post without needing to count the number of related likes each time. This is particularly beneficial when displaying lists of posts with their like counts, which is a common requirement in a Twitter-like application.
Moreover, when a user wants to see the list of users who liked a post (perhaps by clicking on the like count), you can then query the Like type using the post ID. This provides the detail when you need it, without impacting the performance of every post read.
If a user changes their username or display name, it needs to be updated in just one place. You still have the ability to easily find all the posts a specific user has liked by querying the Like type using the user id.
The cost of this approach is additional complexity when likes are added or removed. Not only do you have to insert or remove a record in the Like type, but you also need to increment or decrement the likeCount on the relevant Post. However, the benefit of reduced complexity and increased efficiency on reads often outweighs this cost, given that reads typically far outnumber writes in many web applications.
We will work on the data model in the next step. For now, stage and commit all changes:
git add .
git commit -m "Like Counter"
Step 2: Data Model and Sample Data
In this step, we're going to be working with a data model that includes users, posts, likes, and comments. For the purposes of our Posts app, we will use a mock dataset which is encapsulated in the data.ts file. Please update this file with the following content:
export type User = {
  id: string;
  userName: string;
  displayName: string;
  avatar?: string;
};

export type Post = {
  id: string;
  userId: string;
  content: string;
  timestamp: string;
  image?: string;
  likeCount: number;
  commentCount: number;
};

export type Like = {
  id: string;
  postId: string;
  userId: string;
};

export type Comment = {
  id: string;
  postId: string;
  userId: string;
  content: string;
  timestamp: string;
};

export const users: User[] = [
  {
    id: "u1",
    userName: "edsger",
    displayName: "Edsger Dijkstra",
    avatar: "edsger-dijkstra.webp",
  },
  {
    id: "u2",
    userName: "donald",
    displayName: "Donald Knuth",
    avatar: "donald-knuth.webp",
  },
  {
    id: "u3",
    userName: "grace",
    displayName: "Grace Hopper",
    avatar: "grace-hopper.webp",
  },
];

export const posts: Post[] = [
  {
    id: "p1",
    userId: "u1",
    content: "Do only what only you can do.",
    timestamp: "2023-07-24T12:00:00Z",
    likeCount: 2,
    commentCount: 1,
  },
  {
    id: "p2",
    userId: "u1",
    content: "Elegance is not a dispensable luxury but a factor that decides between success and failure.",
    timestamp: "2023-07-23T12:00:00Z",
    likeCount: 1,
    commentCount: 2,
  },
  {
    id: "p3",
    userId: "u2",
    content: "Beware of bugs in the above code; I have only proved it correct, not tried it.",
    timestamp: "2023-07-22T12:00:00Z",
    likeCount: 1,
    commentCount: 0,
  },
  {
    id: "p4",
    userId: "u2",
    content: "Science is what we understand well enough to explain to a computer, Art is all the rest.",
    timestamp: "2023-07-21T12:00:00Z",
    likeCount: 2,
    commentCount: 1,
  },
  {
    id: "p5",
    userId: "u3",
    content: "The most damaging phrase in the language is: 'It's always been done this way.'",
    timestamp: "2023-07-20T12:00:00Z",
    likeCount: 2,
    commentCount: 1,
  },
  {
    id: "p6",
    userId: "u3",
    content: "To me programming is more than an important practical art. It is also a gigantic undertaking in the foundations of knowledge.",
    timestamp: "2023-07-19T12:00:00Z",
    likeCount: 1,
    commentCount: 1,
  },
];

export const likes: Like[] = [
  { id: "l1", postId: "p1", userId: "u2" },
  { id: "l2", postId: "p1", userId: "u3" },
  { id: "l3", postId: "p2", userId: "u3" },
  { id: "l4", postId: "p3", userId: "u1" },
  { id: "l5", postId: "p4", userId: "u1" },
  { id: "l6", postId: "p4", userId: "u3" },
  { id: "l7", postId: "p5", userId: "u1" },
  { id: "l8", postId: "p5", userId: "u2" },
  { id: "l9", postId: "p6", userId: "u2" },
];

export const comments: Comment[] = [
  { id: "c1", postId: "p1", userId: "u3", content: "This is a fantastic thought!", timestamp: "2023-07-25T12:00:00Z" },
  { id: "c2", postId: "p2", userId: "u2", content: "Absolutely agree.", timestamp: "2023-07-25T12:30:00Z" },
  { id: "c3", postId: "p2", userId: "u3", content: "Well said.", timestamp: "2023-07-25T12:45:00Z" },
  { id: "c4", postId: "p4", userId: "u1", content: "Absolutely correct.", timestamp: "2023-07-25T12:00:00Z" },
  { id: "c5", postId: "p5", userId: "u2", content: "This is a wonderful quote.", timestamp: "2023-07-25T12:30:00Z" },
  { id: "c6", postId: "p6", userId: "u1", content: "I totally agree.", timestamp: "2023-07-25T12:45:00Z" },
];
This file contains TypeScript type definitions, representing our data structure, and arrays of dummy data that mimic actual data we might find in a real-world application.
The dataset features renowned computer scientists – Edsger Dijkstra, Donald Knuth, and Grace Hopper – as our users. Each of them has made posts, reacted to others' posts, and participated in discussions. By exploring and manipulating this data, we will gain hands-on experience in managing relationships between different entities in an application, and we'll see how design decisions can impact data access efficiency and overall application performance.
Remember, while this dummy data simplifies things for our learning, the principles and techniques you'll pick up here will hold true for any data on a much larger scale.
Before moving to the next step, download the following Zip file, unzip it, and move the images to the public folder.
When done, the public folder should contains the following files:
public
├── donald-knuth.webp
├── edsger-dijkstra.webp
├── favicon.svg
└── grace-hopper.webp
Stage and commit all changes:
git add .
git commit -m "Data Model and Sample Data"
Step 3: Mock API
We have hardcoded some sample data in our application, but in a real-world scenario, we would fetch this data from a backend. To simulate this behavior, we will create abstractions in a src/lib/api.ts file:
import { users, posts } from "@/lib/data";
import type { User, Post } from "@/lib/data";

// Mock database
const db = {
  users: [...users],
  posts: [...posts]
};

export type PostWithUserData = Post & { user?: User };

// Helper function to find a user by ID
export const findUser = async (id: string): Promise<User | undefined> => {
  return new Promise((resolve) => {
    setTimeout(() => {
      const user = db.users.find((user) => user.id === id);
      resolve(user);
    }, 200); // Simulate an API delay
  });
};

// Fetch all posts with user data
export const fetchPosts = async (): Promise<PostWithUserData[]> => {
  return new Promise((resolve) => {
    setTimeout(async () => {
      const data: PostWithUserData[] = [];
      for (const post of db.posts) {
        const user = await findUser(post.userId);
        data.push({ ...post, user });
      }
      resolve(data);
    }, 200); // Simulate an API delay
  });
};
Note that both findUser and fetchPosts return a Promise that resolves after a delay. This is done using the Promise object and the setTimeout function. It simulates the asynchronous nature of fetching data from a backend in real-world scenarios.
Moreover, we augment the posts with user data. We need this data since we display the user's avatar, display name, and username along with each post. We could fetch user data for each post as we display it, but reducing the amount of data manipulation done on the client-side is highly beneficial. In a real-world scenario, your backend API would be responsible for joining the required data from different entities and returning a “ready-to-use” result to the client. In this case, the fetchPosts function, which mocks our API, "joins" the User data to the Post data based on the userId field in each Post.
Before going any further, let’s pause and focus on the implementation of fetchPosts:
// Fetch all posts with user data
export const fetchPosts = async (): Promise<PostWithUserData[]> => {
  return new Promise((resolve) => {
    setTimeout(async () => {
      const data: PostWithUserData[] = [];
      for (const post of db.posts) {
        const user = await findUser(post.userId);
        data.push({ ...post, user });
      }
      resolve(data);
    }, 200); // Simulate an API delay
  });
};
- We are iterating over each post sequentially using a
for...ofloop. - For each post, we wait for the
findUserfunction to complete before moving on to the next post. - After fetching the user data, we combine it with the post data and push it to our result array.
Can you implement this without using a for loop and instead utilize an array method like map?
// Fetch all posts with user data
export const fetchPosts = async (): Promise<PostWithUserData[]> => {
  return new Promise((resolve) => {
    setTimeout(async () => {
      // const data: PostWithUserData[] = [];
      // for (const post of db.posts) {
      //   const user = await findUser(post.userId)
      //   data.push({...post, user})
      // }
      const data = db.posts.map(async (post) => {
        const user = await findUser(post.userId)
        return {...post, user}
      })
      resolve(data);
    }, 200) // Simulate an API delay
  });
};
Notice that the resolve(data); statement in VSCode will be highlighted with an error indicating that data does not adhere to the expected type of PostWithUserData[].
The problem with this code lies in the use of the map method with an asynchronous function. When you use async inside map, the result of each iteration is a Promise. So, the data array will be an array of Promises, not an array of PostWithUserData objects as you intend.
To illustrate:
const data = db.posts.map(async (post) => {
  const user = await findUser(post.userId)
  return {...post, user}
})
After this code runs, data will look something like this:
[
  Promise<PostWithUserData>,
  Promise<PostWithUserData>,
  ...
]
When you then call resolve(data), you are resolving the outer promise with an array of promises, not with an array of PostWithUserData objects.
To fix this, you can use Promise.all:
const data = await Promise.all(db.posts.map(async (post) => {
  const user = await findUser(post.userId)
  return {...post, user}
}))
With this change, data will be an array of PostWithUserData objects, and you can safely resolve the outer promise with it.
💡 This
Promise.all()function takes an array of Promises and returns a single Promise that resolves to an array with the resolved values of the original Promises.
Using Promise.all() has the advantage of allowing multiple asynchronous operations to be executed concurrently and returning a single promise that resolves when all the promises in the input array have resolved. This can significantly improve the performance of your code by avoiding unnecessary sequential execution of asynchronous operations.
In the context of the code snippet provided, Promise.all() is used to concurrently fetch user data for each post in the fetchPosts() function. By mapping over the posts array and creating an array of promises, Promise.all() ensures that all the promises are resolved in parallel, resulting in faster data retrieval. Once all the promises have resolved, Promise.all() returns a single promise that resolves to an array of PostWithUserData objects.
By using Promise.all() in this scenario, the code takes advantage of parallelism, improving the overall efficiency and performance of the data fetching process.
Aside about error handling: In the first function where we sequentially iterate over posts, the function will stop at the first post that throws an error and won't continue fetching user data for the subsequent posts. In the second function, since Promise.all rejects as soon as any of the promises in the array reject, it will also stop at the first error encountered. However, because all promises are initiated concurrently, other findUser calls might still be in-flight or even completed by the time an error is encountered.
The second implementation is more concise due to the use of Promise.all and .map(). It also leverages the power of asynchronous operations in JavaScript more effectively. So, let’s update the fetchPosts as follows:
// Fetch all posts with user data
export const fetchPosts = async (): Promise<PostWithUserData[]> => {
  return new Promise((resolve) => {
    setTimeout(async () => {
      const postsWithUserData = await Promise.all(
        db.posts.map(async (post) => ({
          ...post,
          user: await findUser(post.userId),
        })),
      );
      resolve(postsWithUserData);
    }, 200); // Simulate an API delay
  });
};
Before going to the next step, make sure to stage and commit all changes.
git add .
git commit -m "Mock API"
Step 4: Fetch Posts
Let’s update the Posts component:
import { PostWithUserData, fetchPosts } from "@/lib/api";
import Post from "./post";
import { useEffect, useState } from "react";

const Posts = () => {
  const [posts, setPosts] = useState<PostWithUserData[]>([]);

  useEffect(() => {
    const loadPosts = async () => {
      const fetchedPosts = await fetchPosts();
      setPosts(fetchedPosts);
    };

    loadPosts();
  }, []);

  return (
    <div className="">
      {posts.map((post) => (
        <Post post={post} key={post.id} />
      ))}
    </div>
  );
};

export default Posts;
First notice the call to useState:
const [posts, setPosts] = useState<PostWithUserData[]>([]);
The data type of the posts variable is declared as PostWithUserData[] in the call to useState. In React, the useState hook uses angle brackets to specify the generic data type of the state variable. This allows TypeScript to infer and enforce the type of the state variable and its possible values.
Next, let’s focus on useEffect:
useEffect(() => {
  const loadPosts = async () => {
    const fetchedPosts = await fetchPosts();
    setPosts(fetchedPosts);
  };

  loadPosts();
}, []);
The useEffect is a React Hook that lets us run side effects in functional components.
💡 A side effect is anything that occurs outside of the component's render method, such as fetching data, setting up event listeners, etc.
The useEffect hook takes two arguments: a function that performs the side effect, and an optional array of dependencies. The function passed to useEffect is executed after the component is mounted and after every update. The dependencies array tells React to re-run the effect only if one of the dependencies has changed.
💡 If you pass an empty array as the second argument, React will only run the effect once, after the component is mounted.
Okay! There is something strange about the function argument of useEffect in the code above. Namely, we don’t do this:
useEffect(async () => {
  const fetchedPosts = await fetchPosts();
  setPosts(fetchedPosts);
}, []);
In our implementation, we had to create an async function inside the useEffect and call it instead of making the first function argument of useEffect an async function because the first argument of useEffect cannot be an async function directly!
The first argument of useEffect expects a function that can be executed immediately, not a promise that resolves asynchronously. By creating an async function inside useEffect and calling it, we ensure that the function is executed immediately and can perform asynchronous operations within it.
useEffect(() => {
  const loadPosts = async () => {
    const fetchedPosts = await fetchPosts();
    setPosts(fetchedPosts);
  };

  loadPosts();
}, []);
This approach allows us to use the await keyword within the async function to wait for the fetchPosts function to complete and retrieve the data before updating the state with setPosts.
By the way, we can also place the loadPosts function outside of the useEffect hook, which could result in a more modular and readable implementation:
const loadPosts = async () => {
  const fetchedPosts = await fetchPosts();
  setPosts(fetchedPosts);
};

useEffect(() => {
  loadPosts();
}, []);
Aside: The reason for using useEffect instead of directly fetching the posts is that fetching data is an asynchronous operation. If we fetch the posts directly in the component's body, it would cause a delay in rendering the component. This delay can result in an empty or incomplete UI being displayed until the data is fetched and available. By using useEffect, we can separate the data fetching logic from the component rendering process, ensuring a smoother user experience.
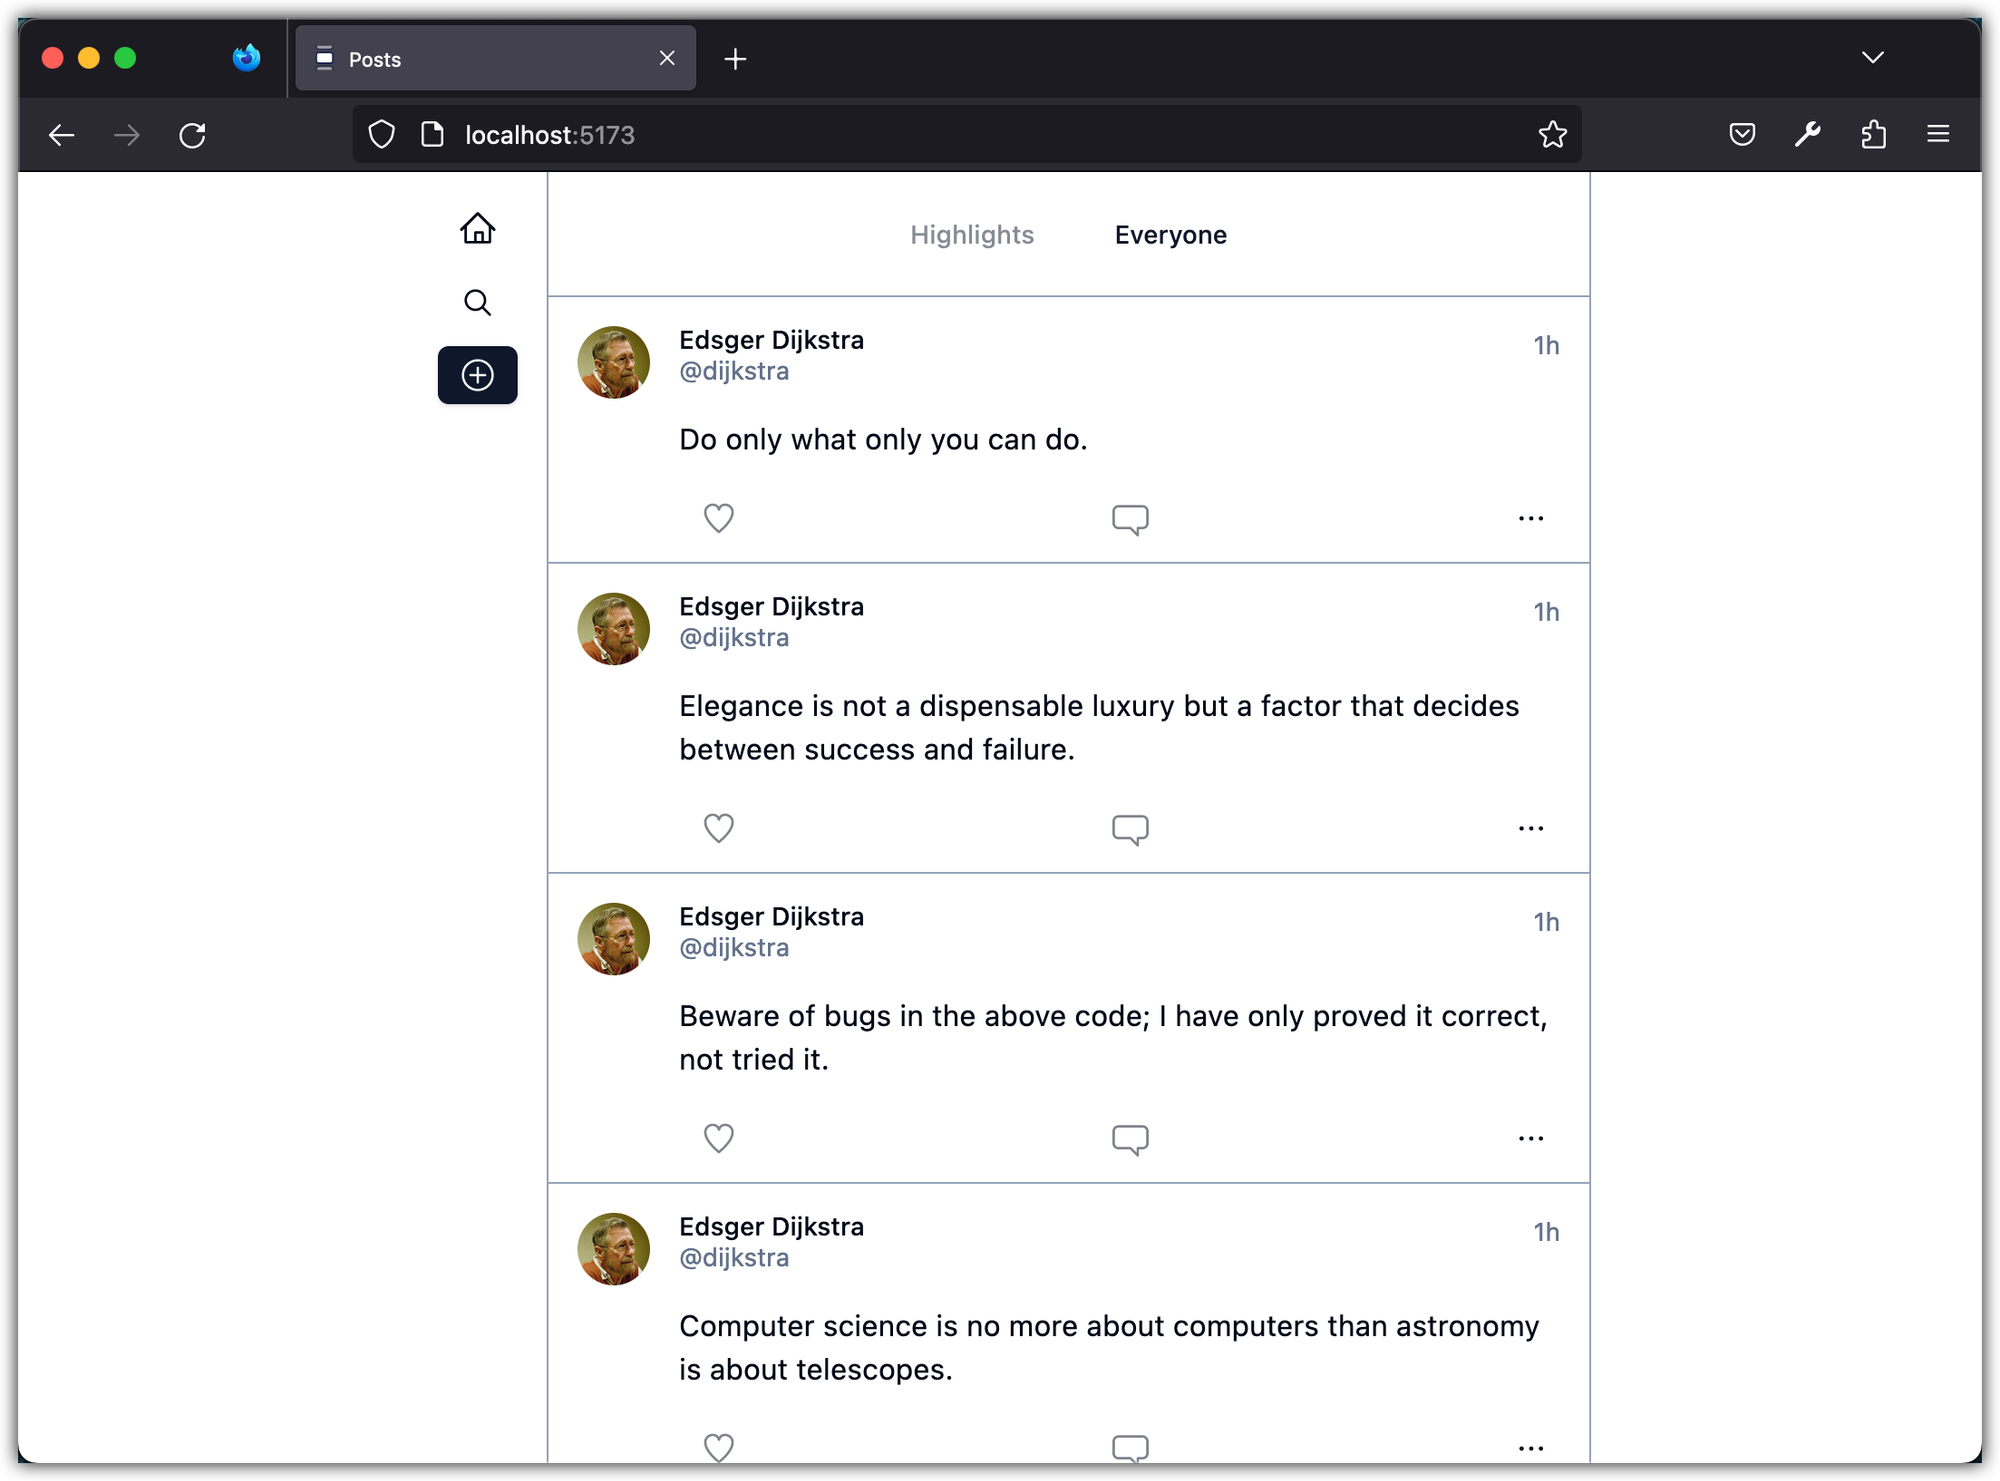
Alright! Now, checkout the app’s UI. Notice all posts are rendered! However, they are all attributed to Edsger Dijkstra since we hardcoded that information in the post header. We will fix this next.
Before going to the next step, make sure to stage and commit all changes.
git add .
git commit -m "Fetch Posts"
Step 5: Consuming Posts Data
In this step, we will continue building our Posts app by consuming the data we defined in the previous steps. We will update the PostAvatar and PostHeader components to dynamically display the user's avatar and username. By the end of this step, we will have a functional posts feed that can display posts from multiple users with their respective avatars, usernames, post dates, and more.
Update the src/components/post-avatar.tsx as follows:
import { Avatar, AvatarFallback, AvatarImage } from "@/components/ui/avatar";
import { getInitials } from "@/lib/utils";

type PostAvatarProps = {
  imageUrl?: string; // author's profile image
  displayName: string; // author's display name
};

function PostAvatar({ imageUrl, displayName }: PostAvatarProps) {
  return (
    <Avatar>
      <AvatarImage src={imageUrl} />
      <AvatarFallback>{getInitials(displayName)}</AvatarFallback>
    </Avatar>
  );
}

export default PostAvatar;
Notice the getInitials helper function. Place this function in src/lib/utils.ts:
// For example "Edsger Dijkstra" becomes "ED"
export function getInitials(displayName: string | null) {
  if (!displayName) return "??";
  const words = displayName.split(" ");
  const first = 0;
  const last = words.length - 1;
  return (
    words[first].charAt(first).toUpperCase() +
    words[last]?.charAt(first).toUpperCase()
  );
}
If the avatar image is missing, a fallback will be displayed showing a circle with the author's initials.
Update the src/components/post-header.tsx as follows:
import { formatTimestamp } from "@/lib/utils";

type PostHeaderProps = {
  name: string; // author's display name
  username: string; // author's username
  timestamp: string; // post's timestamp
};

const PostHeader = ({ name, username, timestamp }: PostHeaderProps) => {
  return (
    <div className="flex justify-between">
      <div>
        <p className="text-sm font-medium leading-none">{name}</p>
        <p className="text-sm text-muted-foreground">{`@${username}`}</p>
      </div>
      <p className="text-sm text-muted-foreground">
        {formatTimestamp(timestamp)}
      </p>
    </div>
  );
};

export default PostHeader;
The formatTimestamp is another helper method which will help us to format the timestamp. This function goes to utils.ts too; here is the updated file:
import { type ClassValue, clsx } from "clsx";
import { twMerge } from "tailwind-merge";
import dayjs from "dayjs";
import relativeTime from "dayjs/plugin/relativeTime";

dayjs.extend(relativeTime); // Load dayjs plugin

export function cn(...inputs: ClassValue[]) {
  return twMerge(clsx(inputs));
}

// For example "Edsger Dijkstra" becomes "ED"
export function getInitials(displayName: string | null) {
  if (!displayName) return "??";
  const words = displayName.split(" ");
  const first = 0;
  const last = words.length - 1;
  return (
    words[first].charAt(first).toUpperCase() +
    words[last]?.charAt(first).toUpperCase()
  );
}

// Format timestamp to relative time if less than 48 hours ago, otherwise
// format to "ddd, MMM D, YYYY h:mm A"
// For example "2 hours ago" or "Mon, Jul 26, 2021 9:46 PM"
export function formatTimestamp(timestamp: string) {
  const formattedTimestamp =
    dayjs().diff(dayjs(timestamp), "hour") <= 48
      ? dayjs(timestamp).fromNow()
      : dayjs(timestamp).format("ddd, MMM D, YYYY h:mm A");
  return formattedTimestamp;
Notice we have a new dependency, dayjs which is imported and initialized at the top of the file:
import dayjs from "dayjs";
import relativeTime from "dayjs/plugin/relativeTime";

dayjs.extend(relativeTime); // Load dayjs plugin
The dayjs is a minimalist JavaScript library that parses, validates, manipulates, and displays dates and times. Install it with the following command:
pnpm add dayjs
Finally, update the Post component as follows:
import PostAvatar from "./post-avatar";
import PostHeader from "./post-header";
import PostFooter from "./post-footer";
import type { PostWithUserData } from "@/lib/api";

const Post = ({ post }: { post: PostWithUserData }) => {
  const { content, user, timestamp } = post;

	// The code below uses Optional Chaining (?.) and Nullish Coalescing (??)
  const displayName = user?.displayName ?? "Unknown";
  const userName = user?.userName ?? "Unknown";
  const avatar = user?.avatar;

  return (
    <div className="flex border-b border-slate-400">
      <div className="p-4">
        <PostAvatar imageUrl={avatar} displayName={displayName} />
      </div>
      <div className="w-full pt-4 pr-4">
        <PostHeader
          name={displayName}
          username={userName}
          timestamp={timestamp}
        />
        <div className="my-4">{content}</div>
        <PostFooter />
      </div>
    </div>
  );
};

export default Post;
Notice in the code, I'm using Optional Chaining (?.) and Nullish Coalescing (??) operator:
const displayName = user?.displayName ?? "Unknown";
const userName = user?.userName ?? "Unknown";
const avatar = user?.avatar;
-
Optional Chaining (
?.): This allows you to read the value of a property within a chain of connected objects without having to explicitly check each reference in the chain.For example:
let value = obj?.property?.subProperty;In this example, if
objisnullorundefined, thenvaluewill beundefinedwithout any errors. Similarly, ifpropertyisnullorundefined,valuewill also beundefined. -
Nullish Coalescing (
??): This is an operator that returns its right-hand operand when its left-hand operand isnullorundefined, and otherwise returns its left-hand operand.For example:
let value = possibleNullValue ?? "default value";In this example, if
possibleNullValueis eithernullorundefined,valuewill be assigned the string "default value".
Both of these features were added in TypeScript 3.7, and they are also available in modern versions of JavaScript (ES2020 onwards).
Now, run the app and check the UI:

Stage and commit all changes.
git add .
git commit -m "Consuming Posts Data"