Task 10: Search, Sort, Filter, and Pagination
Step 1: Understanding Pagination of the Posts
Pagination is a technique used to break down a large set of data into smaller, more manageable chunks or pages. It is commonly used in web applications to display search results, similar to how Google shows search results on multiple pages.
When you perform a search on Google, you are presented with a limited number of results on the first page. At the bottom of the page, you will find links or buttons to navigate to the next page of results. This is pagination in action.
Similarly, in our application, pagination allows us to limit the number of posts displayed on a single page. By dividing the posts into pages, we can improve performance and provide a better user experience. Users can easily navigate through the pages to view additional posts.
For example, if we have 100 posts and we decide to display 10 posts per page, the first page will show the first 10 posts, the second page will show the next 10 posts, and so on. The number of pages and the number of posts per page can be customized based on our application's needs.
To implement pagination, we typically use query parameters in the URL. These parameters specify the page number and the number of items to display per page. For example, a URL for the second page with 10 posts per page might look like this:
GET /posts?page=2&limit=10
By including these parameters in the request, the server knows which page of posts to retrieve and how many to return.
Aside: Infinite scroll is a user interface pattern that allows for continuous scrolling or loading of content as the user reaches the end of a page. It is often used in combination with pagination to provide a seamless browsing experience.
With traditional pagination, the user needs to click on a "next page" button or link to load more content. In contrast, infinite scroll automatically loads more content as the user scrolls down the page, without the need for explicit user action.
The basic idea behind infinite scroll is to dynamically fetch and append additional content to the existing page whenever the user reaches the bottom. This is typically achieved using JavaScript to detect the scroll position and trigger a fetch request to pull more data from the server.
Here's a high-level overview of how infinite scroll works with pagination:
- The initial page of content is loaded, typically with a predefined number of items.
- As the user scrolls down, the scroll position is monitored.
- When the user reaches a certain threshold near the bottom of the page, a fetch request is sent to the server to get the next page of content.
- The new content is received from the server and appended to the existing content on the page.
- The process continues as the user scrolls further, loading more pages of content as needed.
Infinite scroll provides a more seamless and enjoyable browsing experience, as it eliminates the need for manual pagination and allows users to continuously consume content without interruption.
Whether you implement infinite scroll or traditional pagination on the frontend, the backend behaves the same in terms of pagination.
Step 2: Add pagination to the Posts
When working with Nest.js applications, it is common to use the "offset" and "limit" query parameters for pagination.
GET /posts?offset=20&limit=10
The "offset" and "limit" query parameters control the number of items to display per page and the starting point of the items to retrieve.
- The "offset" parameter determines the starting point of the items to retrieve. It specifies the number of items to skip before retrieving the desired items. For example, if the "offset" is set to 20, the query will start retrieving items from the 21st item.
- The "limit" parameter defines the maximum number of items to display per page. It specifies the maximum number of items to retrieve in a single request. For example, if the "limit" is set to 10, the query will retrieve a maximum of 10 items.
Let's implement pagination! First, update the findAll operation in PostsController:
@Get()
async findAll(
  @Query('limit') limit: number,
  @Query('offset') offset: number,
): Promise<PostResponseDto[]> {
  const posts = await this.postsService.findAll(limit, offset);
  return posts.map((post) => {
    delete post.userId;
    return post;
  });
}
In the updated version, the findAll operation accepts two query parameters: limit and offset. The @Query decorator in Nest.js is used to retrieve query parameters from the request URL. For example, if the request URL is /posts?limit=10&offset=20, the @Query('limit') decorator will extract the value 10 for the limit parameter, and the @Query('offset') decorator will extract the value 20 for the offset parameter.
These parameters are then passed to the findAll operation of the PostsService class. Next, we should update that operation:
async findAll(limit: number, offset: number): Promise<Post[]> {
  const queryBuilder = this.postRepository.createQueryBuilder('posts');

  queryBuilder.limit(limit);
  queryBuilder.offset(offset);

  return await queryBuilder.getMany();
}
In the function declaration, limit and offset are parameters. In the function body, we use the createQueryBuilder method to construct a database query.
💡 In the context of databases, a query is a request for data or information from a database table or combination of tables. This request is written in SQL (Structured Query Language), the standard language for dealing with relational databases.
You use createQueryBuilder when you need to build more complex or dynamic SQL queries that can't be easily handled by simple ORM methods. The string 'posts' is an alias that you assign to the table you're querying. In this case, you're querying from a table that stores posts. This alias is used to reference the table in different parts of the query (more on this later).
The limit and offset operations correspond to the SQL LIMIT and OFFSET clauses. The SQL equivalent of a query built with createQueryBuilder('post').limit(10).offset(5) would be:
SELECT * FROM posts LIMIT 10 OFFSET 5;
The method getMany() executes the SQL query that has been built up to this point. It retrieves the results and returns them as an array of objects.
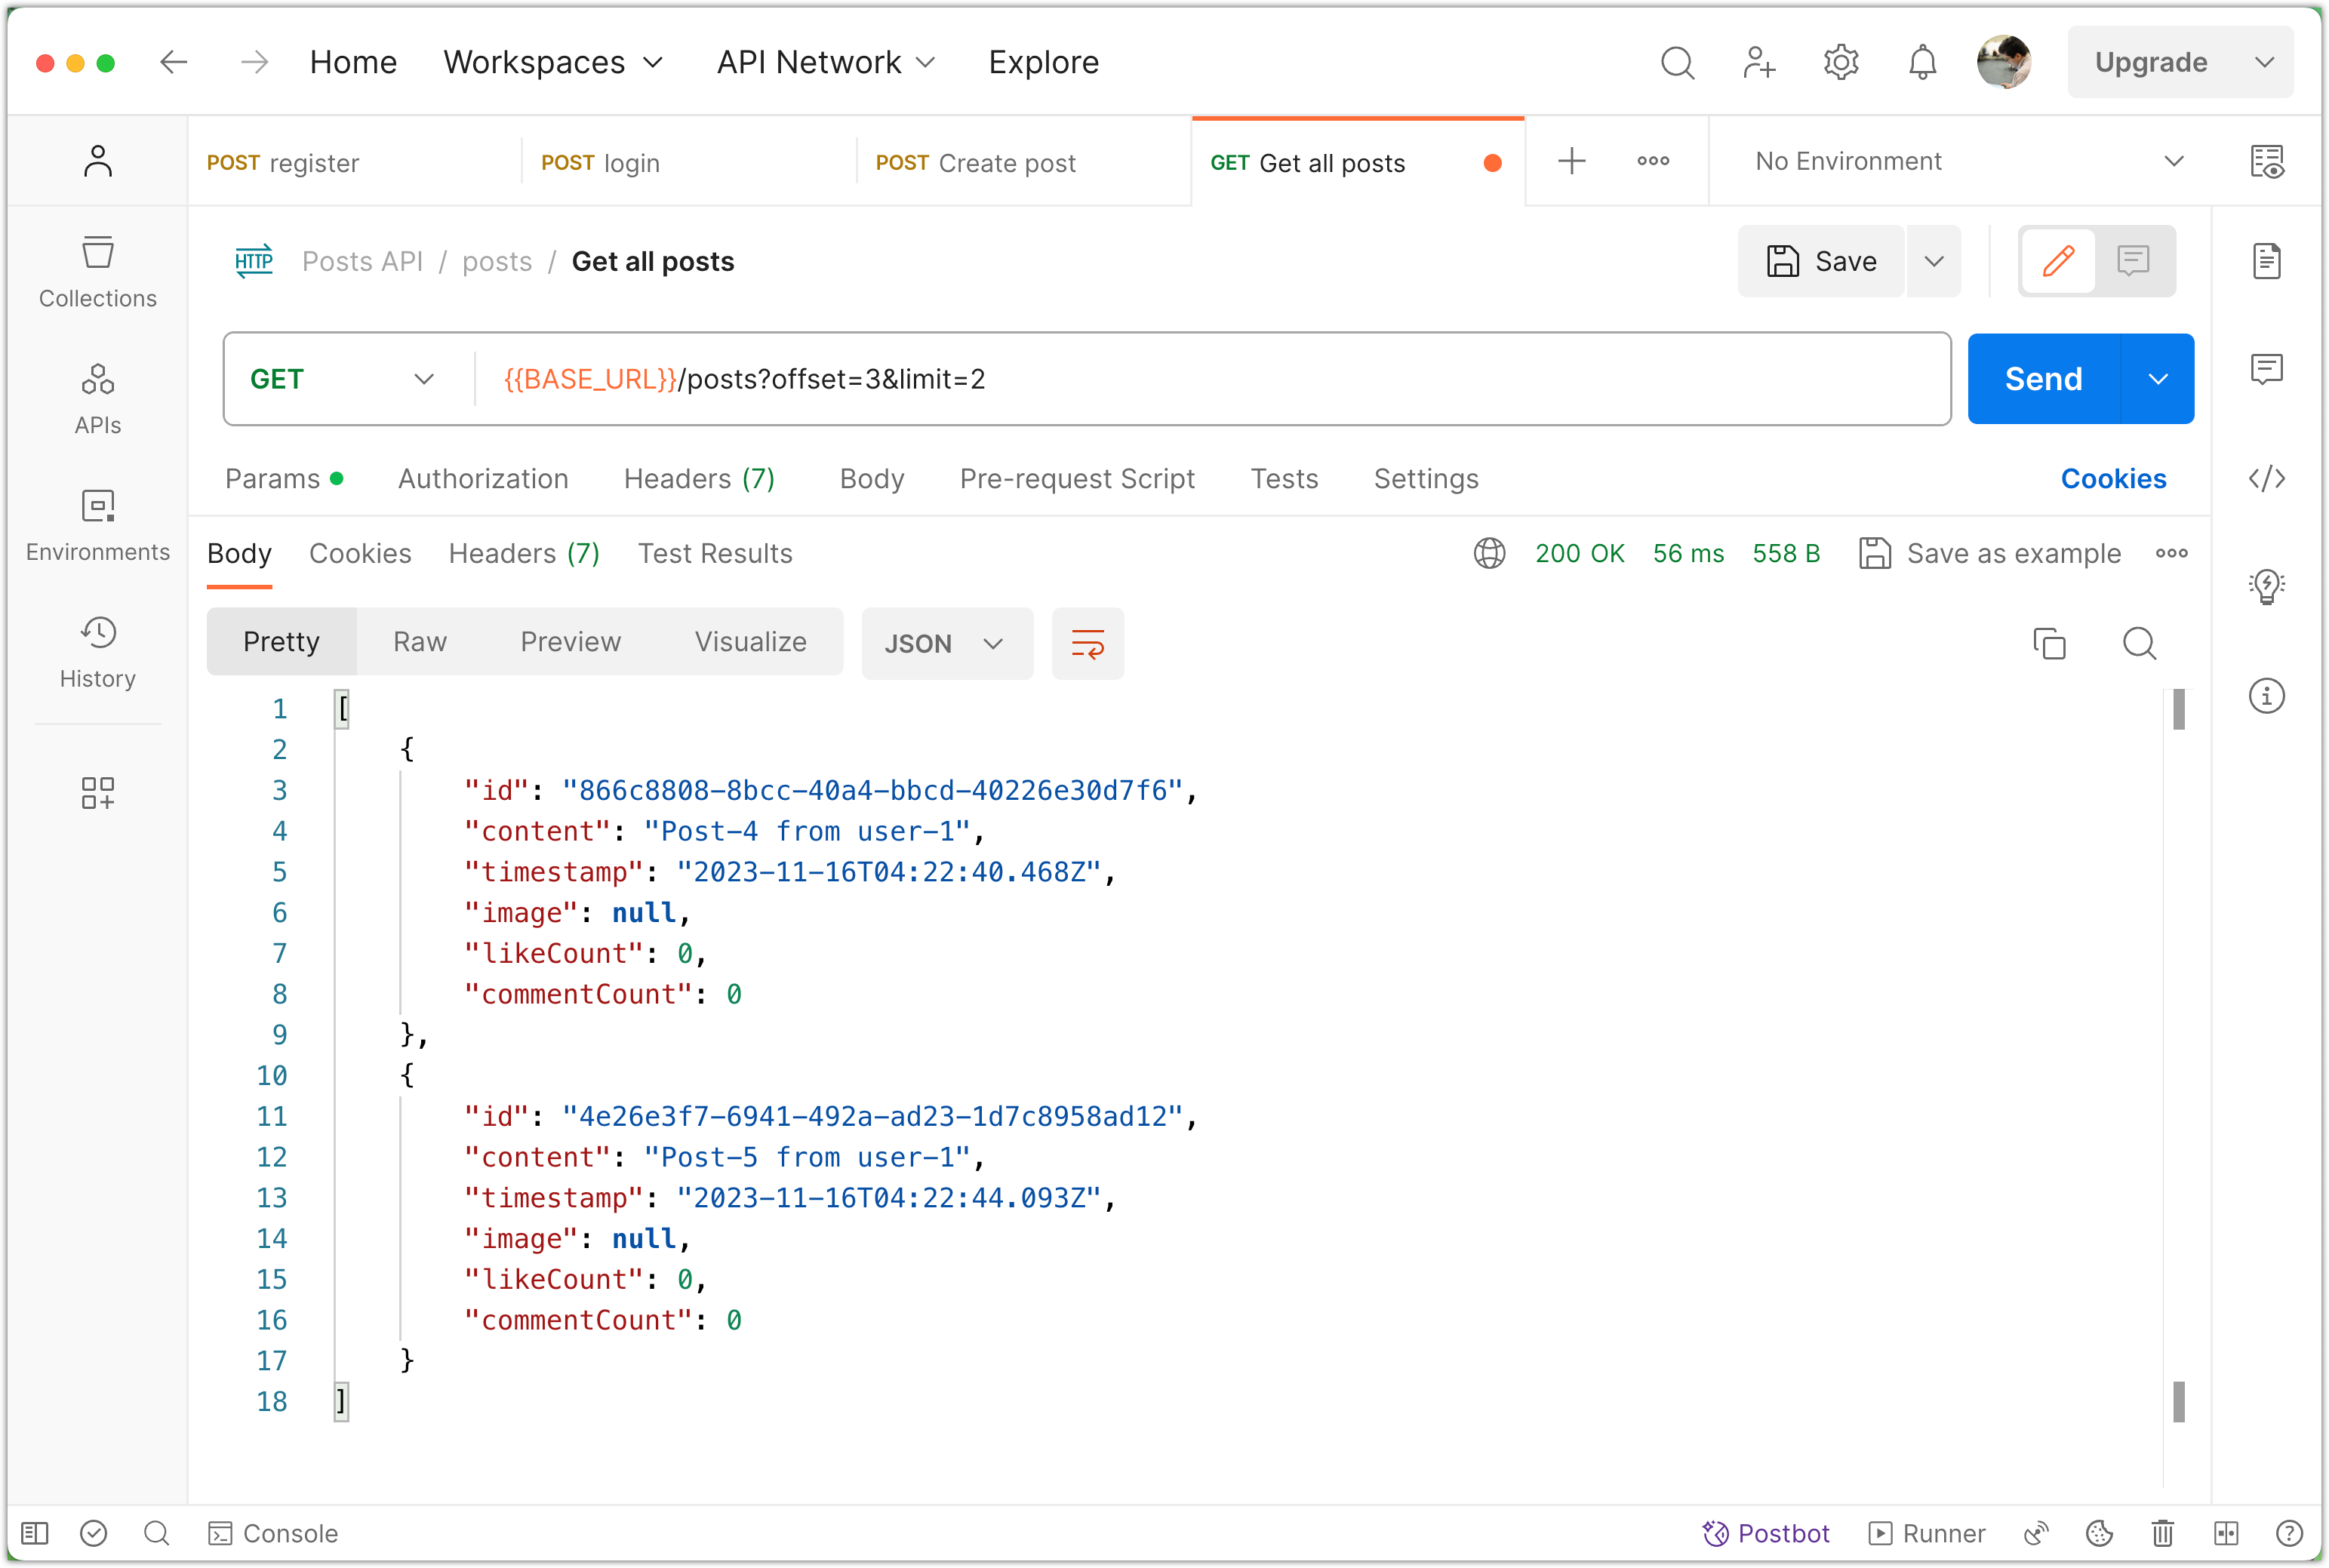
To test pagination functionality, follow these steps:
- Run the Nest.js app.
- Use Postman to create a dozen posts.
- Make a GET request with different
offsetandlimitquery parameters. - Verify that the returned data matches the expected behavior.
Please commit your changes to version control:
git add .
git commit -m "Add Pagination to the Posts"
Step 3: Improve Pagination
In the current implementation, if a client does not provide pagination parameters, all the posts will be retrieved. While this may be a desired behavior in some applications, it is generally undesirable. Consider a post sharing application with millions of users and billions of posts. Returning all that data to a client can have severe consequences. It can overwhelm the server and even cause the client's computer to crash! Therefore, it is considered a good practice to paginate the response by default. We can easily implement this with TypeScript default parameter values:
@Get()
async findAll(
  @Query('limit') limit: number = 10,
  @Query('offset') offset: number = 0,
): Promise<PostResponseDto[]> {
  const posts = await this.postsService.findAll(limit, offset);
  return posts.map((post) => {
    delete post.userId;
    return post;
  });
}
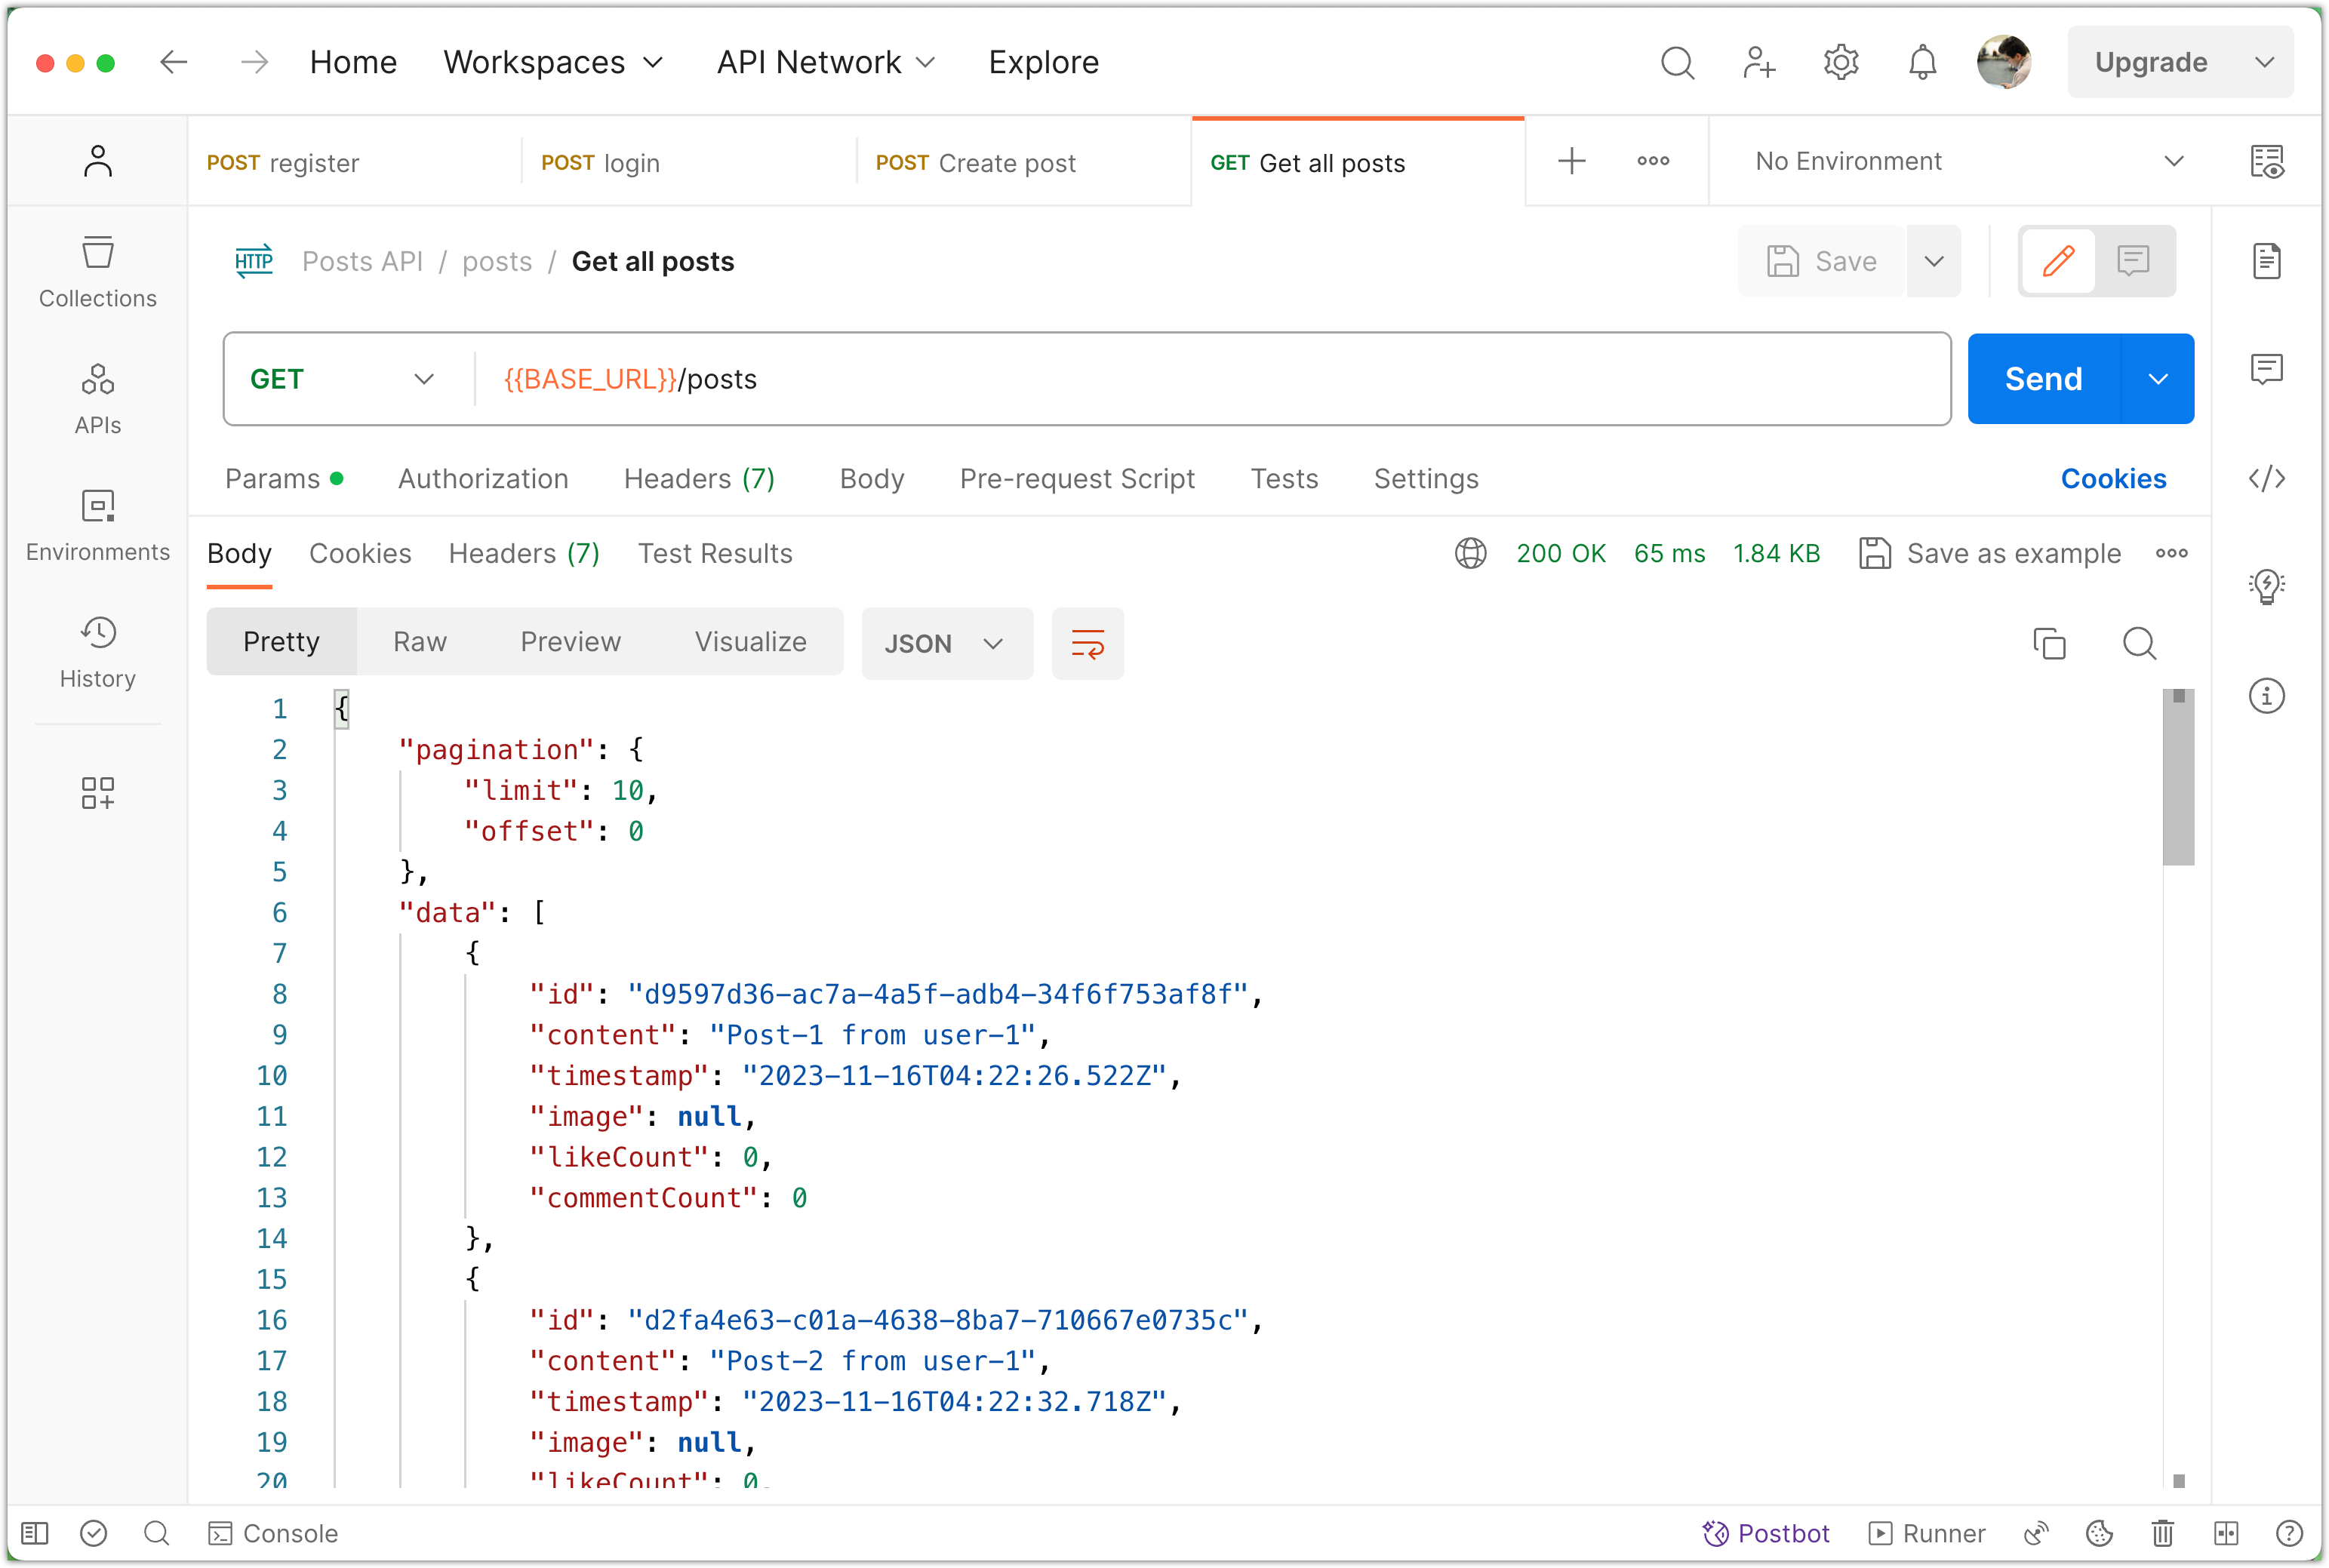
Now if a client attempts to get all posts without providing pagination parameters, they will receive the first 10 posts only. You can adjust this number to what makes sense in your application.
It is also a good practice to let the client know that we are applying pagination and share the parameters too; otherwise, they may think there are only 10 posts in the system!
Let’s update our code by adding a custom type. You can place this before the PostsController declaration:
type PostResponseWithPagination = {
  data: PostResponseDto[];
  pagination: {
    limit: number;
    offset: number;
  };
};
Now update the implementation of findAll:
@Get()
async findAll(
  @Query('limit') limit: number = 10,
  @Query('offset') offset: number = 0,
): Promise<PostResponseWithPagination> {
  const posts = await this.postsService.findAll(limit, offset);
  return {
    pagination: {
      limit,
      offset,
    },
    data: posts.map((post) => {
      delete post.userId;
      return post;
    }),
  };
}
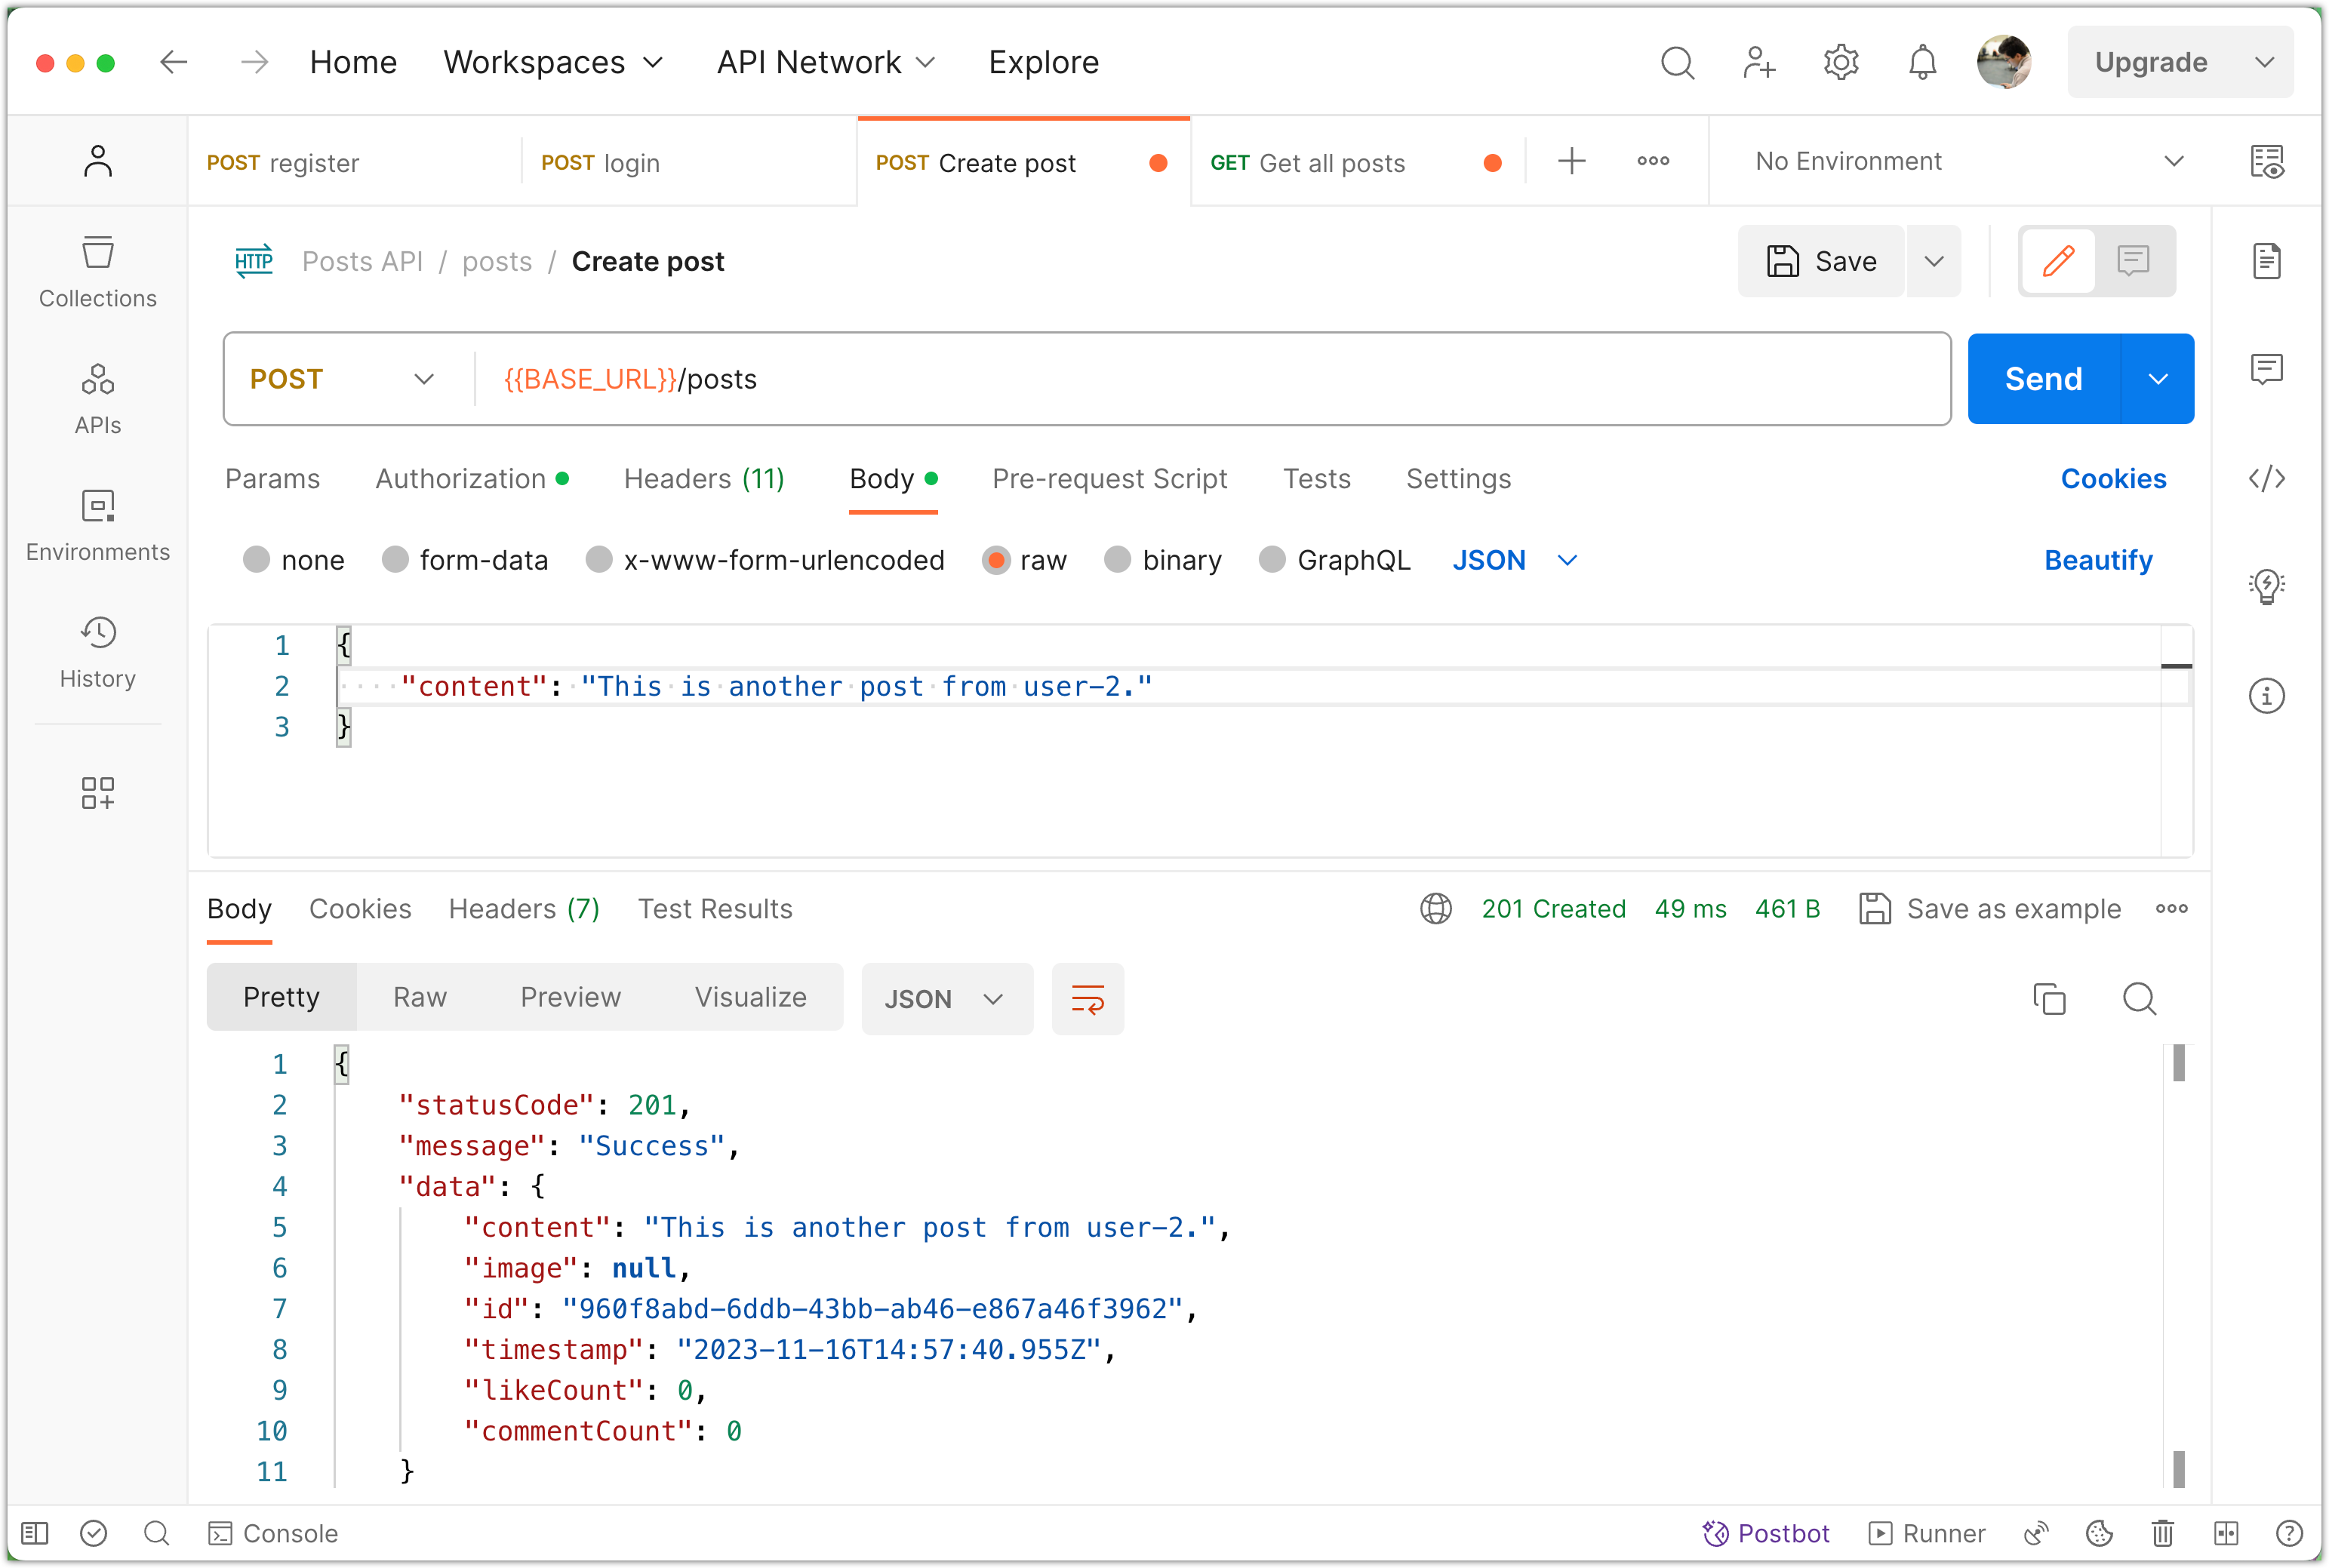
To test this functionality, you can make a GET request to fetch all the posts in Postman:
Please remember to commit your changes to version control:
git add .
git commit -m "Pagination with default parameters"
Step 4: Sort Posts
In addition to pagination, we can enhance our application by implementing post sorting. It is common for post sharing applications to display posts in reverse chronological order, from the most recent to the oldest.
To achieve this, we can use the query builder in the following way:
async findAll(limit: number, offset: number): Promise<Post[]> {
  const queryBuilder = this.postRepository.createQueryBuilder('posts');

  queryBuilder.limit(limit);
  queryBuilder.offset(offset);

  queryBuilder.orderBy('posts.timestamp', 'DESC'); // <-- Add this line

  return await queryBuilder.getMany();
}
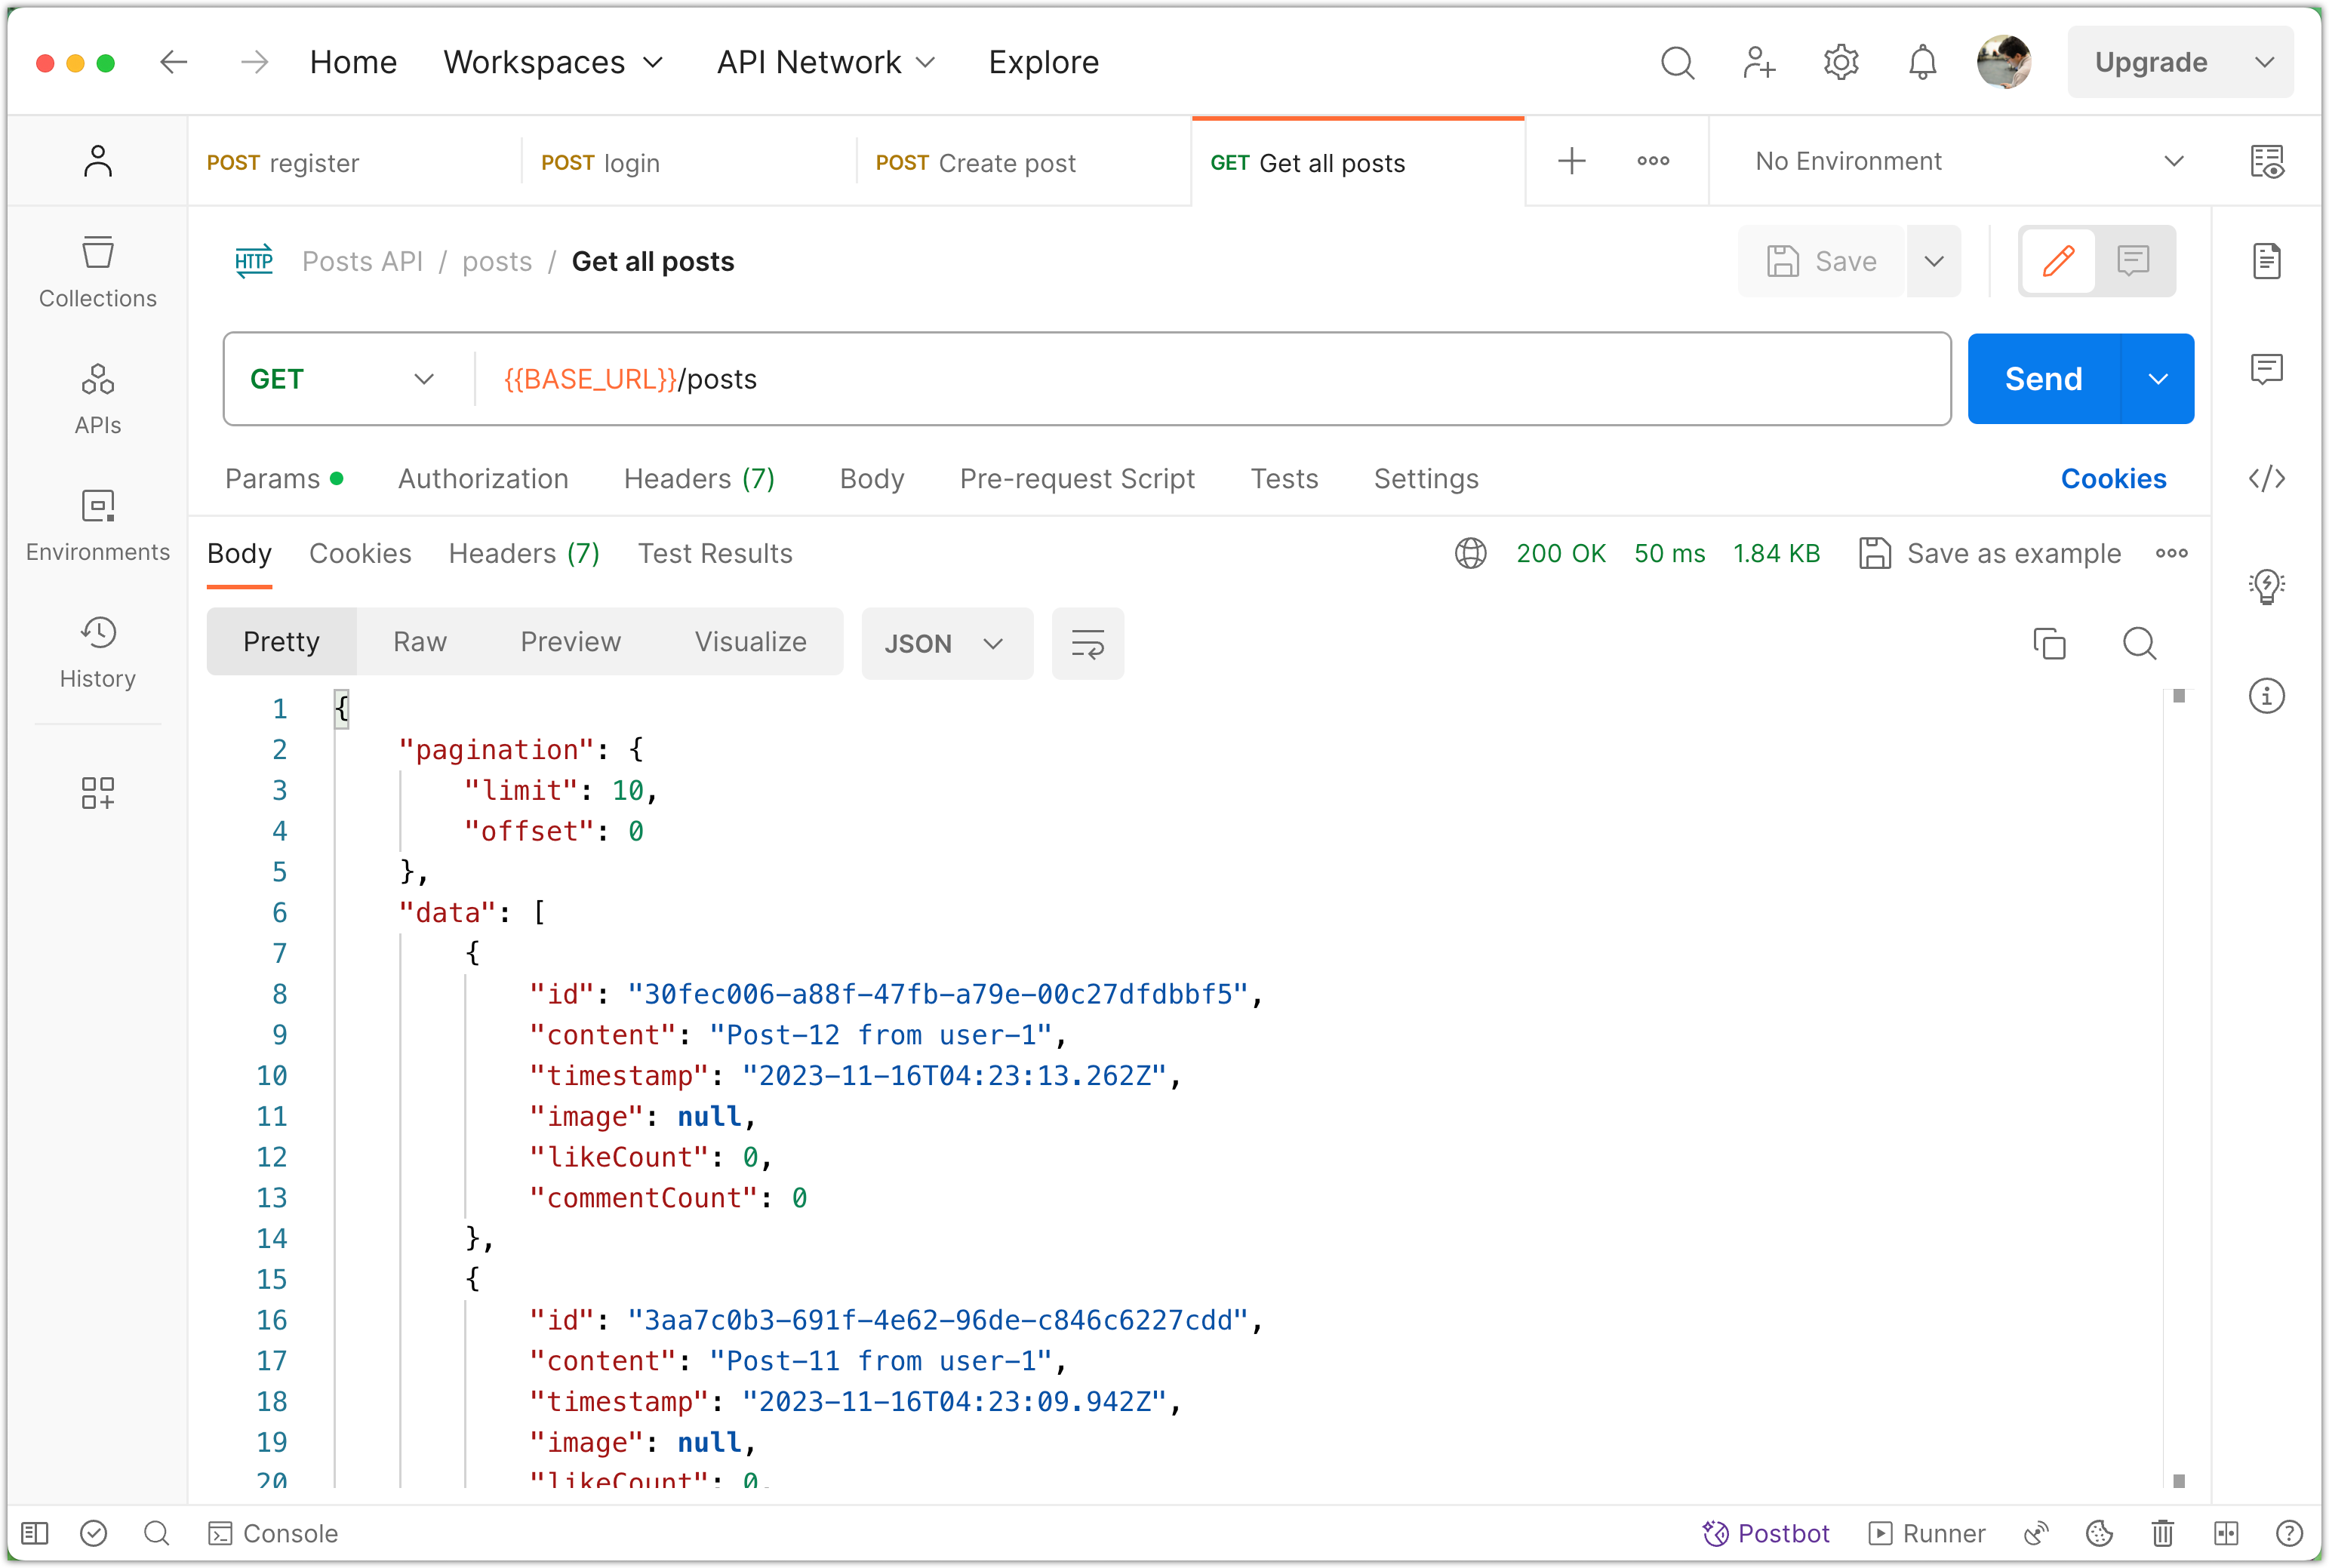
The line queryBuilder.orderBy('posts.timestamp', 'DESC') is responsible for sorting the posts in descending order based on the timestamp column in the posts table. The 'DESC' indicates the sorting direction, ensuring that the results are arranged from the most recent to the oldest.
To test this functionality, you can make a GET request to fetch all the posts in Postman:

Please remember to commit your changes to version control:
git add .
git commit -m "Sort Posts"
Step 5: Implement Search Functionality
Search is a common feature in most applications, including post sharing applications. In this step, we will implement a simple and basic version of search to find posts that contain a specific word in their content.
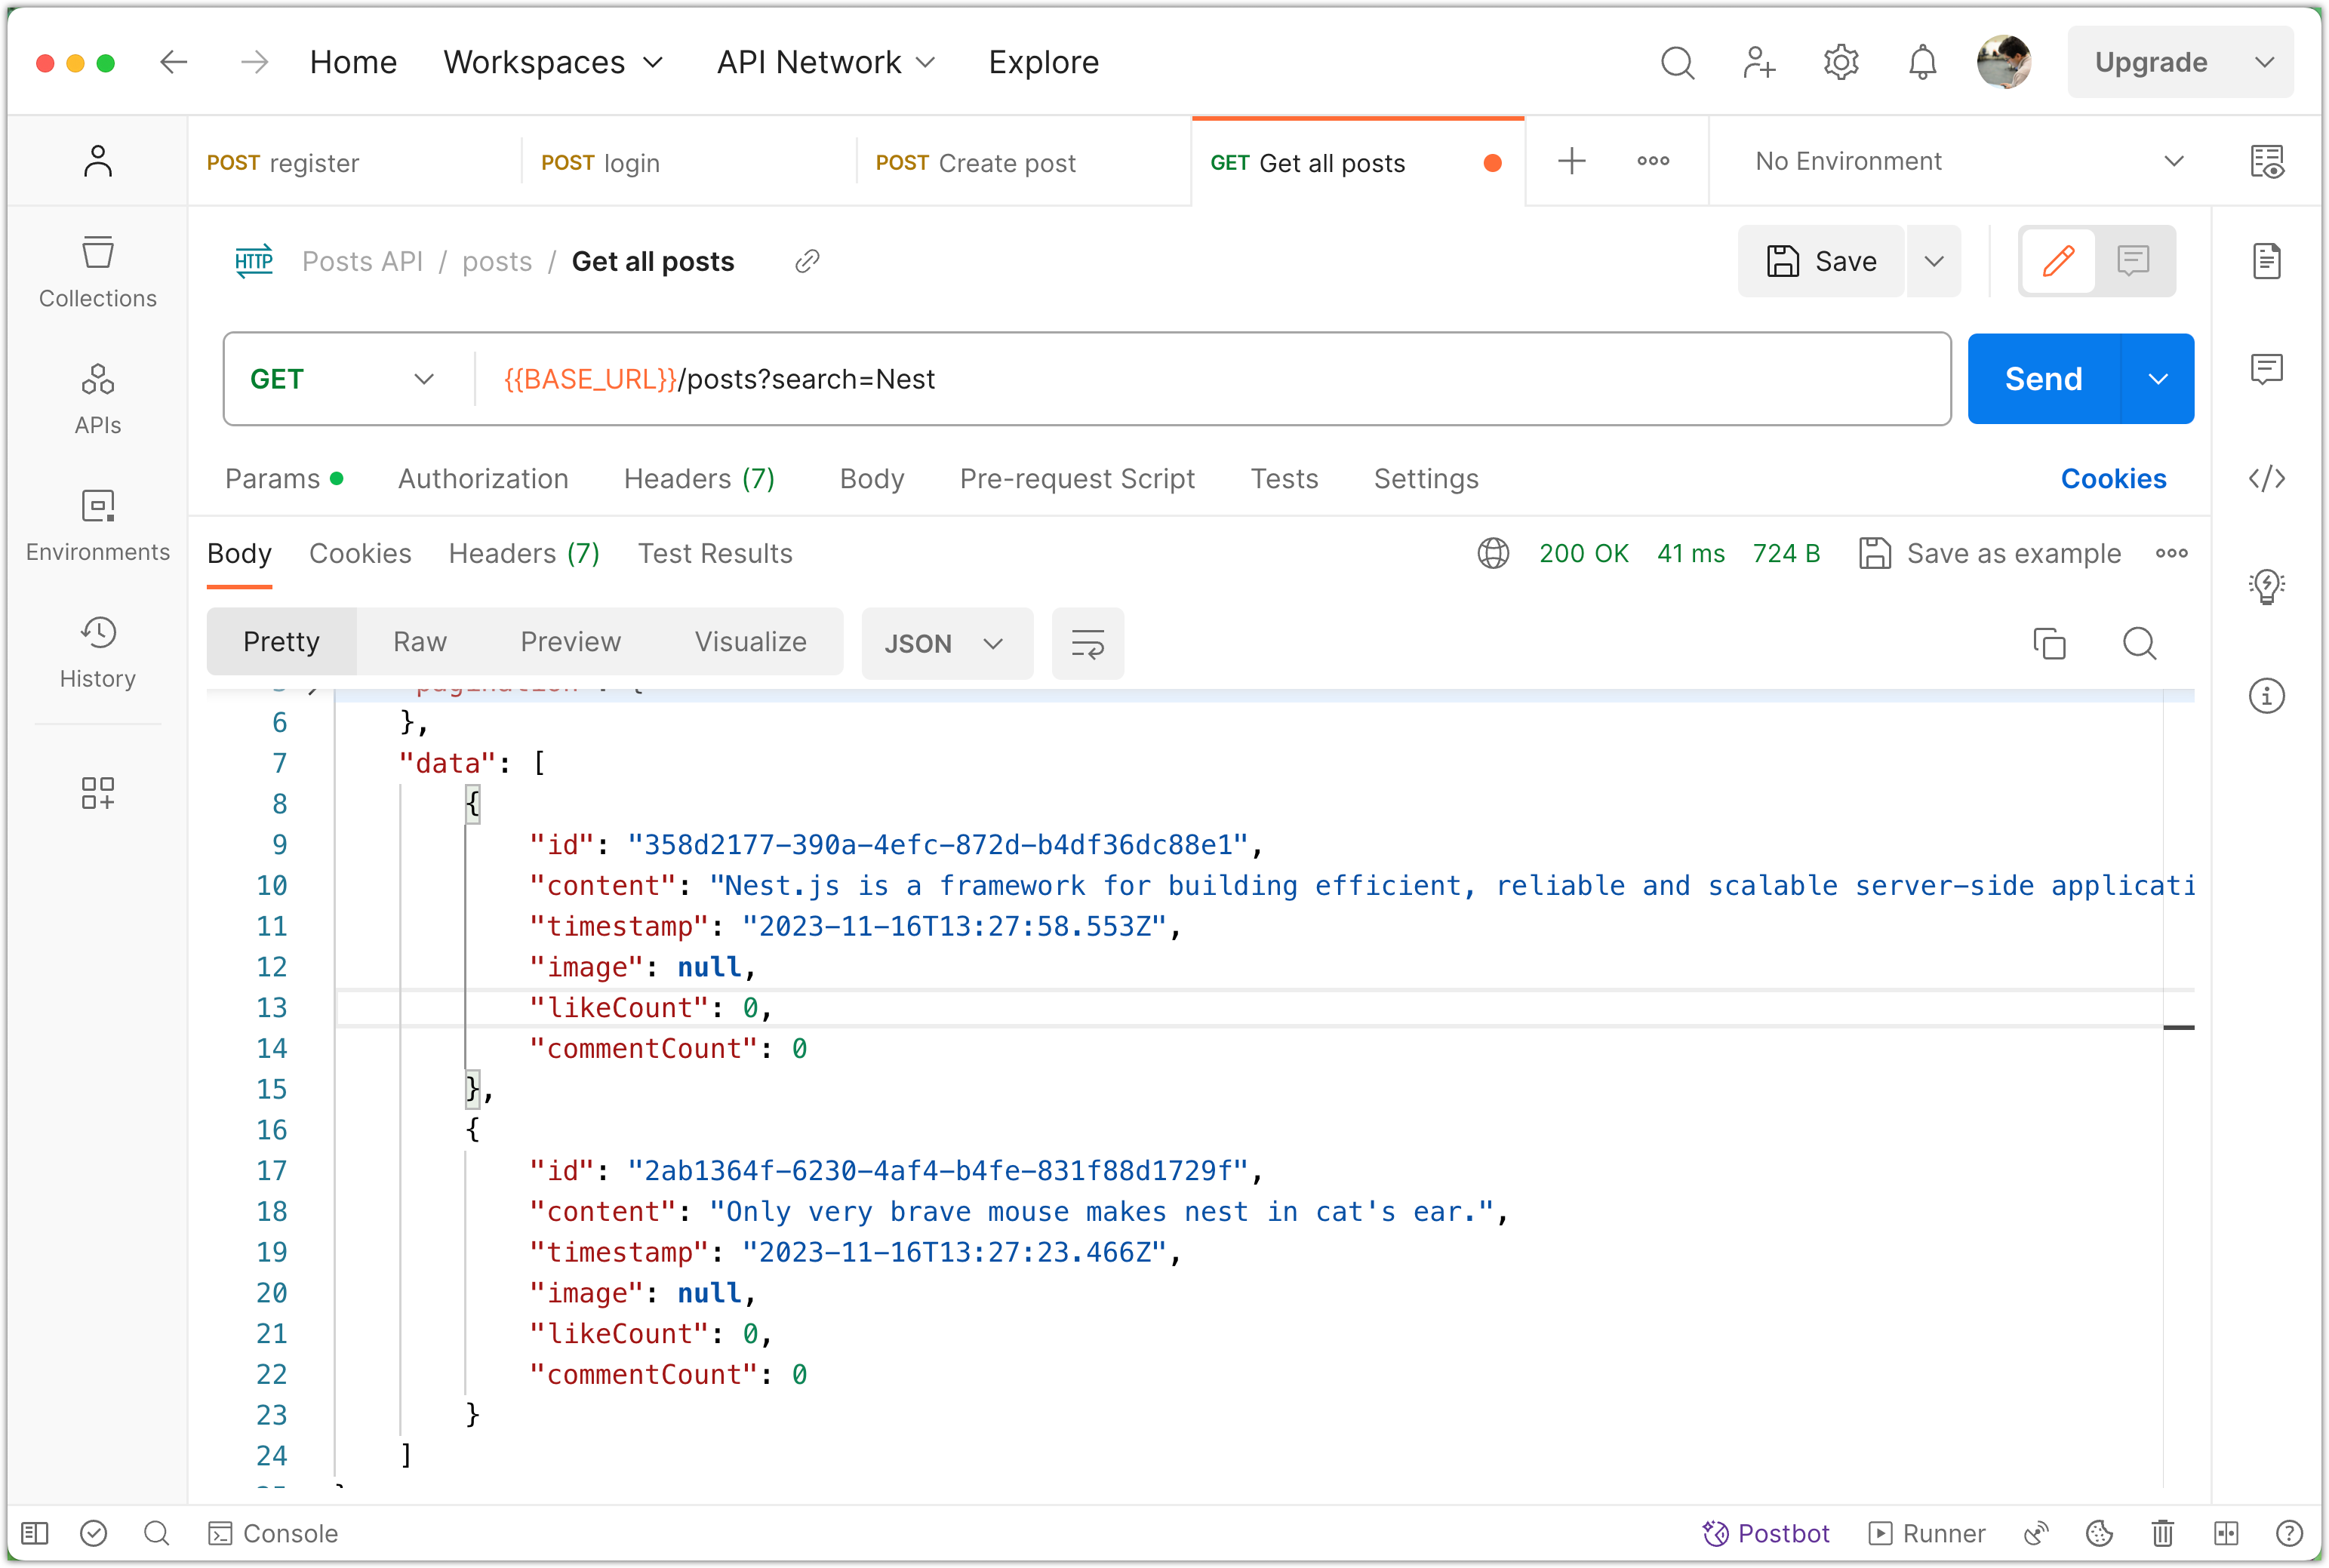
Let's say you want to search for posts that contain the word "NestJS". You can make a request like this:
GET /posts?search=NestJS
The server will then return only the posts that match the search criteria.
To implement search, we will use query parameters in the URL, similar to how we implemented pagination. The specific query parameters will depend on the options we want to provide. Let's update the findAll operation in the PostsService:
async findAll(
  limit: number,
  offset: number,
  search?: string,
): Promise<Post[]> {
  const queryBuilder = this.postRepository.createQueryBuilder('posts');

  if (search !== undefined) {
    queryBuilder.where('posts.content ILIKE :search', {
      search: `%${search}%`,
    });
  }

  queryBuilder.limit(limit);
  queryBuilder.offset(offset);

  queryBuilder.orderBy('posts.timestamp', 'DESC');

  return await queryBuilder.getMany();
}
In the updated findAll function, the search parameter is optional and represents the search query. If a search query is provided, the function adds a condition to the query builder using the where method. The condition specifies that the content column of the posts table should be compared using the ILIKE operator with the search query. The % symbols are used as wildcard characters to match any characters before and after the search query. This allows for a partial match in the content.
Aside: The ILIKE operator is used in PostgreSQL to perform a case-insensitive pattern match in a query.
Now, let's update the findAll operation in the PostsController:
@Get()
async findAll(
  @Query('limit') limit: number = 10,
  @Query('offset') offset: number = 0,
  @Query('search') search: string,
): Promise<PostResponseWithPagination> {
  const posts = await this.postsService.findAll(limit, offset, search);
  return {
    search,
    pagination: {
      limit,
      offset,
    },
    data: posts.map((post) => {
      delete post.userId;
      return post;
    }),
  };
}
Notice that we provide the search parameter in the response as well, to inform the client that the response is a result of a search query. If no search query is provided, the response will not include the search property. Make sure to update the PostResponseWithPagination type to reflect this:
type PostResponseWithPagination = {
  search?: string;        // <-- Add this line
  data: PostResponseDto[];
  pagination: {
    limit: number;
    offset: number;
  };
};
To test the search functionality, follow these steps:
- Run the Nest.js app.
- Use Postman to create a few posts with specific words in them.
- Make a GET request with and without the
searchquery parameter. - Verify that the returned data matches the expected behavior.
Please commit your changes to version control:
git add .
git commit -m "Implement Search Functionality"
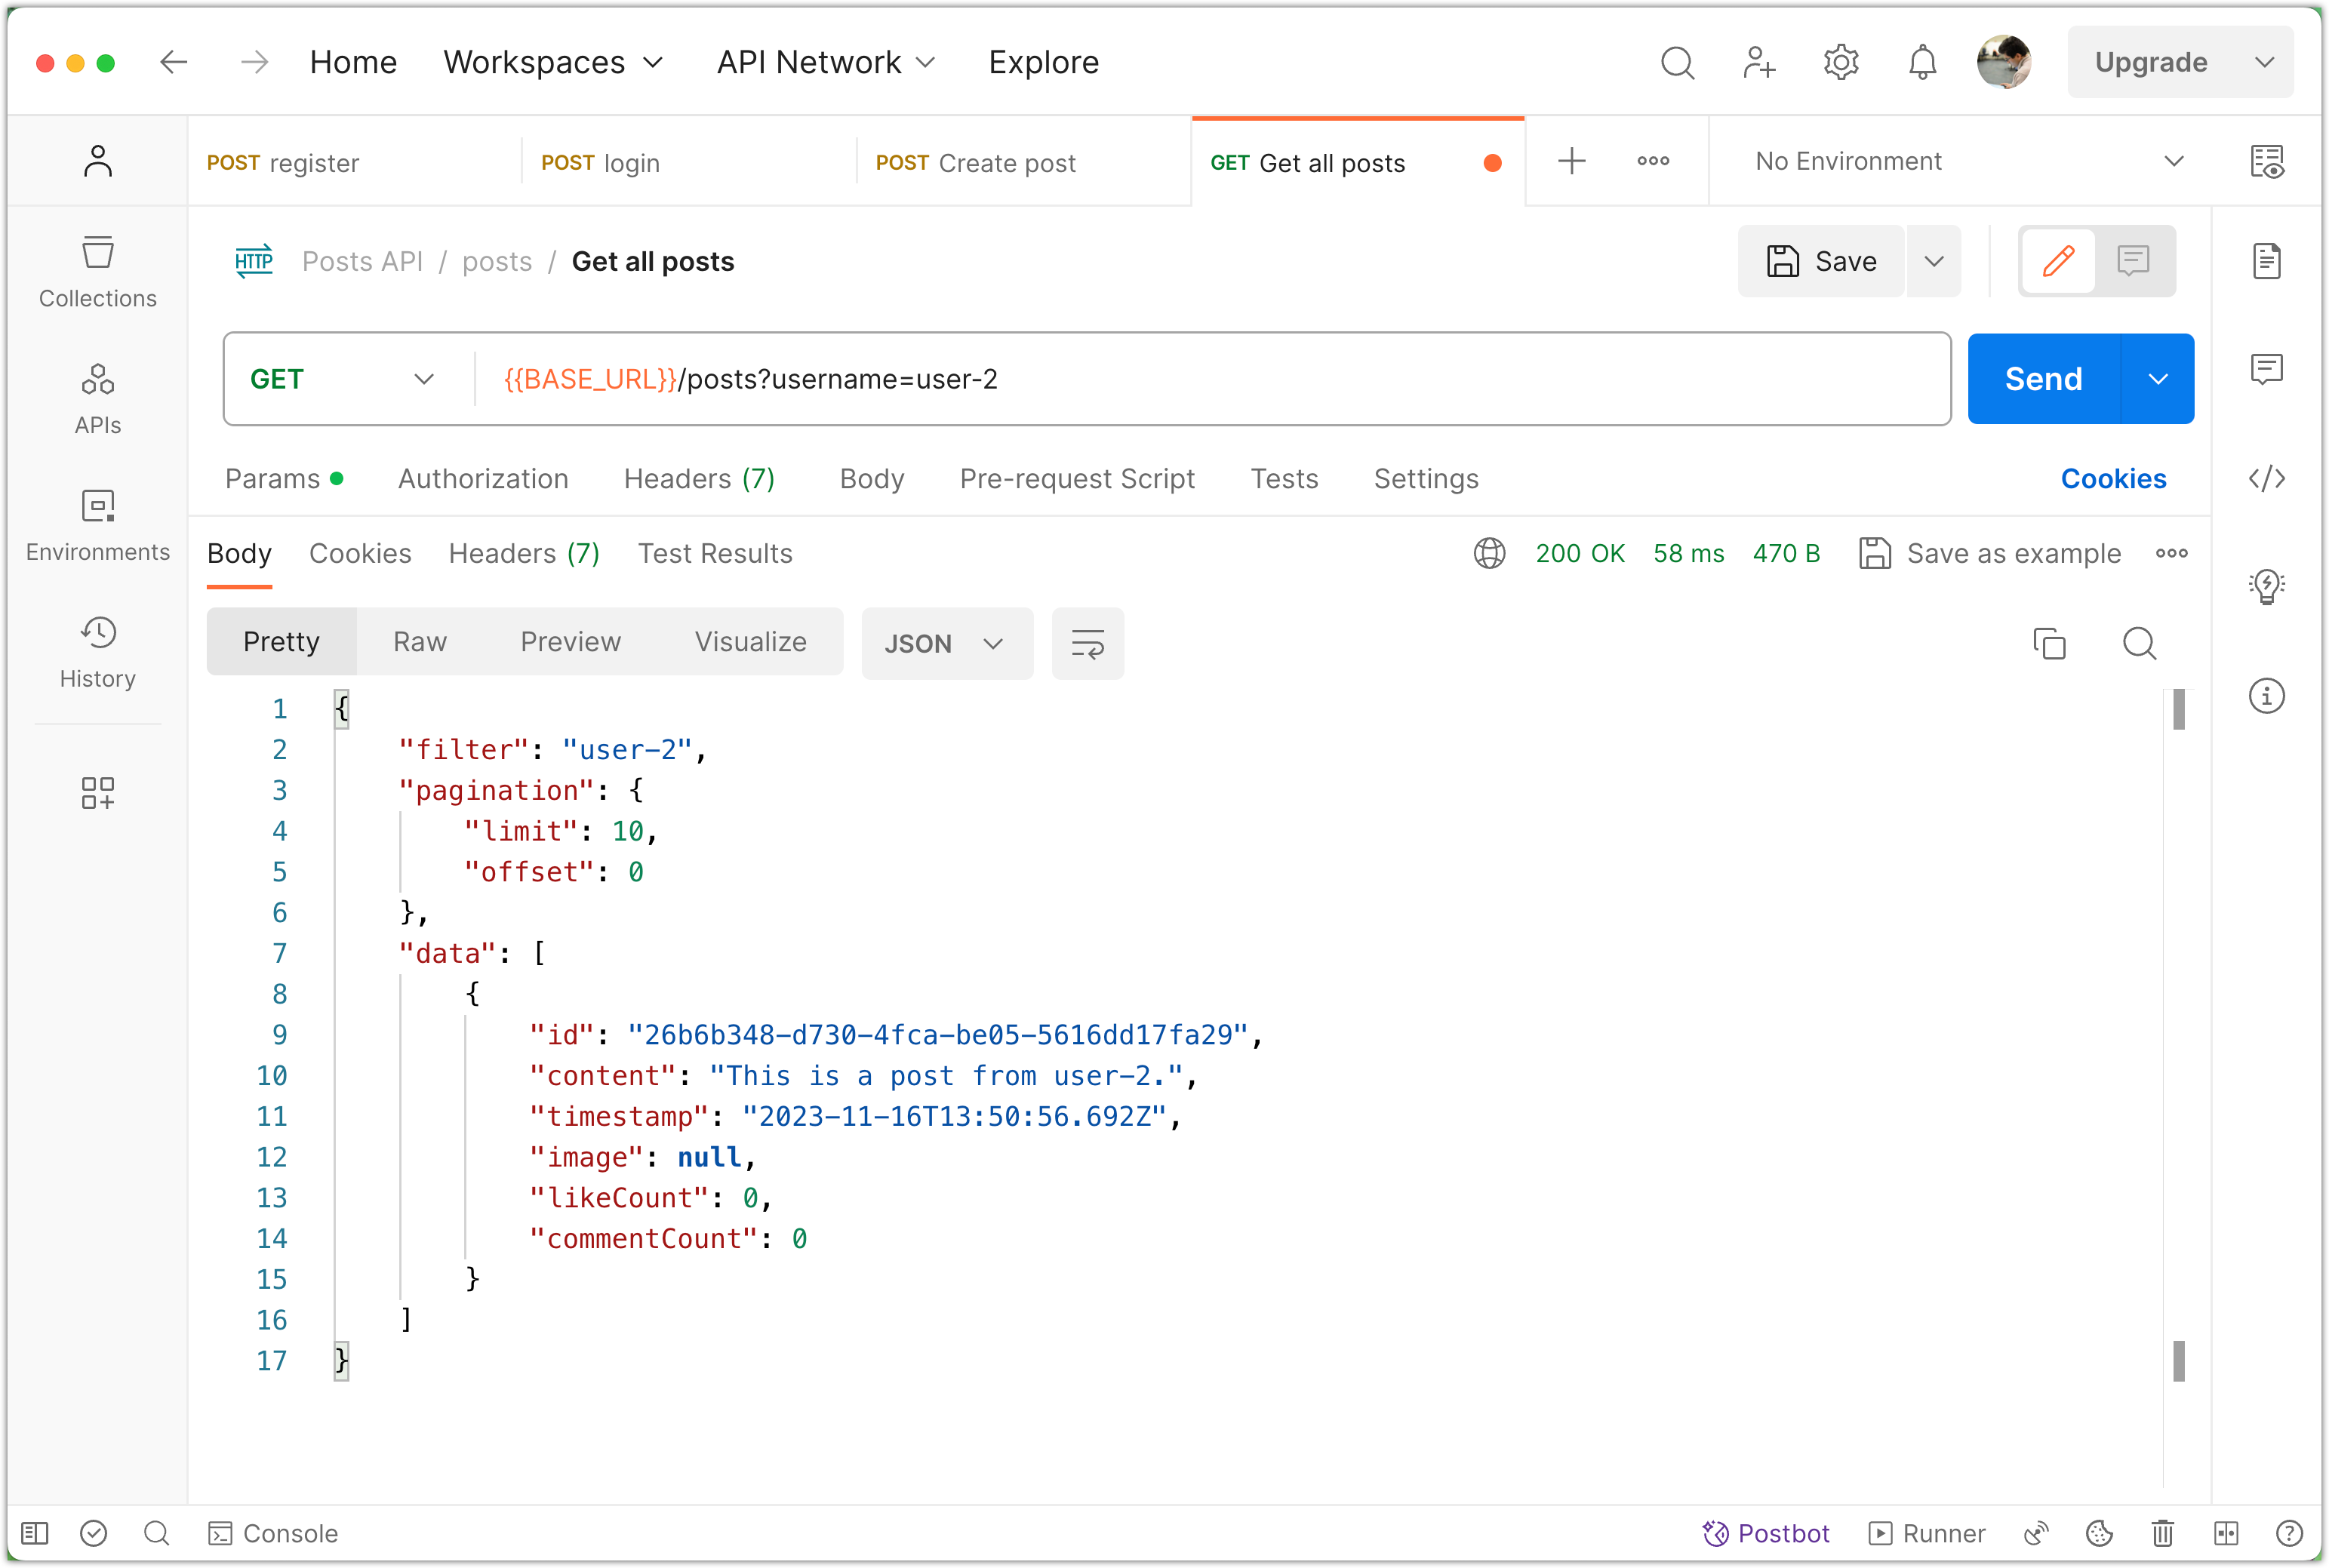
Step 6: Implement Filter to Fetch Posts by a Specific User
Filtering posts by a specific user is a common feature in social media platforms. In this step, we will modify our application to allow filtering posts either by a specific username or by displaying all posts if no filter is provided. This is a good example of how the controller can handle more than just simple pass-through logic!
First, update the PostsController to handle the new filtering logic. We will add an optional username query parameter to the findAll method. If username is provided, we will resolve it to a user ID and then filter posts based on that ID.
type PostResponseWithPagination = {
  filter?: string;         // <-- Add this line
  search?: string;
  data: PostResponseDto[];
  pagination: {
    limit: number;
    offset: number;
  };
};

@Controller('posts')
export class PostsController {
  constructor(
    private readonly postsService: PostsService,
    private readonly userService: UserService // <-- Add this service
  ) {}

	@Get()
  async findAll(
    @Query('limit') limit: number = 10,
    @Query('offset') offset: number = 0,
    @Query('search') search: string,
    @Query('username') username?: string,    // <-- Add this parameter
  ): Promise<PostResponseWithPagination> {.
    let userId: number | undefined;

    if (username) {
      const user = await this.userService.findOne(username);
      if (!user) {
        throw new NotFoundException(`User with username ${username} not found`);
      }
      userId = user.id;
    }

    const posts = await this.postsService.findAll(
      limit,
      offset,
      search,
      userId,
    );
    return {
			filter: username,
      search,
      pagination: {
        limit,
        offset,
      },
      data: posts.map((post) => {
        delete post.userId;
        return post;
      }),
    };
  }

  // ... other methods
}
Since we are using the UserService in PostsController, we have to update PostsModule controller as follows:
	import { Module } from '@nestjs/common';
	import { PostsService } from './posts.service';
	import { PostsController } from './posts.controller';
	import { TypeOrmModule } from '@nestjs/typeorm';
	import { Post } from './post.entity';
+	import { UserService } from 'src/user/user.service';
+	import { User } from 'src/user/user.entity';

	@Module({
-	  imports: [TypeOrmModule.forFeature([Post])],
+	  imports: [TypeOrmModule.forFeature([Post, User])],
-	  providers: [PostsService],
+	  providers: [PostsService, UserService],
	  controllers: [PostsController],
	})
	export class PostsModule {}
Now, let's modify the PostsService to handle this new filter functionality.
async findAll(
  limit: number,
  offset: number,
  search?: string,
  userId?: number,
): Promise<Post[]> {
  const queryBuilder = this.postRepository.createQueryBuilder('posts');
  let hasWhereCondition = false;

  if (search !== undefined) {
    queryBuilder.where('posts.content ILIKE :search', {
      search: `%${search}%`,
    });
    hasWhereCondition = true;
  }

  if (userId !== undefined) {
    if (hasWhereCondition) {
      queryBuilder.andWhere('posts.userId = :userId', { userId });
    } else {
      queryBuilder.where('posts.userId = :userId', { userId });
      hasWhereCondition = true;
    }
  }

  queryBuilder.limit(limit);
  queryBuilder.offset(offset);

  queryBuilder.orderBy('posts.timestamp', 'DESC');

  return await queryBuilder.getMany();
}
In this implementation, the userId parameter is used to filter the posts. If is provided, the query builder adds an additional condition to only fetch posts created by that user.
Here we use a variable called hasWhereCondition to manage the addition of multiple WHERE clauses in our SQL query. This variable is a boolean, initially set to false, indicating that no WHERE clause has been added to the query yet.
Aside: Why hasWhereCondition is Needed?
SQL queries follow a specific syntax, especially when combining multiple conditions. In SQL, the first condition after the FROM clause is introduced using the WHERE keyword. Any subsequent conditions are introduced using the AND keyword. For example:
SELECT * FROM posts WHERE content LIKE '%NestJS%' AND userId = 1;
In the above SQL query, the first condition checks the content field for a match, and the second condition checks the userId. The AND keyword combines these conditions.
In our NestJS service, we use the createQueryBuilder method to build our SQL query. We need to ensure that our query syntax is correct, depending on whether we have one or more conditions. This is where hasWhereCondition comes into play.
let hasWhereCondition = false;

if (search !== undefined) {
  queryBuilder.where('posts.content ILIKE :search', {
    search: `%${search}%`,
  });
  hasWhereCondition = true;
}

if (userId !== undefined) {
  if (hasWhereCondition) {
    queryBuilder.andWhere('posts.userId = :userId', { userId });
  } else {
    queryBuilder.where('posts.userId = :userId', { userId });
    hasWhereCondition = true;
  }
}
Here’s how it works:
- Initial Condition (Search): If a search term is provided, we add a
WHEREclause to filter posts by content. We then sethasWhereConditiontotrue, indicating that aWHEREclause has been added to the query. - Subsequent Condition (User ID): If a user ID is provided, we check
hasWhereCondition. If it'strue, we useandWhereto add an additional condition. If it'sfalse, we usewhere, as this will be the first condition in our query. - Other Parts of the Query: We then add
limit,offset, andorderByclauses as needed.
The hasWhereCondition boolean serves as a control mechanism to correctly structure our SQL query based on the conditions present. It ensures that we use WHERE for the first condition and AND for any additional conditions, maintaining the correct syntax for the SQL query generated by our query builder.
To test this new filter functionality, follow these steps:
- Run your Nest.js app.
- Ensure you have posts created by different users.
- Use Postman to make GET requests with the
usernameparameter set to one of the users. - Verify that the response correctly filters the posts based on the specified criteria.
After testing and verifying that the functionality works as expected, remember to commit your changes:
git add .
git commit -m "Implement filtering posts by username"
Step 7: Standardize HTTP Responses using Interceptors
In this step, we will focus on standardizing HTTP responses in our NestJS application using an interceptor. Standardizing the format of HTTP responses is important for maintaining consistency and predictability, especially when building APIs that will be accessed by different clients, such as web and mobile applications.
Why Standardize HTTP Responses?
- Consistency: It ensures that all API responses follow the same structure, making them easier for clients to parse and handle.
- Predictability: Clients can always expect the same format of response, regardless of the endpoint or the outcome of the request.
- Error Handling: Standardized responses can simplify error handling on the client side.
What is an Interceptor in NestJS?
In NestJS, an interceptor is a class decorated with the @Injectable() decorator. It allows us to intercept incoming requests or outgoing responses. Interceptors can be used for various purposes, such as transforming the response, adding additional data to the response, or handling errors in a centralized manner.
Interceptors have the ability to execute logic before and after a method is called. They are part of NestJS's aspect-oriented programming (AOP) capabilities.
Our Custom HttpResponseInterceptor
Now that you have learned about interceptors in NestJS, we can proceed to implement our custom HttpResponseInterceptor:
- Create a folder named
interceptorsinside thesrcfolder. - Inside the
interceptorsfolder, add a file namedhttp-response.interceptor.ts. - Open the
http-response.interceptor.tsfile and add the following content:
import {
  CallHandler,
  ExecutionContext,
  Injectable,
  NestInterceptor,
} from '@nestjs/common';
import { Observable } from 'rxjs';
import { map } from 'rxjs/operators';

@Injectable()
export class HttpResponseInterceptor implements NestInterceptor {
  intercept(context: ExecutionContext, next: CallHandler): Observable<any> {
    return next.handle().pipe(
      map((response) => {
        if ('data' in response) {
          return {
            statusCode: context.switchToHttp().getResponse().statusCode,
            message: 'Success',
            ...response,
          };
        }

        return {
          statusCode: context.switchToHttp().getResponse().statusCode,
          message: 'Success',
          data: response,
        };
      }),
    );
  }
}
Understanding the code:
- The
interceptmethod is where the logic of our interceptor is implemented. It takes in anExecutionContext(which provides details about the current request) and aCallHandler(which handles the route handler method). - The interceptor uses the
mapoperator fromrxjsto transform the response before it's sent out. It checks if the original response already contains adatafield.- If
datais present, the interceptor spreads the existing response and addsstatusCodeandmessage. - If
datais not present, the interceptor wraps the response inside adatafield and addsstatusCodeandmessage.
- If
Applying the Interceptor
To apply the interceptor globally in our main.ts file, we can follow these steps:
import { NestFactory } from '@nestjs/core';
import { AppModule } from './app.module';
import { ValidationPipe } from '@nestjs/common';
import { HttpResponseInterceptor } from './interceptors/http-response.interceptor'; // <-- Add this line

async function bootstrap() {
  const app = await NestFactory.create(AppModule);
  app.useGlobalPipes(new ValidationPipe());
  app.useGlobalInterceptors(new HttpResponseInterceptor()); // <-- Add this line
  await app.listen(3000);
}
bootstrap();
NestJS provides flexibility in applying interceptors. They can be applied in the following ways:
- Globally (as in our case): This applies the interceptor to all controllers and routes.
- At the Controller Level: By using the
@UseInterceptors()decorator at the controller level. - At the Route Handler Level: By using the
@UseInterceptors()decorator on specific route handlers.
To test this new filter functionality, you can use Postman to make requests. Verify that the response adheres to the expected format.
After testing and verifying that the functionality works as expected, remember to commit your changes using the following commands:
git add .
git commit -m "Standardize HTTP Responses using Interceptors"
Step 8: Global error handler using filters
In this step, we're going to implement a global error handler in our NestJS application using a custom filter. This is an important aspect of building robust and reliable APIs, as it ensures consistent error handling and response formatting.
Why Implement a Global Error Handler?
- Consistency: Ensures that all errors are handled uniformly, regardless of where they occur in the application.
- Clarity: Provides clear and informative error messages to the client, aiding in debugging and user experience.
- Maintainability: Centralizes error handling logic, making the codebase cleaner and easier to maintain.
What are Filters in NestJS?
Filters in NestJS are used to handle exceptions that are thrown during the execution of application code. They are part of NestJS's exception layer and can be used to catch exceptions and format error responses in a custom way. Filters are a great tool for building an effective error handling strategy in your application.
Creating the HttpResponseFilter
- In your
srcfolder, create a new folder namedfilters. - Inside the
filtersfolder, create a file namedhttp-response.filter.ts. - Open the
http-response.filter.tsfile and add the following content:
import { Catch, ArgumentsHost, HttpException } from '@nestjs/common';
import { Response } from 'express';

@Catch()
export class HttpResponseFilter {
  catch(exception: unknown, host: ArgumentsHost) {
    const ctx = host.switchToHttp();
    const response = ctx.getResponse<Response>();
    const request = ctx.getRequest<Request>();
    const status =
      exception instanceof HttpException ? exception.getStatus() : 500;

    const errorResponse = {
      statusCode: status,
      timestamp: new Date().toISOString(),
      path: request.url,
    };

    if (exception instanceof HttpException) {
			const exceptionResponse = exception.getResponse();

      if (typeof response === "object" && "data" in response) {
        // If the response is a string, set it as the message
        errorResponse['message'] = exceptionResponse;
      } else {
        // If the response is an object, spread it into errorResponse
        errorResponse = { ...errorResponse, ...exceptionResponse };
      }
    } else {
      errorResponse['message'] = 'Internal Server Error';
      if (process.env.NODE_ENV === 'development') {
        errorResponse['error'] = exception.toString();
      }
    }

    response.status(status).json(errorResponse);
  }
}
Understanding the Code:
- The
@Catch()decorator tells Nest to use this filter to catch exceptions. - The
catchmethod processes the exception and constructs a custom error response. - We determine the status code based on whether the exception is an instance of
HttpException. - The error response includes a timestamp and the path of the request that caused the error.
- In development mode, the actual error message is included for easier debugging.
Applying the Filter in main.ts
To apply the filter globally, update your main.ts file as follows:
import { NestFactory } from '@nestjs/core';
import { AppModule } from './app.module';
import { ValidationPipe } from '@nestjs/common';
import { HttpResponseFilter } from './filters/http-response.filter'; // <-- Add this line
import { HttpResponseInterceptor } from './interceptors/http-response.interceptor';

async function bootstrap() {
  const app = await NestFactory.create(AppModule);
  app.useGlobalPipes(new ValidationPipe());
  app.useGlobalFilters(new HttpResponseFilter());  // <-- Add this line
  app.useGlobalInterceptors(new HttpResponseInterceptor());
  await app.listen(3000);
}
bootstrap();
To test the new filter functionality, you can use Postman to send requests that are expected to trigger errors. For example, you can use invalid inputs or try to access non-existent resources. Make sure to verify that the error responses follow the format defined in the HttpResponseFilter.
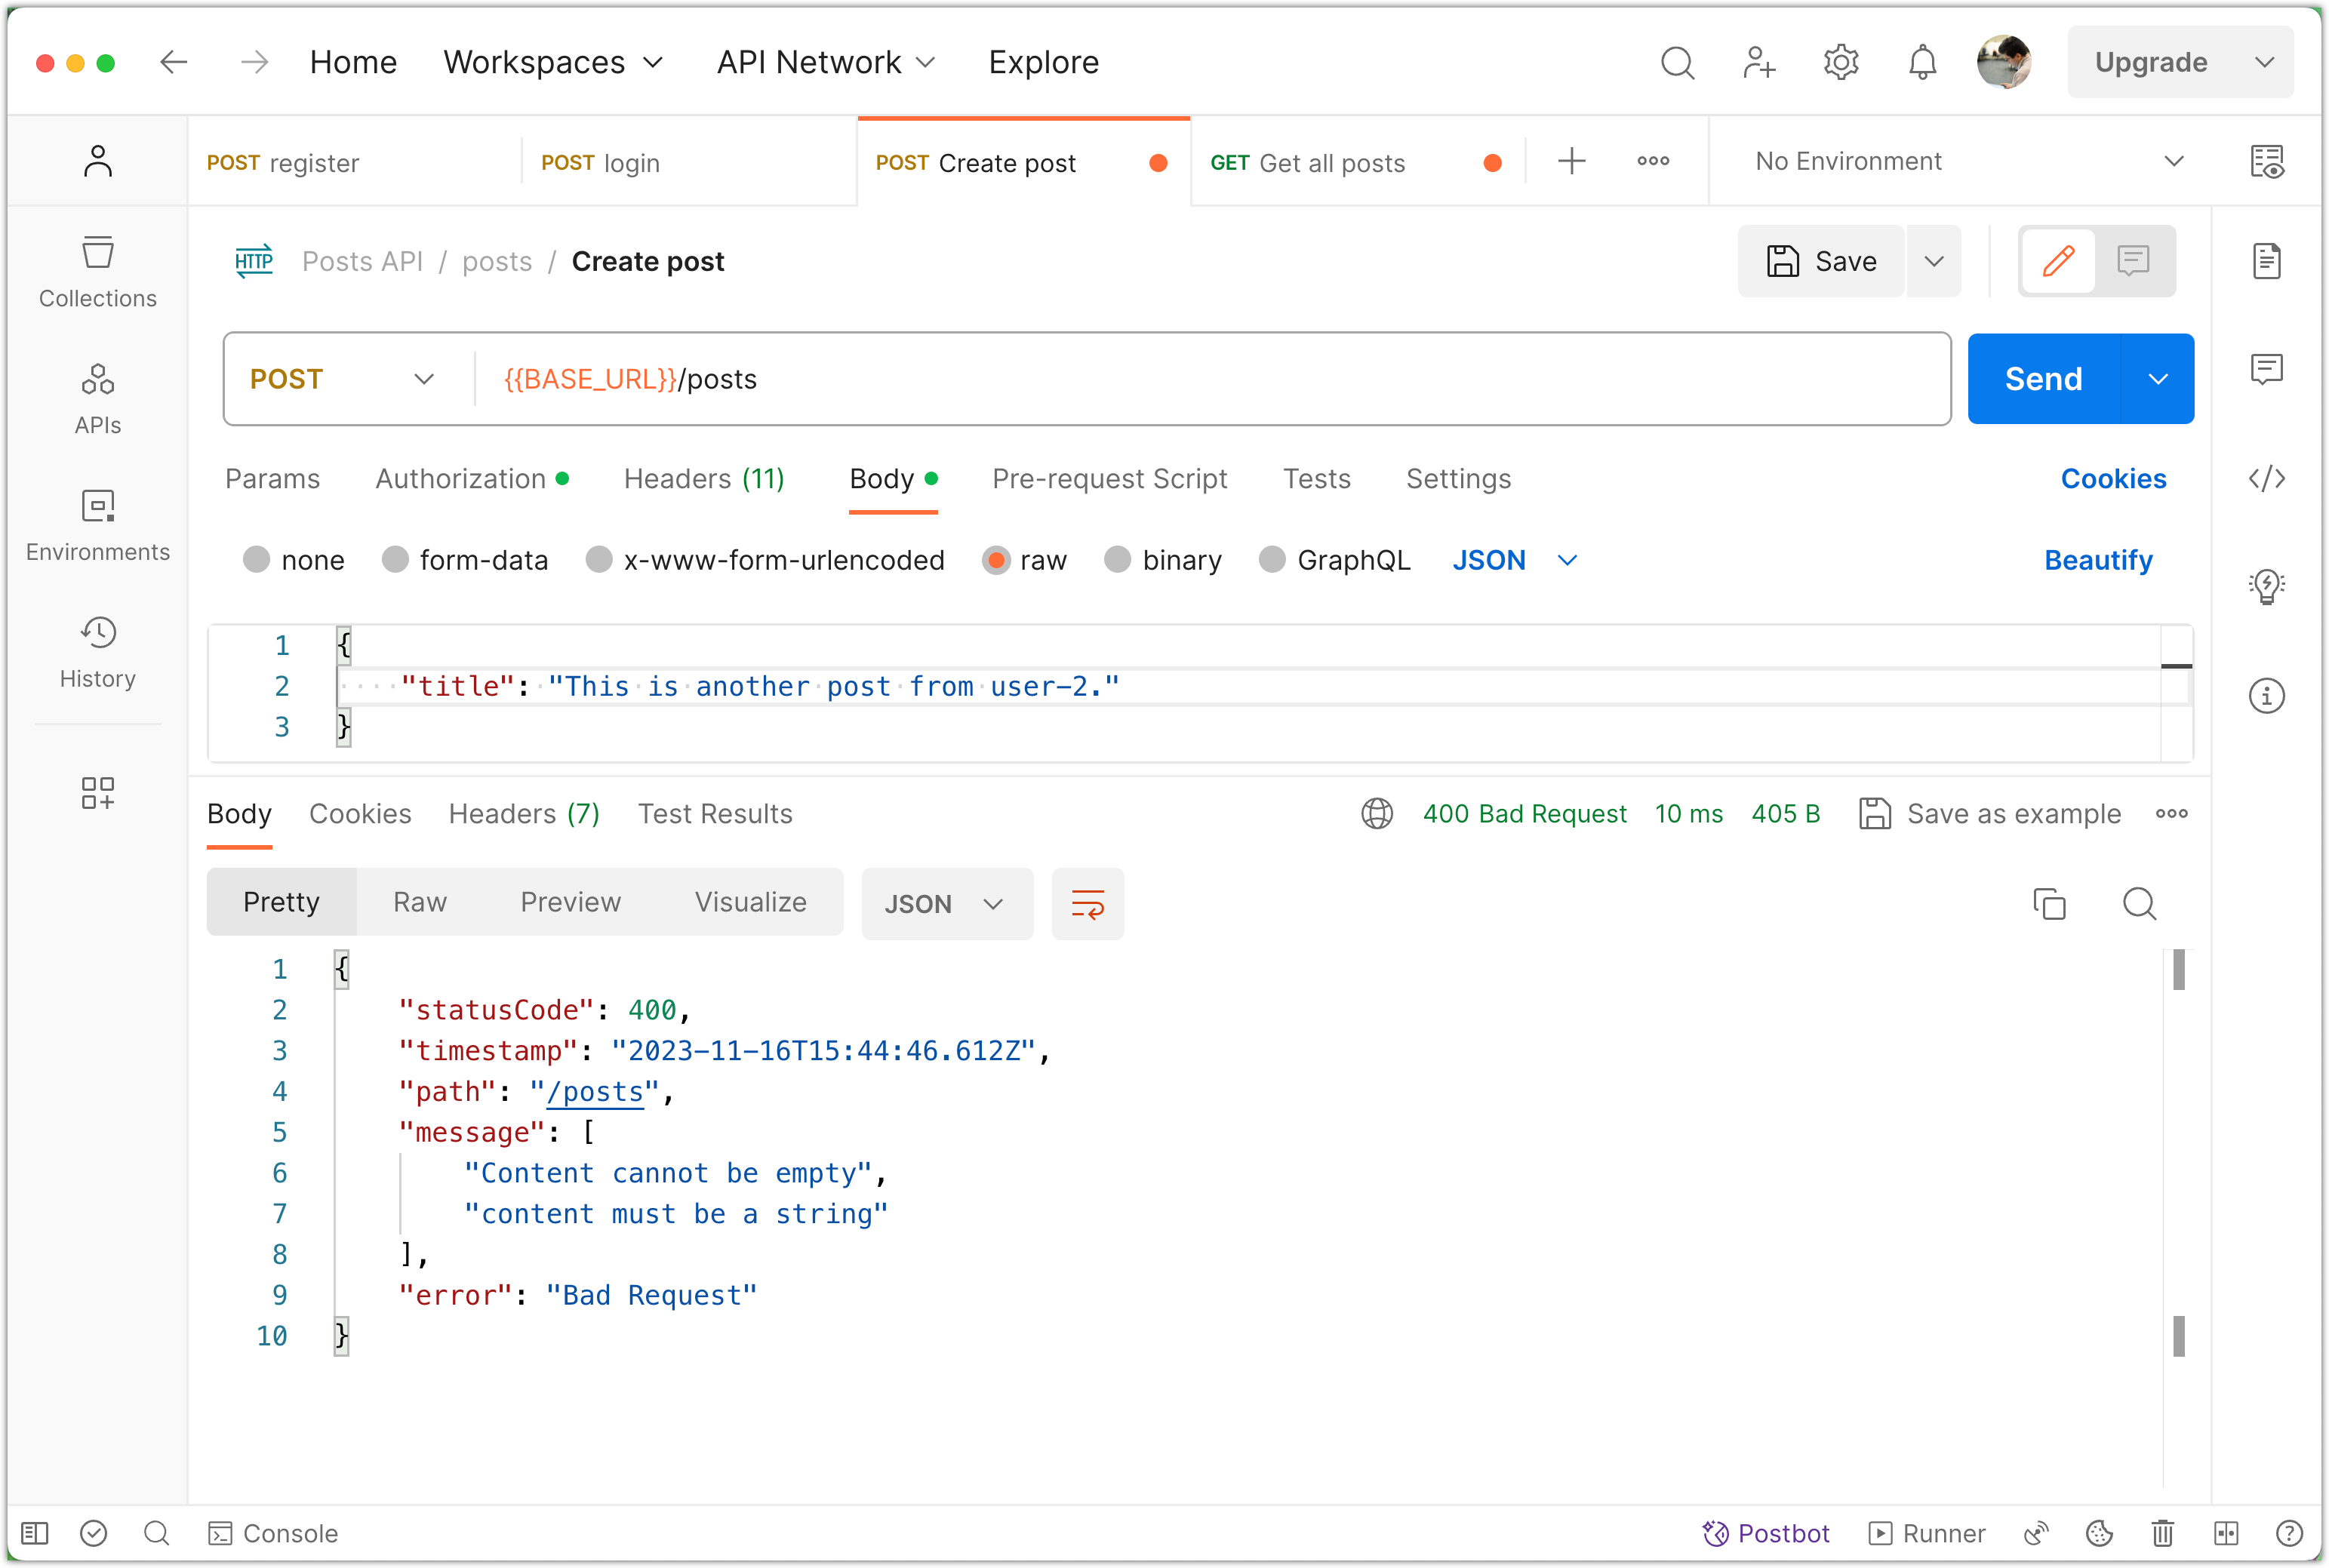
After testing and ensuring that the error handling works as expected, commit your changes to your Git repository:
git add .
git commit -m "Implement global error handling using filters"