Task 6: Set up the Nest.js project
We’ve made enough progress on our frontend, it's a good time to take a break from it and shift our focus to building the backend. The backend will be responsible for handling and processing requests from our frontend, interacting with the database, and providing the necessary responses.
For our backend, we'll be using Nest.js.
What is Nest.js?
Nest.js is a progressive Node.js framework for building efficient, scalable, and maintainable server-side applications. It's built with TypeScript and combines elements of Object-Oriented Programming (OOP), Functional Programming (FP), and Functional Reactive Programming (FRP).
Some of the standout features of Nest.js include:
- Extensible: Nest provides a modular structure that allows for easy and intuitive extension.
- Versatile: It works well with other libraries and has support for many databases out of the box.
- Modern: It leverages the latest JavaScript features, bringing design patterns and mature solutions to node.js world.
- Inbuilt TypeScript support: With TypeScript's strong typing, we can catch bugs earlier and leverage the power of intelligent code editors.
With Nest.js, we can ensure a solid foundation for our backend. It also provides a lot of tools out of the box, which can accelerate our development process.
Let's dive in and set up our Nest.js project!
Step 1: Install Nest CLI
The Nest CLI (Command Line Interface) is a powerful tool that assists in developing Nest applications, enabling many features and capabilities that make development with Nest even faster and more efficient. With the Nest CLI, you can scaffold a new project, generate application artifacts (like modules, controllers, services, etc.), run and debug your applications, and much more.
Installation
To start using the Nest CLI, you first need to install it globally. This can be done by running the following command in the terminal:
npm install -g @nestjs/cli
Verification
After installation, you can verify that the CLI has been installed correctly by running the following command:
nest --version
This should display the version of the Nest CLI installed on your machine.
In the next steps, we'll use the CLI to scaffold our new Nest project and explore its structure.
Step 2: Create a new Nest project
With the CLI installed, let's create a new Nest application. Navigate to the directory where you want to create your project, and then run the following command in the terminal:
nest new posts-api
The CLI will prompt you to choose a package manager. Choose pnpm. This command will create a new directory called posts-api and set up a new Nest application inside it. The CLI will generate various files and folders necessary for the application.
Once the command completes, you will see a success message along with some instructions:
⚡  We will scaffold your app in a few seconds..

? Which package manager would you ❤️  to use? pnpm
CREATE posts-api/.eslintrc.js (663 bytes)
CREATE posts-api/.prettierrc (51 bytes)
CREATE posts-api/README.md (3347 bytes)
CREATE posts-api/nest-cli.json (171 bytes)
CREATE posts-api/package.json (1950 bytes)
CREATE posts-api/tsconfig.build.json (97 bytes)
CREATE posts-api/tsconfig.json (546 bytes)
CREATE posts-api/src/app.controller.spec.ts (617 bytes)
CREATE posts-api/src/app.controller.ts (274 bytes)
CREATE posts-api/src/app.module.ts (249 bytes)
CREATE posts-api/src/app.service.ts (142 bytes)
CREATE posts-api/src/main.ts (208 bytes)
CREATE posts-api/test/app.e2e-spec.ts (630 bytes)
CREATE posts-api/test/jest-e2e.json (183 bytes)

✔ Installation in progress... ☕

🚀  Successfully created project posts-api
👉  Get started with the following commands:

$ cd posts-api
$ pnpm run start


                          Thanks for installing Nest 🙏
                 Please consider donating to our open collective
                        to help us maintain this package.


               🍷  Donate: https://opencollective.com/nest
Follow these instructions to navigate to the newly created project directory and start the application using the provided command.
-
Navigate to the project directory:
cd posts-backend -
Run the application:
By default, the CLI sets up a minimal application. Let's run it and see:
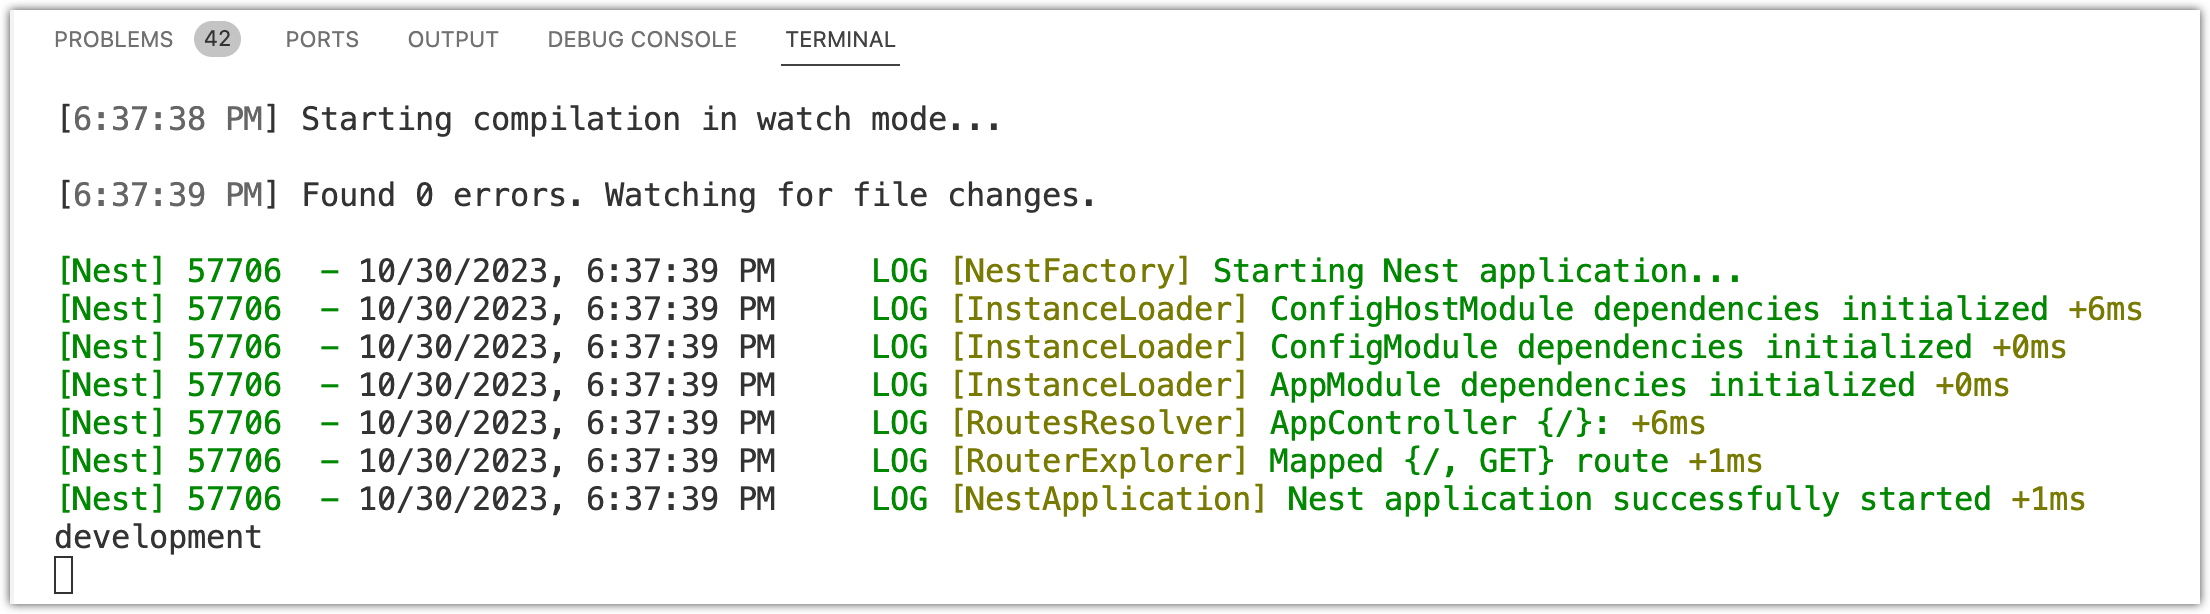
pnpm run start:devThis will start your application in development mode. Once started, you should see the message:
Nest application successfully started. By default, Nest applications start on port3000. You can navigate tohttp://localhost:3000in your browser, and you should see a "Hello World!" message.
Congratulations, you've successfully set up and run your first Nest.js application! Before going to the next step, commit the changes:
git commit -m "Scaffolded posts API using Nest CLI"
Step 3: Explore the scaffolded Nest project
Now that you have successfully created a new Nest.js project, let's dive into the structure of the generated application. Understanding the anatomy of the Nest.js application will help you navigate and organize your code efficiently.
Project Structure
Upon creating a new Nest application, you'll find several directories and files:
-
src/: The main directory where the bulk of your application's code will reside.app.controller.ts: A basic controller that Nest generates. Controllers handle incoming requests and return responses.app.controller.spec.ts: A minimal set of unit tests for theAppControllerclass, which is declared inapp.controller.ts.app.service.ts: A basic service. Services encapsulate the logic of your application, and you'll call them from your controllers.app.module.ts: The root module of the application. Nest uses a modular structure, and this is where you'll import other modules.main.ts: The entry file of the application. It's responsible for bootstrapping the Nest application.
-
test/: Contains end-to-end tests. -
.eslintrc.js,.prettierrc: Configuration files for ESLint and Prettier, respectively. These tools help in linting and formatting your code. -
nest-cli.json: Configuration for the Nest CLI. -
tsconfig.jsonandtsconfig.build.json: Configuration files for TypeScript compiler.
Modules
In Nest, modules are a fundamental aspect. They provide a way to organize features and functionalities into clean, single-responsibility groups. The app.module.ts file is the root module, and as your application grows, you'll be creating more modules and importing them here.
Controllers
Controllers in Nest are responsible for handling incoming requests. They can return responses directly or delegate the heavy lifting to services. The app.controller.ts file is a sample controller that's generated by the CLI.
Services
Services are meant to contain the core business logic of your application. They're called from controllers and can interact with databases, external services, or any other parts of your application. The app.service.ts file is a sample service.
Providers
Providers are a fundamental concept in Nest. They can be services, repositories, factories, and they can be injected into controllers, other services, modules, etc. They're a key part of Nest's powerful Dependency Injection system.
Decorators
Nest makes heavy use of decorators, which are a feature of TypeScript (and ES7). You'll see them frequently, especially in controllers, to define routes, HTTP methods, etc. Decorators in Nest.js are annotations that start with the "@" symbol. They are used to enhance the functionality of classes, methods, properties, or parameters. For example:
@Controller('users')
class UsersController {
  @Get()
  getAllUsers() {
    // ...
  }
}
In this example, the @Controller decorator is used to define a controller class for handling requests related to users. The @Get decorator is used to define a route handler for the HTTP GET method. These decorators provide additional metadata and functionality to the decorated elements, making it easier to define routes and handle requests in Nest.js.
Environment & Configuration
While not set up by default, as your application grows, you'll likely need configuration management (for database URLs, secret keys, etc.). Nest offers a configuration module for this, which we'll set up in later steps.
With this understanding of the basic structure and components of a Nest.js application, you're well-equipped to begin developing the backend. As you add more features, this structure will ensure that your application remains maintainable and organized.
In the next steps, we'll set up a database connection, configure environment variables, and more. Remember to commit your progress regularly to maintain a clear history of your project's development.
Step 4: Set up a PostgreSQL database with Docker
Before diving into the actual setup, let's briefly discuss Databases and Docker!
Introduction to Databases
At its core, a database is a structured collection of data. Think of it as a digital filing cabinet where you can store, organize, and retrieve information.
Many of you have taken the course Data Structures, and some of you may have also taken Introduction to Databases. For those who are unfamiliar, think of a database as a more advanced and sophisticated data structure. It is optimized for tasks such as search, sort, and persistence. While simple data structures like arrays, linked lists, or trees help us organize and manipulate data in memory, databases are specifically designed to handle large amounts of data that cannot fit in memory. They ensure data integrity, consistency, and durability.
Why do we need databases? As applications grow and serve more users, the amount of data they handle increases significantly. Storing this data in files or in-memory becomes inefficient and unreliable. Databases provide mechanisms to store data persistently, efficiently, and securely. They also offer features like search capabilities, relationships between data sets, and transaction management.
Example: Imagine you run a library. Initially, you might remember all your books and their borrowers. But as your collection grows, this becomes impossible. Instead, you'd use a system (database) where you can quickly check which books you have, who borrowed them, and when they're due back.
💡 There are various types and brands of of databases. For our project, we'll be using PostgreSQL.
What is PostgreSQL? PostgreSQL (often pronounced as "Postgres") is an open-source relational database management system. It's known for its extensibility, robustness, and performance. PostgreSQL supports advanced data types, has powerful indexing mechanisms, and offers features like table inheritance and function overloading, making it one of the most advanced relational databases available.
Relational Databases: One key feature of many databases, such as PostgreSQL, is their use of the relational model. In this model, data is stored in tables with rows and columns, allowing for complex queries and associations between different data entities. Relational databases, like MySQL, PostgreSQL, and SQL Server, are the most common type of database.
Non-Relational Databases: In contrast to relational databases (such as PostgreSQL), there are non-relational (NoSQL) databases. These databases do not use tables in the traditional sense and can store data in different ways, such as document-oriented, key-value pairs, or graph databases. Examples of non-relational databases include MongoDB, Redis, and Cassandra.
Introduction to Docker
Docker is a platform designed to make it easier to create, deploy, and run applications using containers. Containers allow developers to package up an application with all parts it needs, such as libraries and other dependencies, and ship it all out as one package.
Why is this useful? Imagine you've developed an application on your machine, which works perfectly. However, when you try to run it on a different machine or a server, it doesn't work due to differences in the environment, like missing dependencies. Docker containers solve this problem by ensuring that the application runs in the same environment, regardless of where the container is run.
Example: Consider a real-world analogy. Imagine you have a toy (application) that requires batteries (dependencies) to operate. Instead of giving someone just the toy and expecting them to find the right batteries, you give them the toy inside a special box (container) that already includes the batteries. Now, they can play with the toy immediately, without any extra effort.
For our project, we will use Docker to run a PostgreSQL database. This ensures that every student or developer working on this project uses the exact same version and configuration of PostgreSQL, eliminating the "it works on my machine" problem.
Setting up PostgreSQL with Docker
-
Docker Compose File
Create a
docker-compose.ymlfile in the root of your project. This file describes how to run the PostgreSQL container:version: '3.9' services: # Ensure environment variables DB_PORT, DB_USER, DB_PASSWORD are set in .env file. # # To access the db in the docker # - DATABASE_URL=postgres://${DB_USER}:${DB_PASSWORD}@postgres/ # To access the db in outside the docker # - DATABASE_URL=postgres://${DB_USER}:${DB_PASSWORD}@localhost:${DB_PORT}/ db: image: postgres:15-alpine restart: always container_name: postgres-for-posts-api ports: - '${DB_PORT}:5432' # HOST_PORT:CONTAINER_PORT environment: POSTGRES_USER: ${DB_USER} POSTGRES_PASSWORD: ${DB_PASSWORD} POSTGRES_DB: ${DB_NAME}This file instructs Docker to pull the PostgreSQL 15 Alpine image, set the provided environment variables, and map the specified host port to the container's port.
-
Environment File
Create a
.envfile in the root of your project. This will store environment-specific variables:NODE_ENV=development DB_HOST=localhost DB_PORT=5432 DB_USER=postgres DB_PASSWORD=password DB_NAME=posts-dbThe
.envfile is an environment-specific configuration file commonly used in software development. It allows developers to define and store environment variables that are specific to the current environment (e.g., development, staging, production).Environment variables are values that can be accessed by the application at runtime and are used to configure various aspects of the application's behavior. For example, database connection details, API keys, or feature toggles can be stored as environment variables.
By using an
.envfile, developers can easily manage different configurations for different environments without hardcoding sensitive information or having to modify the application's code. This separation of configuration from code promotes better security practices and simplifies the deployment process.In our case, the
.envfile is used to store the configuration details for the PostgreSQL database, including the host, port, username, password, and database name.💡 The
.envfile should not be committed to version control and should be added to the project's.gitignorefile to prevent accidentally committing sensitive information. -
Docker Commands
Add these commands to the
scriptssection of yourpackage.json:"docker:up": "docker-compose up -d", "docker:down": "docker-compose down"Now, you can use
pnpm docker:upto start the PostgreSQL container andpnpm docker:downto stop it.
With Docker and PostgreSQL set up, we are now ready to connect our Nest.js application to this database using TypeORM. This will be covered in the next step. For now, please run the command pnpm docker:up to start the PostgreSQL container.
Please stage and commit your changes.
git add .
git commit "Set up a PostgreSQL database with Docker"
Step 5: Configure environment variables with config module
Recap: Environment Variables
In software development, environment variables are variables outside of the application that store configuration information. They can be crucial for several reasons:
- Security: You shouldn't hard-code sensitive information like database passwords or API keys. If you do, anyone with access to your code can see (and misuse) this information.
- Flexibility: By using environment variables, you can easily change configurations without altering the code. This is useful when deploying your application in different environments (e.g., development, staging, production).
- Separation of Concerns: Code should be separate from configuration. Your application logic should not be intertwined with your configuration settings.
Example: Imagine you're developing an app that connects to a database. In your local development environment, you connect to a local database. But in production, you connect to a different, remote database. Instead of hard-coding these different connection strings into your code, you'd use environment variables. When deploying your app, you'd simply change the environment variable values accordingly.
For managing environment variables in a Nest.js application, we utilize the config module.
Setting up the config module in Nest.js
-
Installation:
To begin with, you need to install the necessary packages:
pnpm add @nestjs/config -
Configuration:
Now, import the
ConfigModuleinto the rootAppModule.import { ConfigModule } from '@nestjs/config'; @Module({ imports: [ ConfigModule.forRoot(), // Loads the .env file // ... other modules ], }) export class AppModule {}By default, the
ConfigModulewill look for a.envfile in the root directory of the application and load those environment variables. -
Using ConfigService:
Once you've set up the
ConfigModule, you can inject theConfigServicewherever you need it in your application. This service provides agetmethod that allows you to access your environment variables. For example, let’s update theapp.service.tsfile as follows:import { Injectable } from '@nestjs/common'; + import { ConfigService } from '@nestjs/config'; @Injectable() export class AppService { + constructor(private configService: ConfigService) {} getHello(): string { + const NODE_ENV = this.configService.get<string>('NODE_ENV'); + console.log(NODE_ENV); return 'Hello World!'; } }Now run the app and visit the http://localhost:3000/. Notice the word “development” must get printed to your console in VSCode.
Aside: The
constructor(private configService: ConfigService) {}syntax is a shorthand way of declaring a class property and assigning it a value from the constructor parameter.In the given example, the
ConfigServiceis a dependency that is being injected into theAppServiceclass. By specifyingprivate configService: ConfigServicein the constructor parameter, Nest.js automatically creates a private class property calledconfigServiceand assigns the value received from the constructor. Therefore, in theAppServiceclass, you can access theconfigServiceproperty viathis.configService.This shorthand syntax helps to reduce boilerplate code by eliminating the need to explicitly declare the class property and assign it inside the constructor. It is a common practice in TypeScript and is known as a "parameter property."
Revert the
app.service.tsto its original form before moving forward! -
Validation (Optional but recommended):
The
ConfigModulealso allows you to validate your environment variables to ensure they match expected formats or are present before your application starts. This helps catch potential issues early on. This is an optional but recommended step to ensure that the expected environment variables are present and have the correct formats before your application starts.To set up validation, follow these steps:
-
Install these libraries:
pnpm add class-validator class-transformerclass-validatoris a library that provides decorators and validation functions to validate data objects in TypeScript. It allows you to define validation rules for properties of a class and perform validation checks on those properties.class-transformeris a library that provides decorators and functions to transform plain JavaScript objects into instances of specific classes and vice versa. It simplifies the process of converting raw data into structured objects and enables easy manipulation and validation of those objects.By using these libraries together, you can define validation rules for the properties of your classes and easily transform and validate incoming data objects in your Nest.js application.
-
Create a
env.validation.tsfile in thesrcfolder of your project with the following content:import { plainToInstance } from 'class-transformer'; import { IsNumber, IsString, IsEnum, validateSync } from 'class-validator'; enum Environment { Development = 'development', Production = 'production', Test = 'test', Provision = 'provision', } class EnvironmentVariables { @IsString() DB_HOST: string; @IsNumber() DB_PORT: number; @IsString() DB_USER: string; @IsString() DB_PASSWORD: string; @IsString() DB_NAME: string; @IsEnum(Environment) NODE_ENV: Environment; } export function validate(config: Record<string, unknown>) { const validatedConfig = plainToInstance(EnvironmentVariables, config, { enableImplicitConversion: true, }); const errors = validateSync(validatedConfig, { skipMissingProperties: false, }); if (errors.length > 0) { throw new Error(errors.toString()); } return validatedConfig; }The
validatefunction is a custom function defined to validate the environment variables. Here's what the function does:- It takes a
configobject as an argument, which contains the environment variables. - The
plainToInstancefunction from theclass-transformerlibrary is used to transform the plain JavaScript object (config) into an instance of theEnvironmentVariablesclass. - The
IsString,IsNumber,IsEnum, and other decorators from theclass-validatorlibrary are used to specify the validation rules for each environment variable within theEnvironmentVariablesclass. - The
validateSyncfunction from theclass-validatorlibrary is used to perform the validation checks on thevalidatedConfigobject. - If there are any validation errors, an error message containing the validation errors is thrown.
- If there are no validation errors, the
validatedConfigobject is returned.
- It takes a
-
In your
app.module.tsfile, update the importedConfigModuleand tell it to use this validation schema during its initialization.import { Module } from '@nestjs/common'; import { AppController } from './app.controller'; import { AppService } from './app.service'; import { ConfigModule } from '@nestjs/config'; + import { validate } from './env.validation'; @Module({ imports: [ ConfigModule.forRoot({ + validate, }), // Loads the .env file ], controllers: [AppController], providers: [AppService], }) export class AppModule {} -
Run the app with missing or invalid environment variables. The app will crash because the
validate()method will throw an exception based on the defined schema.
By performing environment variable validation, you can ensure that your application starts only if all the required environment variables are present and have the correct formats. This helps catch configuration errors early and ensures the proper functioning of your application.
-
Please stage and commit your changes.
git add .
git commit "Configure environment variables with config module"
Step 6: Set up TypeORM and configure the database connection
Before diving into the configuration, let's briefly discuss TypeORM.
Introduction to TypeORM
TypeORM is an ORM (Object-Relational Mapper) for TypeScript and JavaScript. An ORM is a tool that lets you interact with your database, like querying, inserting, updating, or deleting data, using object-oriented programming. With TypeORM, you can:
- Model your data as classes and save or retrieve instances of those classes from the database.
- Write database-agnostic code, which means your application can switch between different databases with minimal changes.
- Use modern ES/TS features, including async/await, decorators, etc.
Setting Up TypeORM
To integrate TypeORM into our Nest.js project, we first need to install the required packages. TypeORM is a versatile ORM that supports various databases, but since we are using PostgreSQL, we need to install the pg package, which is a PostgreSQL client for Node.js.
Execute the following command in your terminal:
pnpm add @nestjs/typeorm typeorm pg
This command will install:
@nestjs/typeorm: The NestJS module that provides TypeORM integration.typeorm: The core TypeORM library.pg: PostgreSQL client for Node.js.
Once installed, we can proceed to configure our database connection.
Database Connection Configuration
Now, back to our configuration. The TypeOrmModule.forRootAsync() method allows you to configure the connection to your database asynchronously. This is particularly useful when you want to fetch configuration values from services like ConfigService.
Update the app.module.ts as follows:
import { Module } from '@nestjs/common';
import { AppController } from './app.controller';
import { AppService } from './app.service';
import { ConfigModule, ConfigService } from '@nestjs/config';
import { validate } from './env.validation';
import { TypeOrmModule } from '@nestjs/typeorm';

@Module({
  imports: [
    ConfigModule.forRoot({
      validate,
    }), // Loads the .env file
    TypeOrmModule.forRootAsync({
      imports: [ConfigModule],
      useFactory: (configService: ConfigService) => ({
        type: 'postgres',
        host: configService.get<string>('DB_HOST'),
        port: configService.get<number>('DB_PORT'),
        username: configService.get<string>('DB_USER'),
        password: configService.get<string>('DB_PASSWORD'),
        database: configService.get<string>('DB_NAME'),
        entities: [__dirname + '/**/*.entity{.ts,.js}'],
        synchronize: configService.get<string>('NODE_ENV') !== 'production',
      }),
      inject: [ConfigService],
    }),
  ],
  controllers: [AppController],
  providers: [AppService],
})
export class AppModule {}
Let's focus on the configuration part:
TypeOrmModule.forRootAsync({
  imports: [ConfigModule],
  useFactory: (configService: ConfigService) => ({
    type: 'postgres',
    host: configService.get<string>('DB_HOST'),
    port: configService.get<number>('DB_PORT'),
    username: configService.get<string>('DB_USER'),
    password: configService.get<string>('DB_PASSWORD'),
    database: configService.get<string>('DB_NAME'),
    entities: [__dirname + '/**/*.entity{.ts,.js}'],
    synchronize: configService.get<string>('NODE_ENV') !== 'production',
  }),
  inject: [ConfigService],
}),
Here's what each key in the configuration object means:
type: The type of database you are connecting to. In our case, it's PostgreSQL.host,port,username,password,database: These parameters define how to connect to the database. They are being fetched from the environment variables usingConfigService.entities: Specifies the entities (or tables) in your application. The provided path ([__dirname + '/**/*.entity{.ts,.js}']) captures all files that match the.entity.tsor.entity.jspattern in your application, ensuring they are recognized by TypeORM.synchronize: When set totrue, TypeORM will automatically create the database schema on every application launch. It's useful during development, as you don't have to manually set up tables. However, in a production environment, it's recommended to turn this off (set tofalse) and manage the database schema changes using migrations, to prevent data loss.
As discussed, environment variables provide a way to separate configuration from application logic, which is especially important when sensitive information, such as database credentials, is involved.
Please stage and commit your changes.
git add .
git commit "Set up TypeORM and configure the database connection"