Task 4: Delete Posts
Step 1: Delete Post
In this step, we will add the ability to delete a post in our Posts app. We will update the PostActions component, which contains a dropdown menu item for deleting a post. When this item is clicked, the app will make an API call to delete the selected post.
Add the following function to src/lib/api.ts file:
// Delete post by id
export const deletePost = async (id: string): Promise<void> => {
  return new Promise((resolve) => {
    setTimeout(() => {
      db.posts = db.posts.filter((post) => post.id !== id);
      resolve();
    }, 200); // Simulate an API delay
  });
};
Let’s add an event handler to PostActions component so when a user clicks on the “Delete post” menu item, the deletePost API function is called. Here is the summary of changes made to the src/components/post-actions.tsx file:
-
Import the
deletePostfunction.import { deletePost } from "@/lib/api"; -
Update
PostActionsprops and add an event handler.const PostActions = ({ postId }: { postId: string }) => { const handleDelete = async () => { await deletePost(postId); }; return (/* DropdownMenu */) } -
Set
handleDeleteas the event handler for theonClickevent of the related dropdown menu item.- <DropdownMenuItem className="text-red-500"> + <DropdownMenuItem className="text-red-500" onClick={handleDelete}> Delete post </DropdownMenuItem>
Note that we need to pass the post ID from the Post component down to the PostActions component.
-
Destructure the
idattribute from thepostobject:- const { content, user, timestamp } = post; + const { id, content, user, timestamp } = post; -
Pass the
idattribute as a prop to thePostFootercomponent:- <PostFooter /> + <PostFooter postId={id} /> -
Update the
PostFooterdeclaration to receive thepostIdprop:- function PostFooter() { + function PostFooter({ postId } : { postId: string }) { -
In the
PostFootercomponent, pass thepostIdprop to thePostActionscomponent:- <PostActions /> + <PostActions postId={postId} />
Save all changes and run the application. However, please note that the delete function does not appear to be working.
We will investigate the problem in the following steps. For now, stage and commit all the changes.
git add .
git commit -m "Delete a post [incomplete]"
Step 2: Debugging
In this step, we will address an issue with the "delete post" feature that was introduced in the previous step. We will use debugging techniques to identify the source of the problem. Debugging is an essential skill for developers, and we will demonstrate how to use log messages and browser DevTools to inspect our application's behavior and diagnose the problem. Let's get started!
Debug Messages
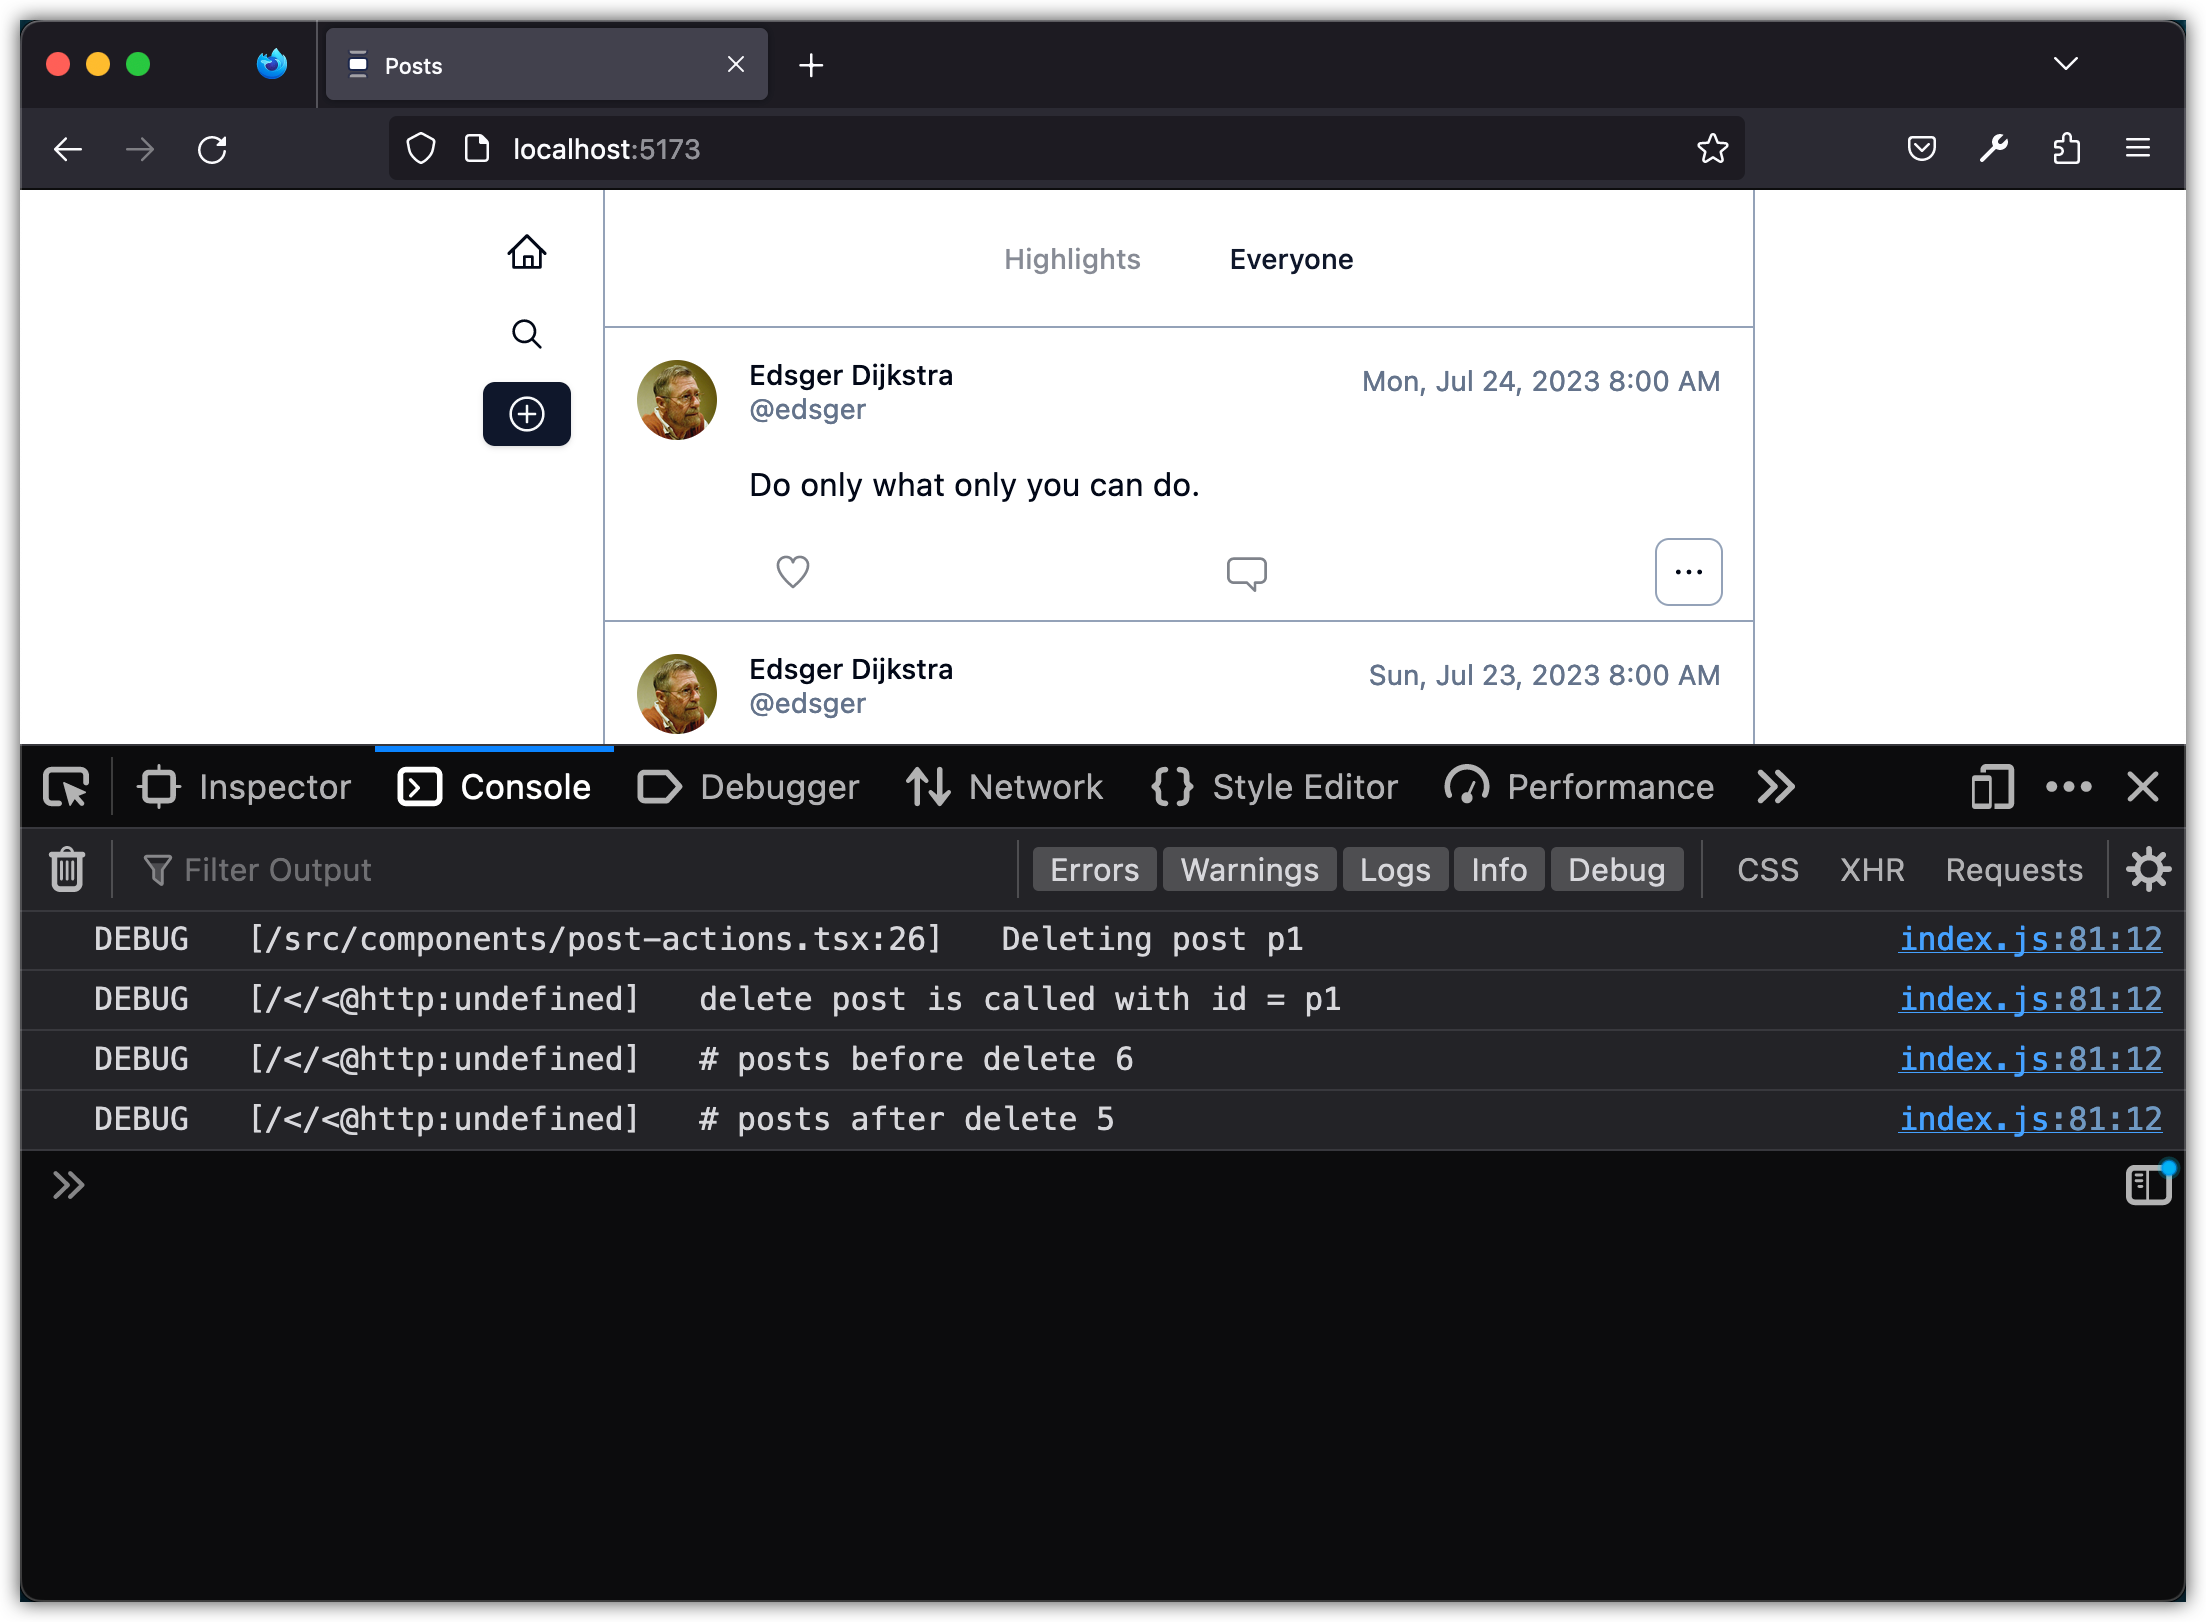
To troubleshoot the issue, we can use the logger to add helpful debug messages and trace the events and data.
-
First, import
login thePostActionscomponent:import { log } from "@/lib/logger"; -
Next, update the
handleDeletefunction (in the same file) by adding a debug message to it:const handleDelete = async () => { log.debug("Deleting post", postId); await deletePost(postId); }; -
Then, import
login thesrc/lib/api.tsfile:import { log } from "./logger"; -
Finally, add debug messages to the
deletePostfunction in the same file:// Delete post by id export const deletePost = async (id: string): Promise<void> => { return new Promise((resolve) => { setTimeout(() => { log.debug("delete post is called with id =", id); log.debug("# posts before delete", db.posts.length); db.posts = db.posts.filter((post) => post.id !== id); log.debug("# posts after delete", db.posts.length); resolve(); }, 200); // Simulate an API delay }); };
Run the app and attempt to delete a post while the browser console is open. You will notice that the debug messages indicate that the delete was successful. However, the post is still being displayed in the UI.
VSCode Debugger
Alternative to placing debug statements, you can attach a debugger to the running application and step into your code. To do this, make sure you have the JavaScript Debugger extension installed in VSCode. Then, follow these steps:
-
Add a
.vscodefolder to the root of your project and create alaunch.jsonfile inside it. The contents of the file should be as follows:{ "version": "0.2.0", "configurations": [ { "type": "chrome", "request": "launch", "name": "Launch Chrome against localhost", "url": "<http://localhost:5173/posts-app/>", "webRoot": "${workspaceFolder}" } ] }Note: The
urlshould be the URL of your application when you run it in development mode. -
Start the app with
pnpm devin the terminal. -
In VSCode, go to the Debug view by clicking on the Debug icon in the Activity Bar on the side of the window.
-
Select
Launch Chrome against localhostfrom the dropdown at the top of the Debug view. -
Click on the green play (▶️) button to start debugging.
A new Chrome instance should open with debugging enabled. You can set breakpoints in your React code within VSCode. When the code execution reaches those points, it will pause, allowing you to inspect variables, the call stack, and more:
- Setting Breakpoints: Click on the left margin next to the line numbers in your code where you want execution to pause.
- Inspecting Variables: When the code execution is paused, you can hover over variables to inspect their values or use the "Variables" pane in the Debug view.
- Navigating the Call Stack: Use the "Call Stack" pane in the Debug view to navigate through the function calls leading up to the breakpoint.
- Console Log: You can view console logs within VSCode's debug console, making it easier to diagnose issues without switching back to the browser.
To stop debugging, click on the red square (⏹️) button in the Debug view in VSCode. Close the Chrome instance that was opened by the debugger.
With these steps, you should be able to effectively debug their React apps directly within VSCode, leveraging the powerful features of both the Chrome Debugger and VSCode's integrated debugging tools.
React Dev Tools
To further investigate this issue, let's inspect our app using the React Developer Tools. This browser extension adds React debugging tools to the built-in browser Developer Tools. Open the developer tools and notice the two tabs with the React logo: Components and Profiler. Use these tabs to navigate through the React components, view their props, state, etc., or profile the performance of your application.
If you inspect the Posts component, you'll notice that the "state" of that component still contains the deleted post.
Indeed the problem is that we must update the app state as we update the app data through an API call. One approach to do this is to bring the delete event handler in the parent component of Posts (where the posts state data resides) and update the state along with the API call to delete the selected post. We will explore this strategy next but for now, stage and commit all changes.
git add .
git commit -m "Added log messages for deleting a post"
Step 3: Update State after Delete
In this step, we will address an issue with the "delete post" feature that was introduced in the previous step. We will explore a strategy to update the app state along with the API call to delete a post. We will bring the delete event handler in the parent component of Posts where the state data resides. This will allow us to update the UI after the post is deleted from the server. Let's get started!
Let's update the Posts component.
-
Import
deletePostandlogger:import { deletePost } from "@/lib/api"; import { log } from "@/lib/logger"; -
Declare an updated version of
handleDeletein the body of thePostsfunction:const handleDelete = async (postId: string) => { log.debug("Deleting post", postId); await deletePost(postId); setPosts(posts.filter((post) => post.id !== postId)); }; -
Pass this function as a prop to the
Postcomponent:- <Post post={post} key={post.id} /> + <Post post={post} key={post.id} handleDelete={handleDelete} />
Let's update the Post component.
-
Update the props that the component receives:
const Post = ({ post, + handleDelete, }: { post: PostWithUserData; + handleDelete: (postId: string) => void; }) => { -
Pass the
handleDeleteas a prop to thePostFootercomponent:- <PostFooter postId={id} /> + <PostFooter postId={id} handleDelete={handleDelete} />
Let's update the PostFooter component.
-
Update the props that the component receives:
const PostFooter = ({ post, + handleDelete, }: { post: PostWithUserData; + handleDelete: (postId: string) => void; }) => { -
Pass the
handleDeleteas a prop to thePostActionscomponent:- <PostActions postId={id} /> + <PostActions postId={id} handleDelete={handleDelete} />
Let's update the PostActions component.
-
Update the props that the component receives:
const PostActions = ({ post, + handleDelete, }: { post: PostWithUserData; + handleDelete: (postId: string) => void; }) => { -
Delete the
handleDeleteinner function and remove any unused import statements. -
Update the
onClickevent as follows:<DropdownMenuItem className="text-red-500" - onClick={handleDelete} + onClick={() => handleDelete(postId)} > Delete post </DropdownMenuItem>
Run the app and try deleting a post. It should work now!
Stage and commit all changes.
git add .
git commit -m "Update state after deleting a post"
Step 4: Zustand
In the previous step, we saw that passing a function several levels down through props (a technique called prop drilling) can be cumbersome and error-prone. To solve this problem, there are several different strategies that can be used. One of these strategies is to use a global state management library. In this step, we will use a library called Zustand to manage the state of our Posts app. Zustand is pronounced "zooshtand" and it means "state" in German.
To start, let's refactor our app.
-
First, move all type declarations from
src/lib/data.tsto a new file calledsrc/lib/types.ts:export type User = { id: string; userName: string; displayName: string; avatar?: string; }; export type Post = { id: string; userId: string; content: string; timestamp: string; image?: string; likeCount: number; commentCount: number; }; export type Like = { id: string; postId: string; userId: string; }; export type Comment = { id: string; postId: string; userId: string; content: string; timestamp: string; }; -
Next, add an import statement to the
src/lib/data.tsfile as follows:import type { Like, Post, User, Comment } from "./types"; -
Move the
PostWithUserDatatype fromsrc/lib/api.tstosrc/lib/types.ts:export type PostWithUserData = Post & { user?: User }; -
Finally, update the import statements in the
src/lib/api.tsfile as follows:- import type { User, Post } from "@/lib/data"; + import type { User, PostWithUserData } from "@/lib/types";
Install Zustand and its dependency Immer
pnpm add zustand immer
Create a new file named src/lib/store.ts and add the following content:
import { PostWithUserData } from "./types";
import { log } from "./logger";
import { create } from "zustand";
import { immer } from "zustand/middleware/immer";
type State = {
posts: PostWithUserData[];
// Add more state variables
};
type Action = {
setPosts: (posts: PostWithUserData[]) => void;
removePost: (id: string) => void;
// Add more actions
};
// define the initial state
const initialState: State = {
posts: [],
};
export const useStore = create<State & Action>()(
immer((set, get) => ({
...initialState,
setPosts: (posts) => set({ posts }),
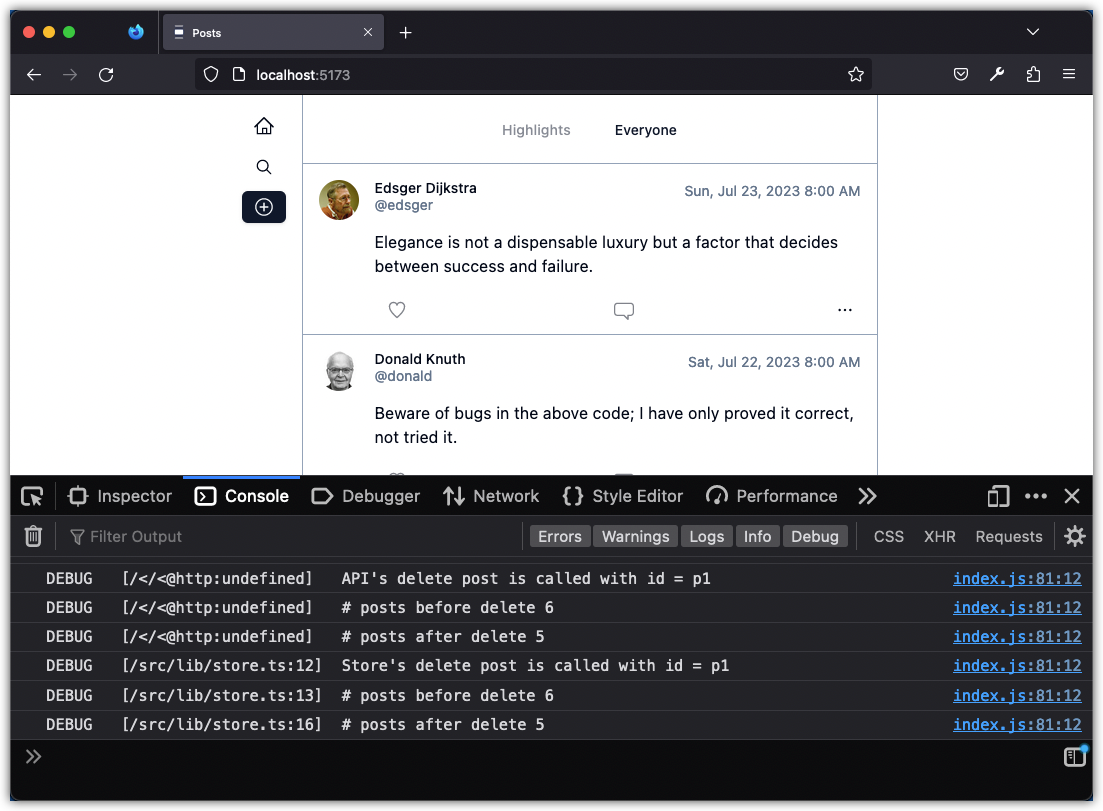
removePost: (id) => {
log.debug("Store's delete post is called with id =", id);
log.debug("# posts before delete", get().posts.length);
const newPosts = get().posts.filter((post) => post.id !== id);
log.debug("# posts after delete", newPosts.length);
set({ posts: newPosts });
},
}))
);
- The
createfunction is a helper function that creates a “store”. A store is a React hook where we can put anything in it: primitives, objects, and functions. We keep the app (global) state in the store along with the operations that modify it. We call those operations “actions”. - Note that the
Statetype, which represents our app's global state, currently only contains an array of posts. Later on, additional variables will be added to store comments, likes, and other data. Currently, there are only two actions: setting the posts and deleting a post. More actions will be added in the future. - In Zustand, like with React
useState, we need to update the state immutably. This means that if we want to change an entry in an array for instance, we must return a new array with the modified entry rather than modifying the existing array directly. Zustand provides animmermiddleware that makes this easier by allowing us to modify the state using mutable syntax while still returning an immutable copy of the state. This ensures that the state is updated correctly and that React re-renders only the components that depend on the changed state. - The
setandgetfunctions are used in the Zustand store to modify and retrieve the global state, respectively. Thesetfunction is used to modify the state by passing in an object that describes the changes we want to make. Thegetfunction is used to retrieve the current state. These functions work together to allow us to manage the state of our application in a simple and efficient way.
Let's update the Posts component:
-
Replace
useStatewithuseStore:- const [posts, setPosts] = useState<PostWithUserData[]>([]); + const [posts, setPosts] = useStore((state) => [state.posts, state.setPosts]); -
Update the import statements accordingly:
- import { useEffect, useState } from "react"; + import { useEffect } from "react"; + import { useStore } from "@/lib/store"; -
Remove the
handleDeleteoperation:- const handleDelete = async (postId: string) => { - log.debug("Deleting post", postId); - await deletePost(postId); - setPosts(posts.filter((post) => post.id !== postId)); - }; -
Remove the
handleDeleteprop from thePostcomponent:- <Post post={post} key={post.id} handleDelete={handleDelete} /> + <Post post={post} key={post.id} /> -
Remove unused import statements:
- import { PostWithUserData, deletePost, fetchPosts } from "@/lib/api";
+ import { fetchPosts } from "@/lib/api";
- import { log } from "@/lib/logger";
Update the Post component:
-
First, update the import statement for
PostWithUserDatatype:- import type { PostWithUserData } from "@/lib/api"; + import type { PostWithUserData } from "@/lib/types"; -
Next, update the component props by removing
handleDelete:const Post = ({ post, - handleDelete, }: { post: PostWithUserData; - handleDelete: (postId: string) => void; }) => { -
Remove the
handleDeleteprop from thePostFootercomponent:- <PostFooter postId={id} handleDelete={handleDelete} /> + <PostFooter postId={id} />
Update the PostFooter component:
-
Update the component props by removing
handleDelete:const PostFooter = ({ post, - handleDelete, }: { post: PostWithUserData; - handleDelete: (postId: string) => void; }) => { -
Remove the
handleDeleteprop from thePostActionscomponent:- <PostActions postId={id} handleDelete={handleDelete} /> + <PostActions postId={id} />
Update the PostActions component:
-
Update the component props by removing
handleDelete:const PostActions = ({ post, - handleDelete, }: { post: PostWithUserData; - handleDelete: (postId: string) => void; }) => { -
Add the
removePostaction from store:const removePost = useStore((state) => state.removePost); -
Import
useStoreand thedeletePostAPI function:import { deletePost } from "@/lib/api"; import { useStore } from "@/lib/store"; -
Define an inner
handleDeletefunction:const handleDelete = async (postId: string) => { await deletePost(postId); removePost(postId); };
Run the app and try deleting a post. It should work!
Take note of the log messages that indicate the delete process was executed through the API and the app store:
Stage and commit all changes.
git add .
git commit -m "Add Zustand store"
Step 5: Custom Hooks
In the previous step, we refactored our Posts app to use Zustand for global state management. We created a new file, store.ts, to define and export a global store using the create function from Zustand. Additionally, we moved all type declarations to a new file called types.ts and updated import statements accordingly. To eliminate prop drilling, we replaced useState with useStore in several components. As a result, the handleDelete operation is defined in the PostActions component.
Make note of these two code segments:
-
The
useEffectin thePostscomponent:useEffect(() => { const loadPosts = async () => { const fetchedPosts = await fetchPosts(); setPosts(fetchedPosts); }; loadPosts(); }, []); -
The
handleDeletein thePostActionscomponent:const handleDelete = async (postId: string) => { await deletePost(postId); removePost(postId); };
These functions exhibit common patterns for developing web applications that involve making a call to an API and updating the application state based on the result of that call. In the first code segment, we use useEffect to fetch data from the server when the component mounts. Once the data is fetched, we use the setPosts function to update the state of the Posts component with the fetched data. In the second code segment, we make a delete request to the API to remove the post from the server. Once the operation is successful, we update the global state of the application and remove the deleted post.
Creating custom hooks is a common practice to further abstract these processes. We will explore that in this section.
In React, a custom hook is a function that starts with the word "use" and allows you to extract common logic into a reusable function. Here is a simple and contrived example:
import { useState, useEffect } from "react";
export const useCounter = (initialValue: number, step: number) => {
const [count, setCount] = useState(initialValue);
const increment = () => {
setCount(count + step);
};
const decrement = () => {
setCount(count - step);
};
useEffect(() => {
console.log(`Count is now ${count}`);
}, [count]);
return { count, increment, decrement };
};
This hook allows you to create a counter that you can increment or decrement by a specified step. The hook returns the current count value and functions to increment or decrement the count. It also logs the current count value to the console whenever it changes.
To use this custom hook in a component, you can do the following:
import { useCounter } from "./useCounter";
const Counter = () => {
const { count, increment, decrement } = useCounter(0, 1);
return (
<div>
<p>Count: {count}</p>
<button onClick={increment}>Increment</button>
<button onClick={decrement}>Decrement</button>
</div>
);
};
This component will display a counter with a current count value and buttons to increment or decrement the count. The useCounter hook is used to create the counter and provide the necessary functions and state.
Custom hooks are a way to share stateful logic between multiple components without requiring the components to be nested in a specific order. By using custom hooks, we can make our code more reusable and easier to reason about. The reason why the function name must start with the word "use" is because that is how React defines hooks.
Create a file src/hooks/use-query-posts.tsx with the following content:
import { fetchPosts } from "@/lib/api";
import { useStore } from "@/lib/store";
import { useEffect } from "react";
function useQueryPosts() {
const posts = useStore((state) => state.posts);
const setPosts = useStore((state) => state.setPosts);
const loadPosts = async () => {
const fetchedPosts = await fetchPosts();
setPosts(fetchedPosts);
};
useEffect(() => {
loadPosts();
}, []);
return { posts };
}
export default useQueryPosts;
Now update the Posts component:
import Post from "./post";
import useQueryPosts from "@/hooks/use-query-posts";
const Posts = () => {
const { posts } = useQueryPosts()
return (
<div className="">
{posts.map((post) => (
<Post post={post} key={post.id} />
))}
</div>
);
};
export default Posts;
Notice how much simpler the Posts component became after using the useQueryPosts hook.
The term "query" in useQueryPosts is used to indicate that this custom hook is a declarative dependency on an asynchronous source of data. In other words, it is a way for components to specify what data they need and let the hook handle fetching that data from the server. This is similar to how a query works in a database, where we specify what data we need and the database engine does the work of finding and returning that data. By using the term "query" in the name of the hook, we're indicating that this is a way to declaratively fetch data from the server rather than imperatively writing code to fetch that data.
Create a file src/hooks/use-mutations-posts.tsx with the following content:
import { deletePost } from "@/lib/api";
import { useStore } from "@/lib/store";
function useMutationPosts() {
const removePost = useStore((state) => state.removePost);
const deletePostById = async (postId: string) => {
await deletePost(postId);
removePost(postId);
};
return { deletePostById };
}
export default useMutationPosts;
Now update the PostActions component:
import { DotsHorizontalIcon } from "@radix-ui/react-icons";

import { Button } from "@/components/ui/button";
import {
  DropdownMenu,
  DropdownMenuContent,
  DropdownMenuItem,
  DropdownMenuTrigger,
} from "@/components/ui/dropdown-menu";
import useMutationPosts from "@/hooks/use-mutation-posts";

const PostActions = ({ postId }: { postId: string }) => {
  const { deletePostById } = useMutationPosts();

  return (
    <DropdownMenu>
      <DropdownMenuTrigger asChild>
        <Button
          variant="ghost"
          className="flex h-8 w-8 p-0 data-[state=open]:bg-muted"
        >
          <DotsHorizontalIcon className="w-4 h-4" />
          <span className="sr-only">Open menu</span>
        </Button>
      </DropdownMenuTrigger>
      <DropdownMenuContent align="end" className="w-[160px]">
        <DropdownMenuItem>Edit post</DropdownMenuItem>
        <DropdownMenuItem
          className="text-red-500"
          onClick={() => deletePostById(postId)}
        >
          Delete post
        </DropdownMenuItem>
        <DropdownMenuItem>Copy link to post</DropdownMenuItem>
        <DropdownMenuItem className="text-red-500">
          Report post
        </DropdownMenuItem>
      </DropdownMenuContent>
    </DropdownMenu>
  );
};

export default PostActions;
Note that abstracting the logic for mutating posts will be very helpful, as it can be reused in other components. Additionally, the PostActions component abstracts several actions (delete, edit, report, etc.). If all of those logics were to be implemented here, this component would become unwieldy long.
The term "mutation" in useMutationPosts is used to indicate that this custom hook is a declarative dependency on an asynchronous operation that changes the state of the application. In other words, it is a way for components to specify what state they need to change and let the hook handle updating that state. This is similar to how a mutation works in a database, where we specify what data we want to update and the database engine does the work of updating that data. By using the term "mutation" in the name of the hook, we're indicating that this is a way to declaratively update the state of the application rather than imperatively writing code to update that state.
To wrap this step, stage and commit all changes.
git add .
git commit -m "Create custom hooks to query and mutate posts"