Task 9: Secure Post Endpoint
In the previous tasks, we implemented endpoints for user registration and authentication. Additionally, we created endpoints to perform CRUD operations on posts. Now, we want to secure certain operations on posts. For instance, only authenticated users should be able to create a post. To achieve this, we can include our authentication token (JWT) in the request to create a post. The server will then verify the token, and if it is valid, the request will be processed successfully. However, if the token is expired or invalid, the request will be rejected with a 401 Unauthorized error.
Step 1: Understanding Authorization Header
Normally, when creating a post, we make a POST request to the /posts endpoint and include the content (and optionally an image URL) in the request body (a.k.a., payload). We can also include the authentication token in the payload.
{
  "content": "This is a the content of my post!",
  "image": "https://placekitten.com/200/300",
  "access_token": "eyJhbGciOiJIUzI1NiIsInR5cCI6IkpXVCJ9.eyJ1c2VybmFtZSI6InRlc3QiLCJzdWIiOjIsImlhdCI6MTY5OTkzMDgwOSwiZXhwIjoxNjk5OTMwODY5fQ.46h0jC2cP95ow7kDgAOeSx35ii5kDMMAqGombKPLbB4"
}
It is more common to provide the authentication token part of the request header.
The HTTP protocol defines a set of headers that can be included in a request or response. Headers contain metadata about the request or response, providing additional information that helps the server and client communicate effectively.
Every HTTP request has a header that includes various fields. Some commonly used fields in the request header include:
- Authorization: Used to send authentication credentials, such as a token, to the server for validation.
- Content-Type: Specifies the format of the request payload, such as JSON or XML.
- Accept: Informs the server about the preferred response format, allowing the server to send the response in the desired format.
- User-Agent: Identifies the client making the request, typically including information about the browser or application.
- Cache-Control: Specifies caching directives for the response, allowing clients and intermediaries to cache the response or control caching behavior.
These headers, among others, help define the behavior of the request and provide context to the server. By including relevant headers, clients can communicate their requirements and preferences to the server, enabling a smoother and more efficient interaction.
So instead of passing the JWT in the request body, we will pass it in the request header through the Authorization field. We’ll see how this can be done in the next step.
Step 2: Understanding Bearer Token
The following code snippet shows an example of using the Fetch API to create a post:
const apiUrl = "http://localhost:3000/posts";
const jwtToken = "eyJhbGciOiJIUzI1NiIsInR5cCI6IkpXVCJ9.eyJ1c2VybmFtZSI6InRlc3QiLCJzdWIiOjIsImlhdCI6MTY5OTkzMDgwOSwiZXhwIjoxNjk5OTMwODY5fQ.46h0jC2cP95ow7kDgAOeSx35ii5kDMMAqGombKPLbB4";

const postData = {
  content: "This is the content of my post!",
};

fetch(apiUrl, {
  method: "POST",
  headers: {
    "Content-Type": "application/json",
    "Authorization": `Bearer ${jwtToken}`,
  },
  body: JSON.stringify(postData),
})
  .then((response) => {
    if (response.ok) {
      return response.json();
    } else {
      throw new Error("Failed to create post");
    }
  })
  .then((data) => {
    console.log("Post created successfully:", data);
  })
  .catch((error) => {
    console.error("Error creating post:", error.message);
  });
Take note of the Authorization field in the headers, which is set as "Bearer " followed by the JSON Web Token (JWT). The term "Bearer" has a specific meaning in this context. Let's break it down for better understanding:
- Historical Context: The term "Bearer" originates from the OAuth 2.0 specification, where it denotes a type of access token.
- Meaning: In the context of HTTP authentication, "Bearer" essentially means "the one who bears or holds." When you use a Bearer token, it implies that the token holder is authorized to access the resource. As long as the token is valid, the server trusts that the token holder has already been authenticated and authorized, without requiring additional proof of identity.
- Simplicity: The Bearer scheme does not require the client to be pre-registered with the server. It is a stateless authentication mechanism, where the user's state is not stored on the server. This simplicity is particularly effective for REST APIs and web services.
To set the bearer token in Postman, first log in using valid user credentials:
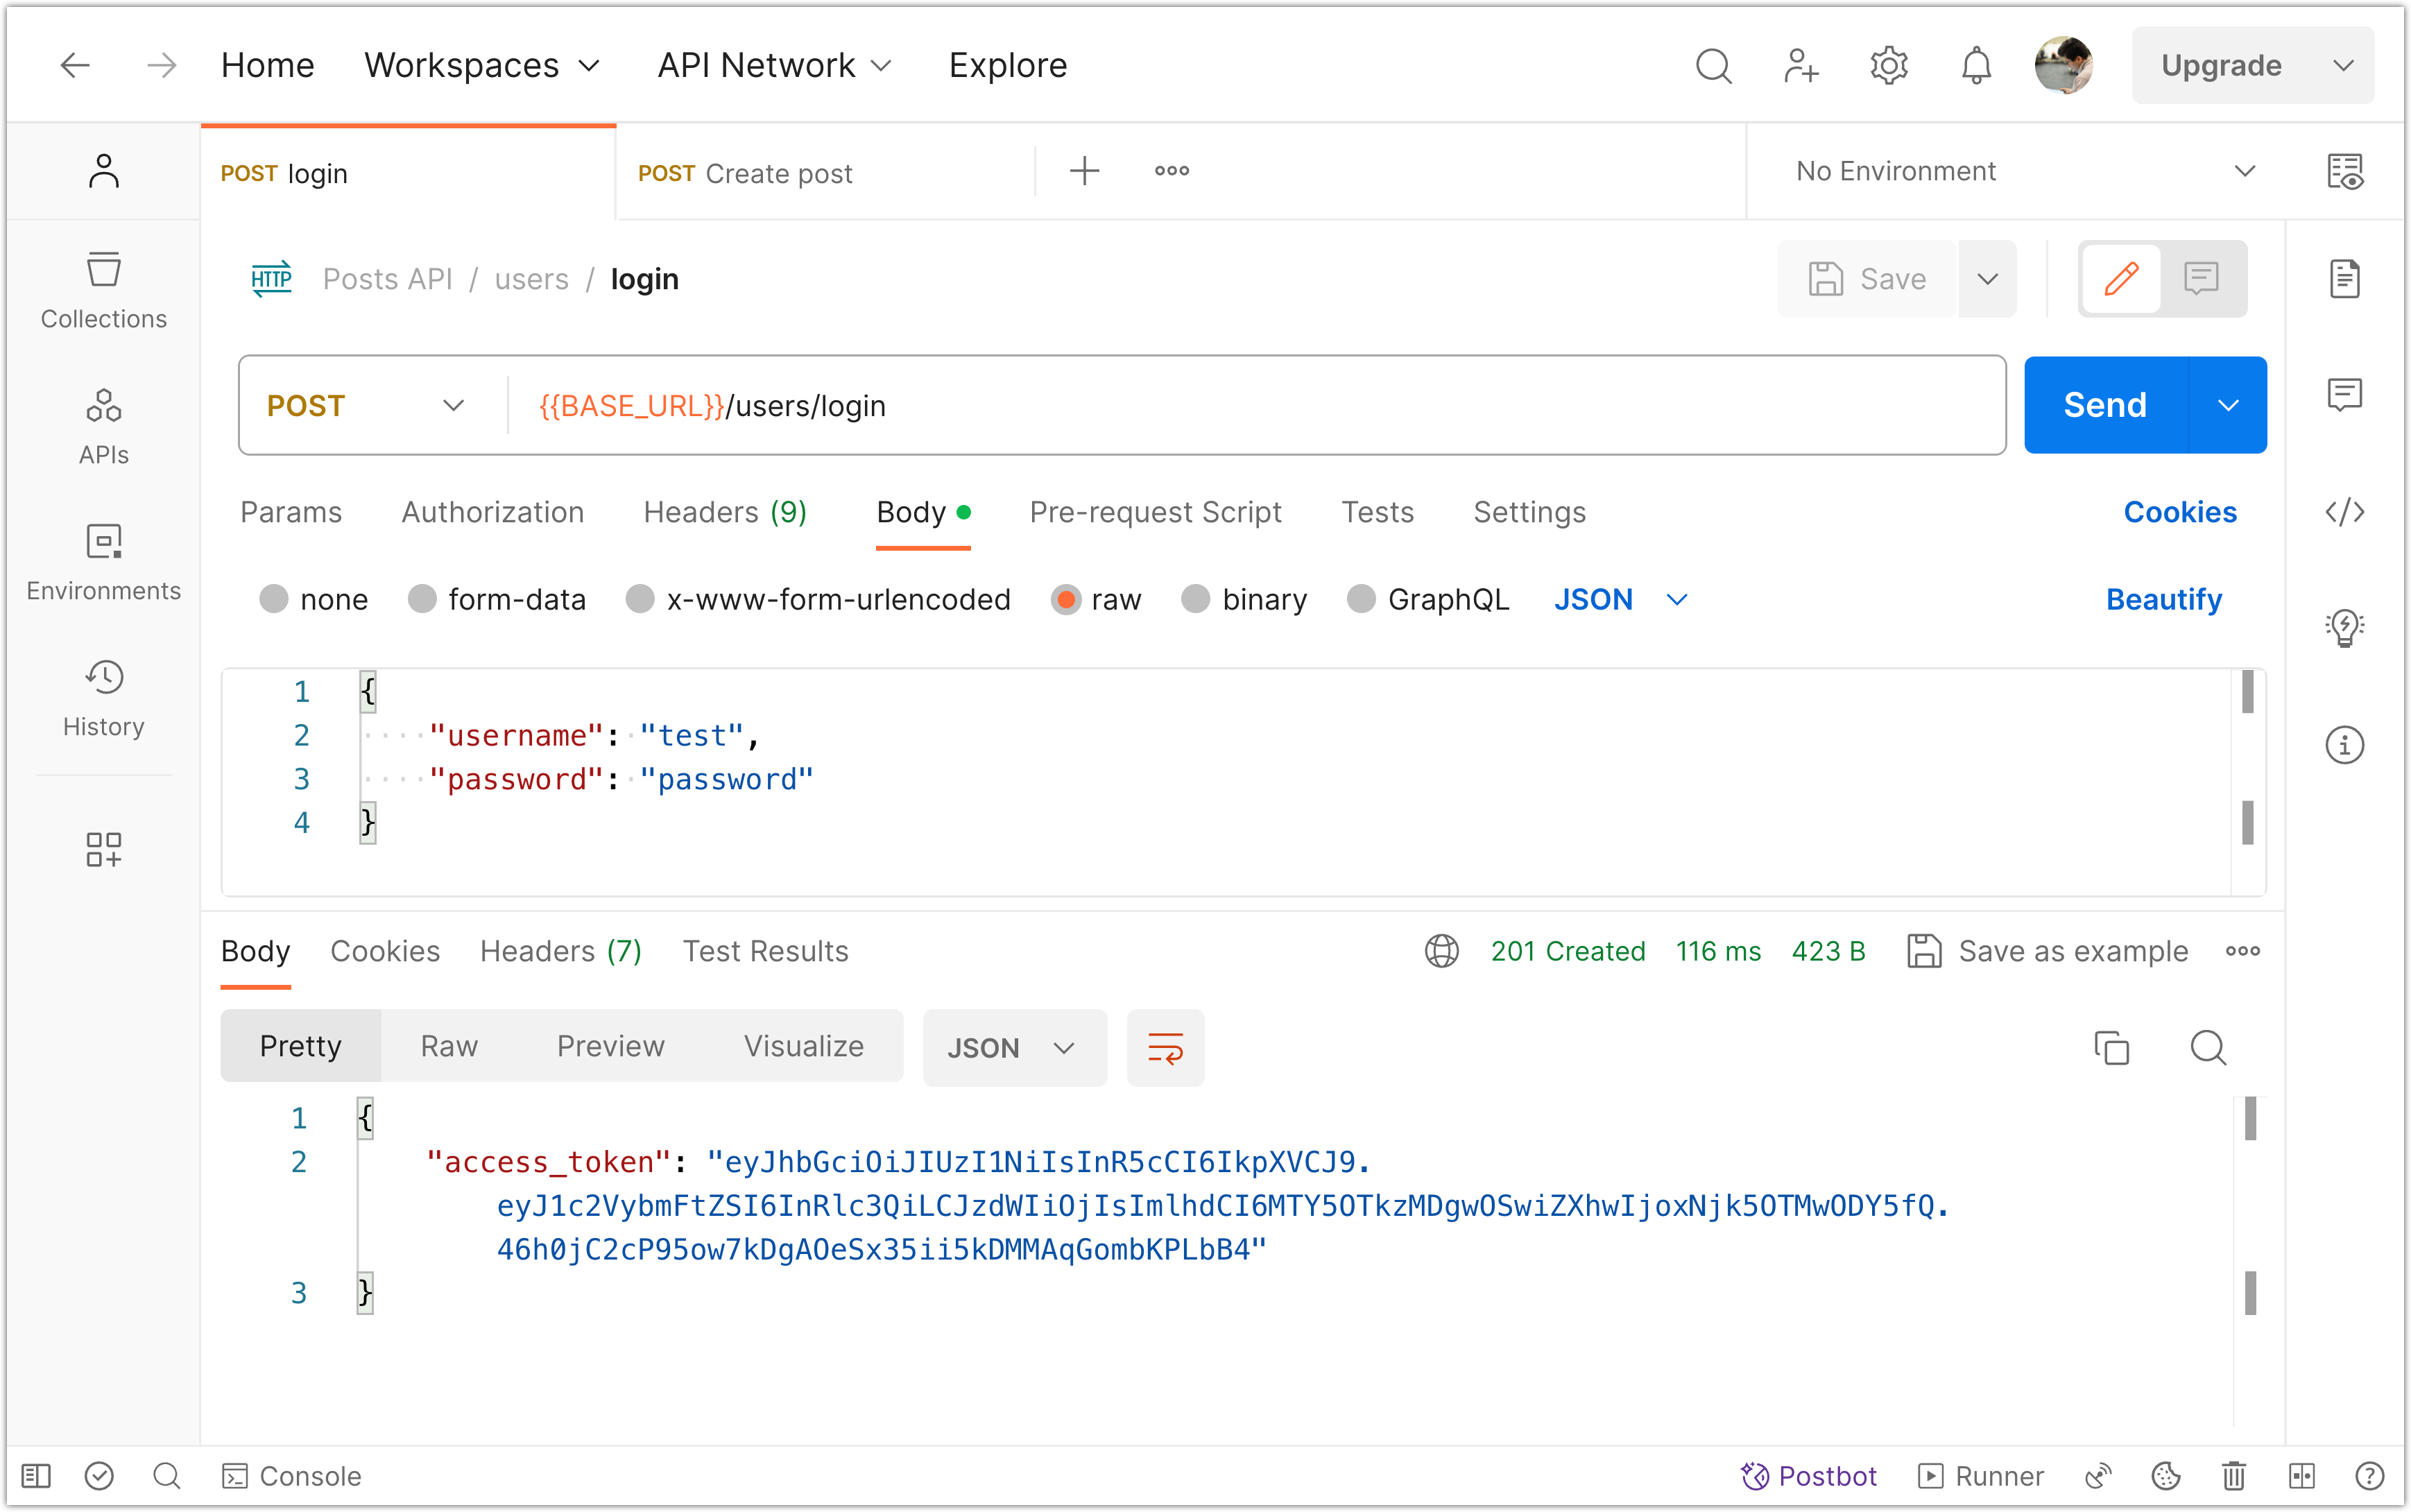
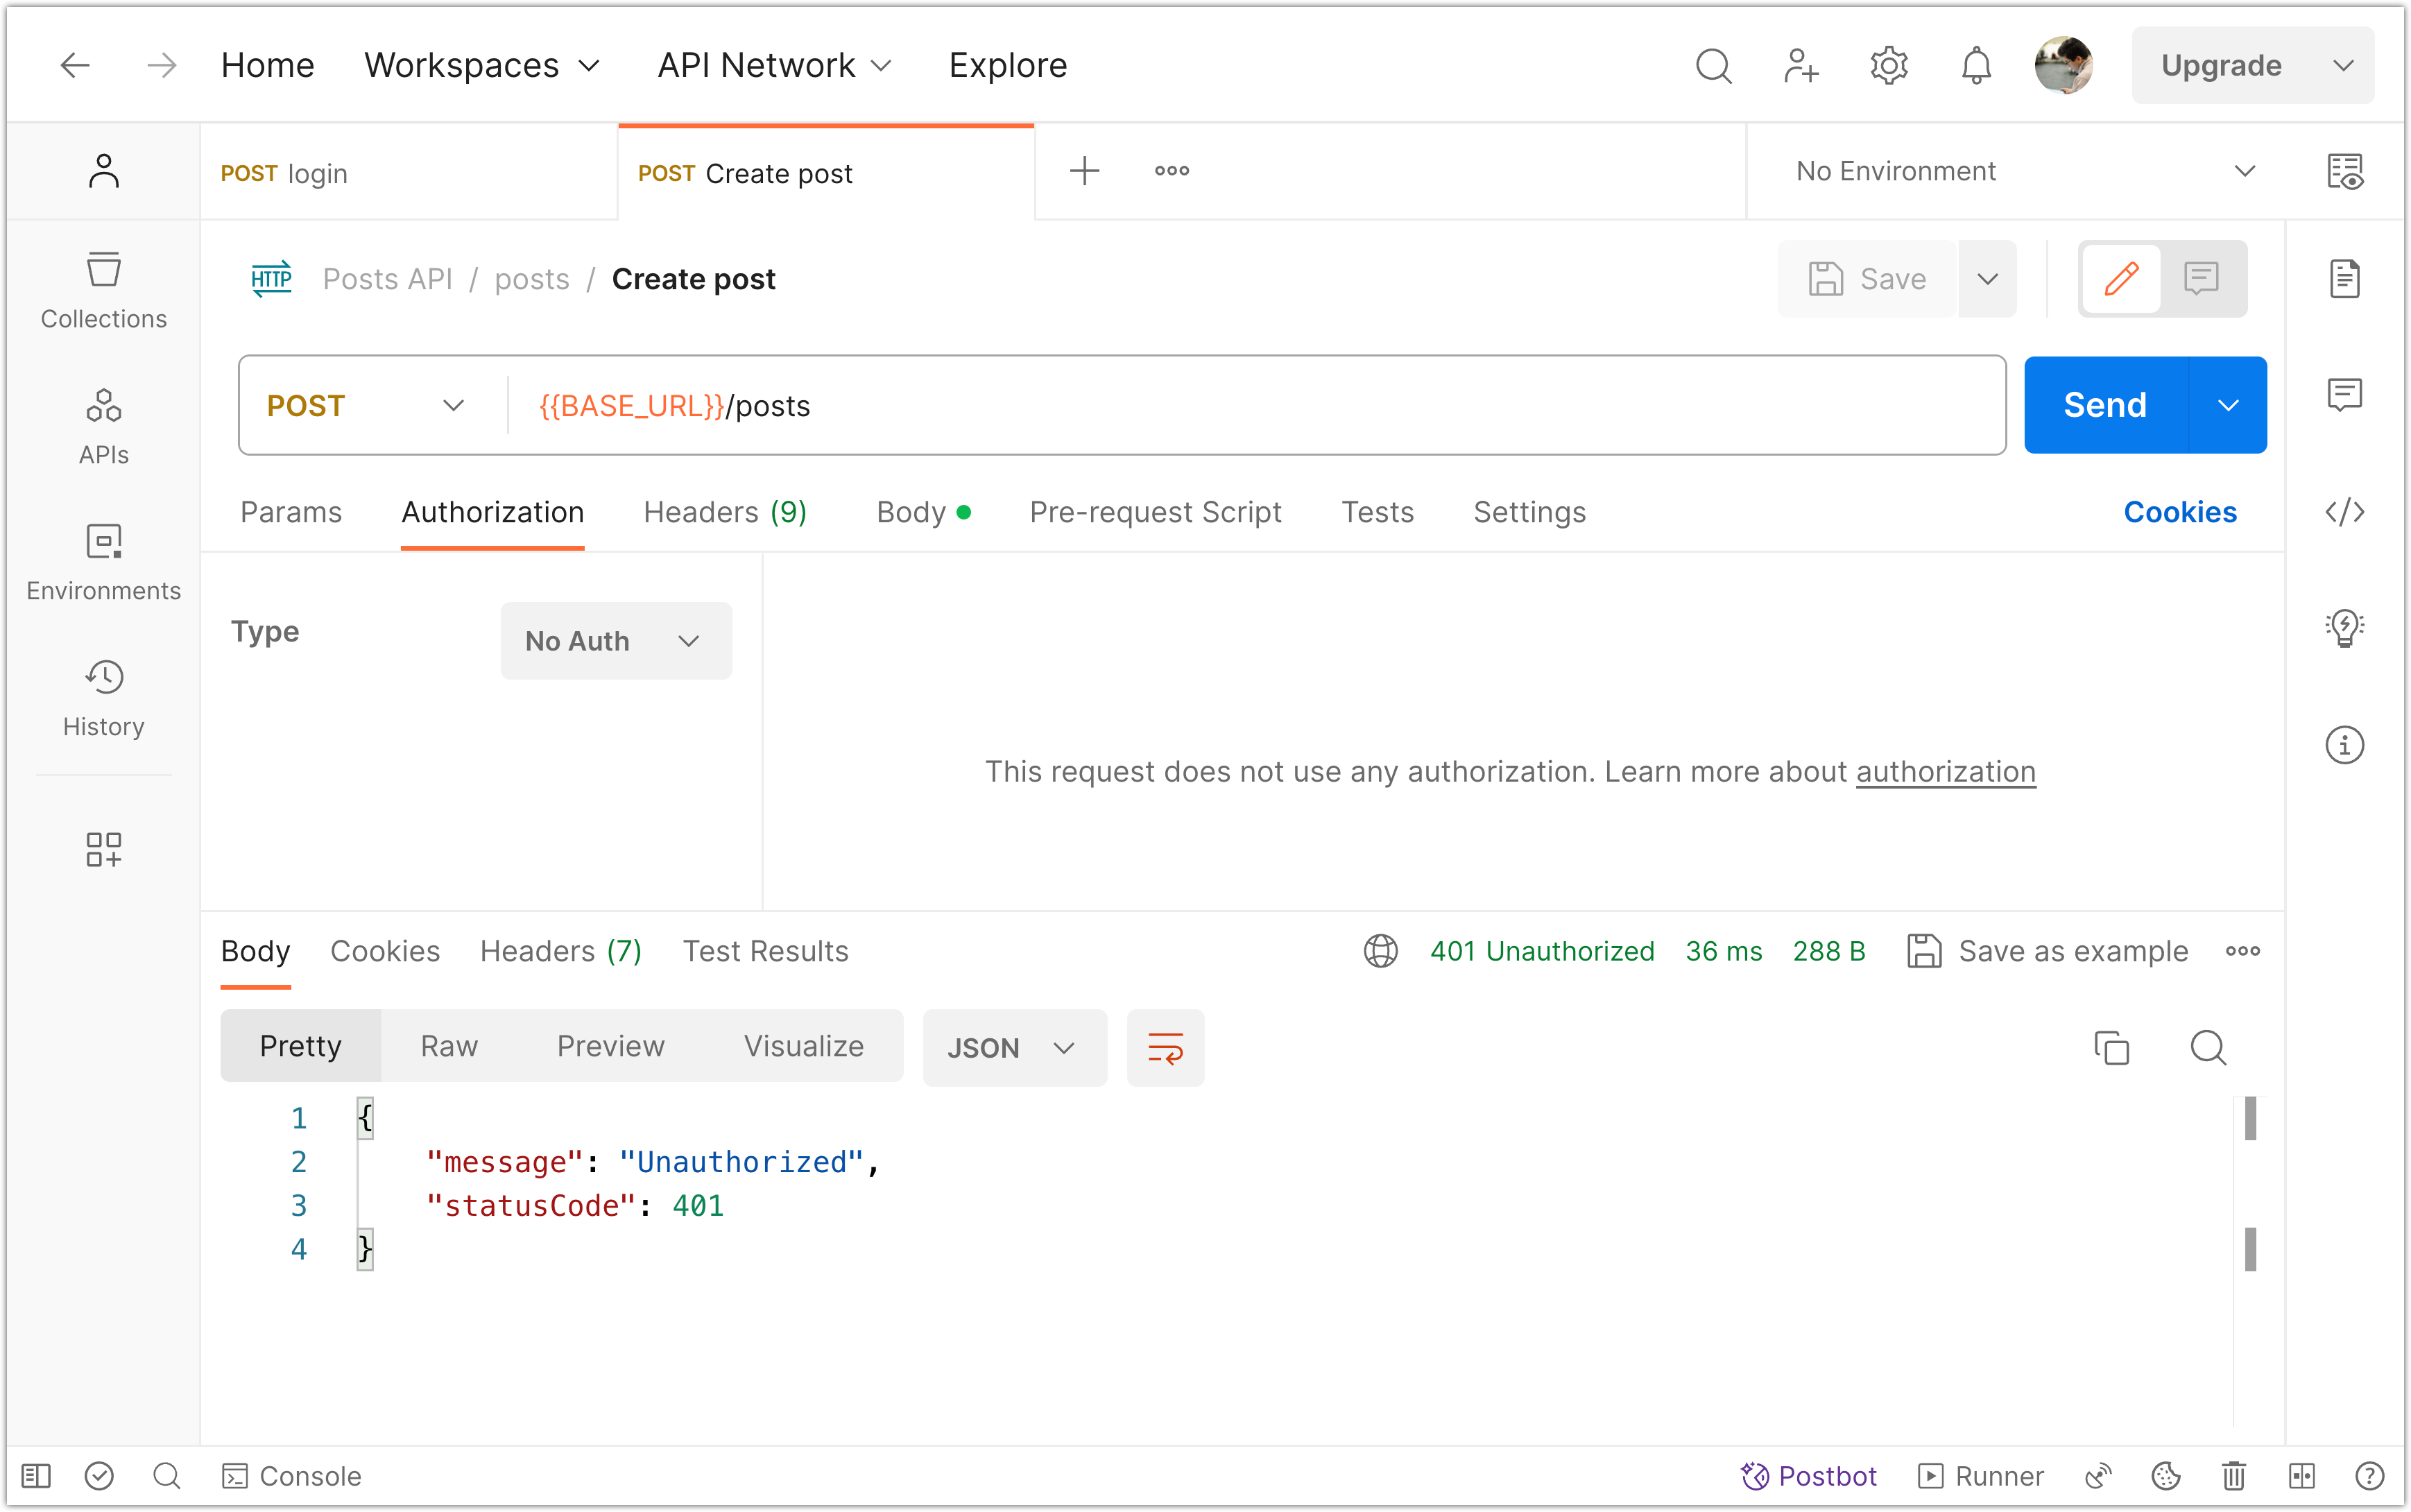
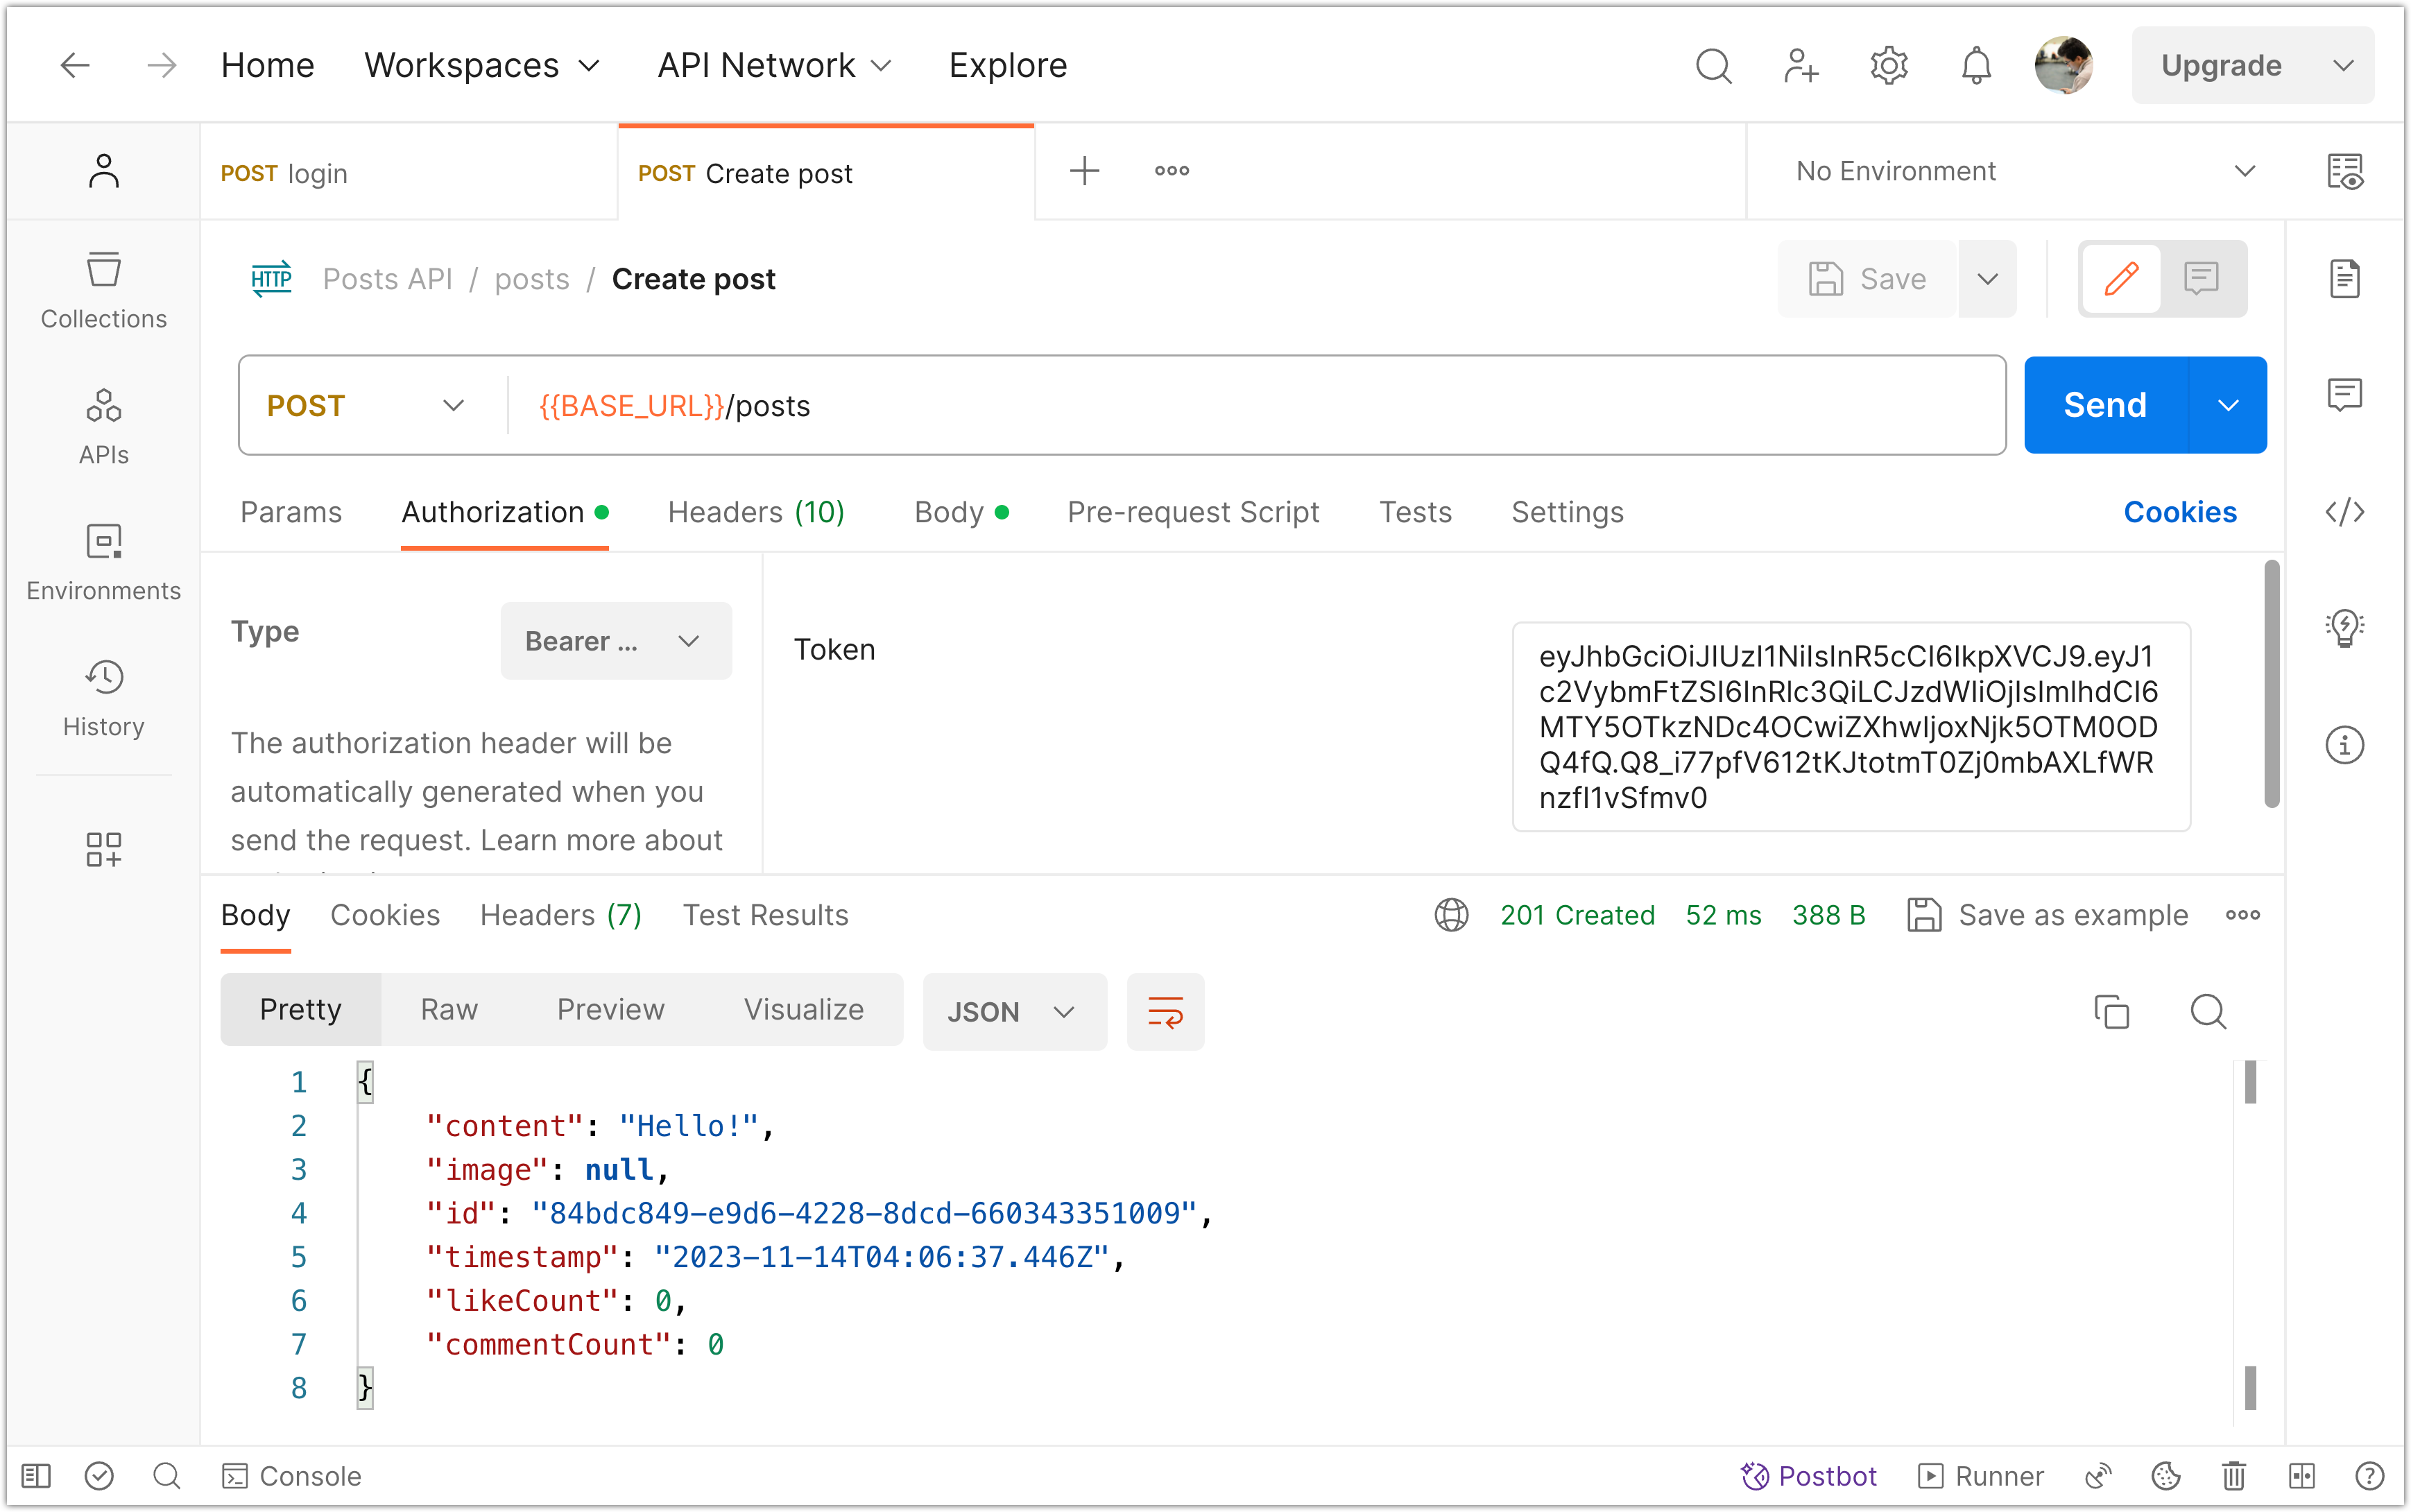
Next, make a new request to create a post. In the request builder, go to the "Authorization" tab. From the available options under "Type", choose "Bearer Token". Then, enter the value of your access token (JWT) in the Token field.

Clicking "Send" will send the request with the bearer token included in the header.
The server can then extract the bearer token from the Authorization header and use it to authenticate and authorize the client. Once authenticated, the server can grant or deny access to the requested resources based on the permissions associated with the token.
Step 3: Create an Authentication Guard
Now that you have learned how to pass a JWT as a bearer token via the authorization header of a request, we can proceed to implement the server-side of JWT authentication.
- Create a folder named
guardsinside thesrcfolder. - Inside the
guardsfolder, add a file namedjwt-auth.guard.ts. - Open the
jwt-auth.guard.tsfile and add the following content:
import { Injectable } from '@nestjs/common';
import { AuthGuard } from '@nestjs/passport';

@Injectable()
export class JwtAuthGuard extends AuthGuard('jwt') {}
The provided code is for creating an authentication guard in a NestJS application.
💡 In NestJS, guards are a fundamental concept that allows you to handle incoming requests and control access to routes and resources. They act as middleware, intercepting requests and performing checks or transformations before allowing the request to proceed to the route handler.
An authentication guard, specifically, is a type of guard that focuses on authenticating and authorizing incoming requests. It verifies the identity of the client making the request and determines if they have the necessary permissions to access the requested resource.
In the provided code, the JwtAuthGuard is an authentication guard that extends the AuthGuard class provided by NestJS. It is specifically designed to work with JWT for authentication.
When applied to a route, the JwtAuthGuard will check if the request contains a valid JWT in the authorization header. If the JWT is valid, the guard allows the request to proceed to the route handler. If the JWT is missing or invalid, the guard will block the request and return an unauthorized status code (401).
To use this authentication guard, it should be applied to the relevant routes in the controller. We will explore this in the following step.
Please commit your changes to version control:
git add .
git commit -m "Create an Authentication Guard"
Step 4: Apply the Authentication Guard
Open the posts.controller.ts file and add the following import statements:
import { UseGuards } from '@nestjs/common';
import { JwtAuthGuard } from 'src/guards/jwt-auth.guard';
Now annotate the create operation with @UseGuards(JwtAuthGuard):
@UseGuards(JwtAuthGuard)
@Post()
async create(@Body() createPostDto: CreatePostDto): Promise<PostResponseDto> {
  const userId = 1; // TODO: get userId from JWT token
  const post = await this.postsService.create(createPostDto, userId);
  delete post.userId;
  return post;
}
Next, runt the Nest app and make a post request to create a post. First, do this without providing any authentication token (but don’t forget to provide the post content through the request body). You should get 401 “Unauthorized” error.
Next, login and provide your JWT as a bearer token as described in the previous step. You should receive a 201 success response.
To apply the JwtAuthGuard authentication guard to all operations in the PostsController, you can decorate the controller class itself. This will ensure that all operations within the controller require authentication.
@UseGuards(JwtAuthGuard)
@Controller('posts')
export class PostsController {
  // ...
}
By adding the @UseGuards(JwtAuthGuard) decorator to the controller class, all routes within the PostsController will require a valid JWT token for authentication. This means that unauthenticated users will not be able to access any operations within the controller.
However, if you want to selectively apply the authentication guard to specific operations, you can decorate each operation individually:
@Controller('posts')
export class PostsController {
  constructor(private readonly postsService: PostsService) {}

  @Get()
  async findAll(): Promise<PostResponseDto[]> {
    // Get all posts
  }

	@Get(':id')
	async findOne(@Param('id') id: string): Promise<PostResponseDto> {
	  // Get one post
	}

  @UseGuards(JwtAuthGuard)
  @Post()
  async create(@Body() createPostDto: CreatePostDto): Promise<PostResponseDto> {
    // Create a new post (requires authentication)
  }

  @UseGuards(JwtAuthGuard)
  @Patch(':id')
  async update(
    @Param('id') id: string,
    @Body() updatePostDto: UpdatePostDto,
  ): Promise<PostResponseDto> {
    // Update an existing post (requires authentication)
  }

  @UseGuards(JwtAuthGuard)
  @Delete(':id')
  async remove(@Param('id') id: string): Promise<{ statusCode: number; message: string }> {
    // Delete a post (requires authentication)
  }
}
In this example, the findAll and findOne operations do not require authentication, while the create, update, and remove operations require authentication. This allows unauthenticated users to view posts but requires authentication for operations such as creating, updating, and deleting posts.
Please commit your changes to version control:
git add .
git commit -m "Apply the Authentication Guard"
Step 5: Extract the userId from JWT
Currently, we have hardcoded the userId in the create operation as shown below.
@UseGuards(JwtAuthGuard)
@Post()
async create(@Body() createPostDto: CreatePostDto): Promise<PostResponseDto> {
  const userId = 1; // TODO: get userId from JWT token
  const post = await this.postsService.create(createPostDto, userId);
  delete post.userId;
  return post;
}
The userId serves as the foreign key in the post table and helps establish the relationship between a post and the user who created it. We need to extract this information from the bearer token.
The good news is that the @nestjs/jwt module does most of the work for us. It intercepts the incoming requests, decodes the bearer token, and attaches the encoded user information to a request object that can be accessed in any of the controllers.
@UseGuards(JwtAuthGuard)
@Post()
async create(
  @Body() createPostDto: CreatePostDto,
  @Req() request: Request,               // <-- Add this line
): Promise<PostResponseDto> {
  const user = (request as any).user;    // <-- Add this line
  console.log(user);                     // <-- Add this line

  const userId = 1; // TODO: get userId from JWT token
  const post = await this.postsService.create(createPostDto, userId);
  delete post.userId;
  return post;
}
The lines commented with // <-- Add this line in the code are as follows:
@Req() request: Request: This line is a parameter decorator in NestJS used to retrieve the HTTP request object. It injects therequestobject from the underlying platform (e.g., Express) into thecreatemethod, allowing access to the request's properties and data.const user = (request as any).user;: This line retrieves theuserproperty from therequestobject. In this context, it assumes that the JWT authentication middleware has added the authenticated user's information to theuserproperty of the request object. The linter does not know that thisuserproperty has been added to therequestobject, so we will get linting errors if we directly accessrequest.user. The casting ofrequestasanyis a temporary solution to bypass the linting errors. A better approach would be to define a custom interface for the request object that includes theuserproperty, ensuring type safety.console.log(user);: This line logs theuserobject to the console, providing a way to inspect the authenticated user's information. It can be helpful for debugging and understanding what user data is available in the request.
If you make a POST request to create a new post, the user object will be printed to the console.

As seen in the image, we can get the userId from the user property attached to the request by the jwt middleware. A more elegant way of doing this would be to create a Nest.js decorator. We'll explore this next.
Step 6: Create @UserId() Decorator
In Nest.js, a decorator is a special kind of function that can be attached to a class declaration, method, property, or parameter. Decorators are used to modify or extend the behavior of the target they are applied to.
Decorators are widely used in Nest.js to define routes using the @Controller decorator, to handle HTTP requests using the @Get, @Post, @Put, @Delete decorators, and to apply middleware using the @UseGuards, @UseInterceptors, and @UsePipes decorators.
We can also create our own custom decorators! To do this, follow these steps:
- Create a folder named
decoratorsinside thesrcfolder. - Inside the
decoratorsfolder, add a file nameduser-id.decorator.ts. - Open the
user-id.decorator.tsfile and add the following content:
import { createParamDecorator, ExecutionContext } from '@nestjs/common';
import { Request } from 'express';

export interface RequestWithUser extends Request {
  user: {
    userId: number;
    username: string;
  };
}

export const UserId = createParamDecorator(
  (data: unknown, ctx: ExecutionContext) => {
    const request = ctx.switchToHttp().getRequest(); // Switching to HTTP context and getting the req object
    const user = (request as RequestWithUser).user;
    return user.userId;
  },
);
Let's break it down:
- The
createParamDecoratorfunction is imported from the@nestjs/commonpackage. This function is used to create custom decorators in NestJS. - The
Requestinterface is imported from theexpresspackage. This interface represents an HTTP request in Node.js. - The
RequestWithUserinterface extends theRequestinterface and adds auserproperty, which contains theuserIdandusername. - The
UserIddecorator is created using thecreateParamDecoratorfunction. This decorator can be used to extract theuserIdfrom the request object in a route handler. - The decorator function takes two parameters:
dataandctx(short for context). Thedataparameter is not used in this implementation. Thectxparameter represents the execution context of the route handler. - Inside the decorator function, the
getRequestmethod is called on thectx.switchToHttp()object to get the current request object. This is necessary because the decorator is executed in a different context than the route handler. - The
requestobject is typecasted toRequestWithUserto access theuserproperty, which contains theuserId. - Finally, the
userIdis returned from the decorator function.
This decorator can be used in a route handler as follows:
@UseGuards(JwtAuthGuard)
@Post()
async create(
  @Body() createPostDto: CreatePostDto,
  @UserId() userId: number,               // <-- Add this line
): Promise<PostResponseDto> {
  const post = await this.postsService.create(createPostDto, userId);
  delete post.userId;
  return post;
}
In this example, the UserId decorator is applied to the userId parameter. When the route handler is called, the decorator extracts the userId from the request object and passes it as an argument to the route handler function.
Please commit your changes to version control:
git add .
git commit -m "Create @UserId() Decorator"
Step 7: Implement an Authorization Check
A user should not be authorized to update or delete another user’s post. To prevent a user from updating or deleting another user's post, we can implement an authorization check. This involves comparing the userId extracted from the JWT with the userId field of the post that the user is trying to access.
@UseGuards(JwtAuthGuard)
@Patch(':id')
async update(
  @Param('id') id: string,
  @Body() updatePostDto: UpdatePostDto,
  @UserId() userId: number,
): Promise<PostResponseDto> {
  let post = await this.postsService.findOne(id);

  if (!post) {
    throw new NotFoundException(`Post with ID ${id} not found`);
  } else if (post.userId !== userId) {
    throw new ForbiddenException();
  }

  post = await this.postsService.update(id, updatePostDto);
  delete post.userId;
  return post;
}
The JwtAuthGuard ensures that the user is authenticated before accessing this route. Once authenticated, an additional authorization check is performed. Inside the route handler, the userId is compared to the userId field of the post being updated. If the userId does not match, indicating that the user is not the owner of the post, a ForbiddenException is thrown. This exception results in a 403 Forbidden response, indicating that the user is not authorized to perform the operation.
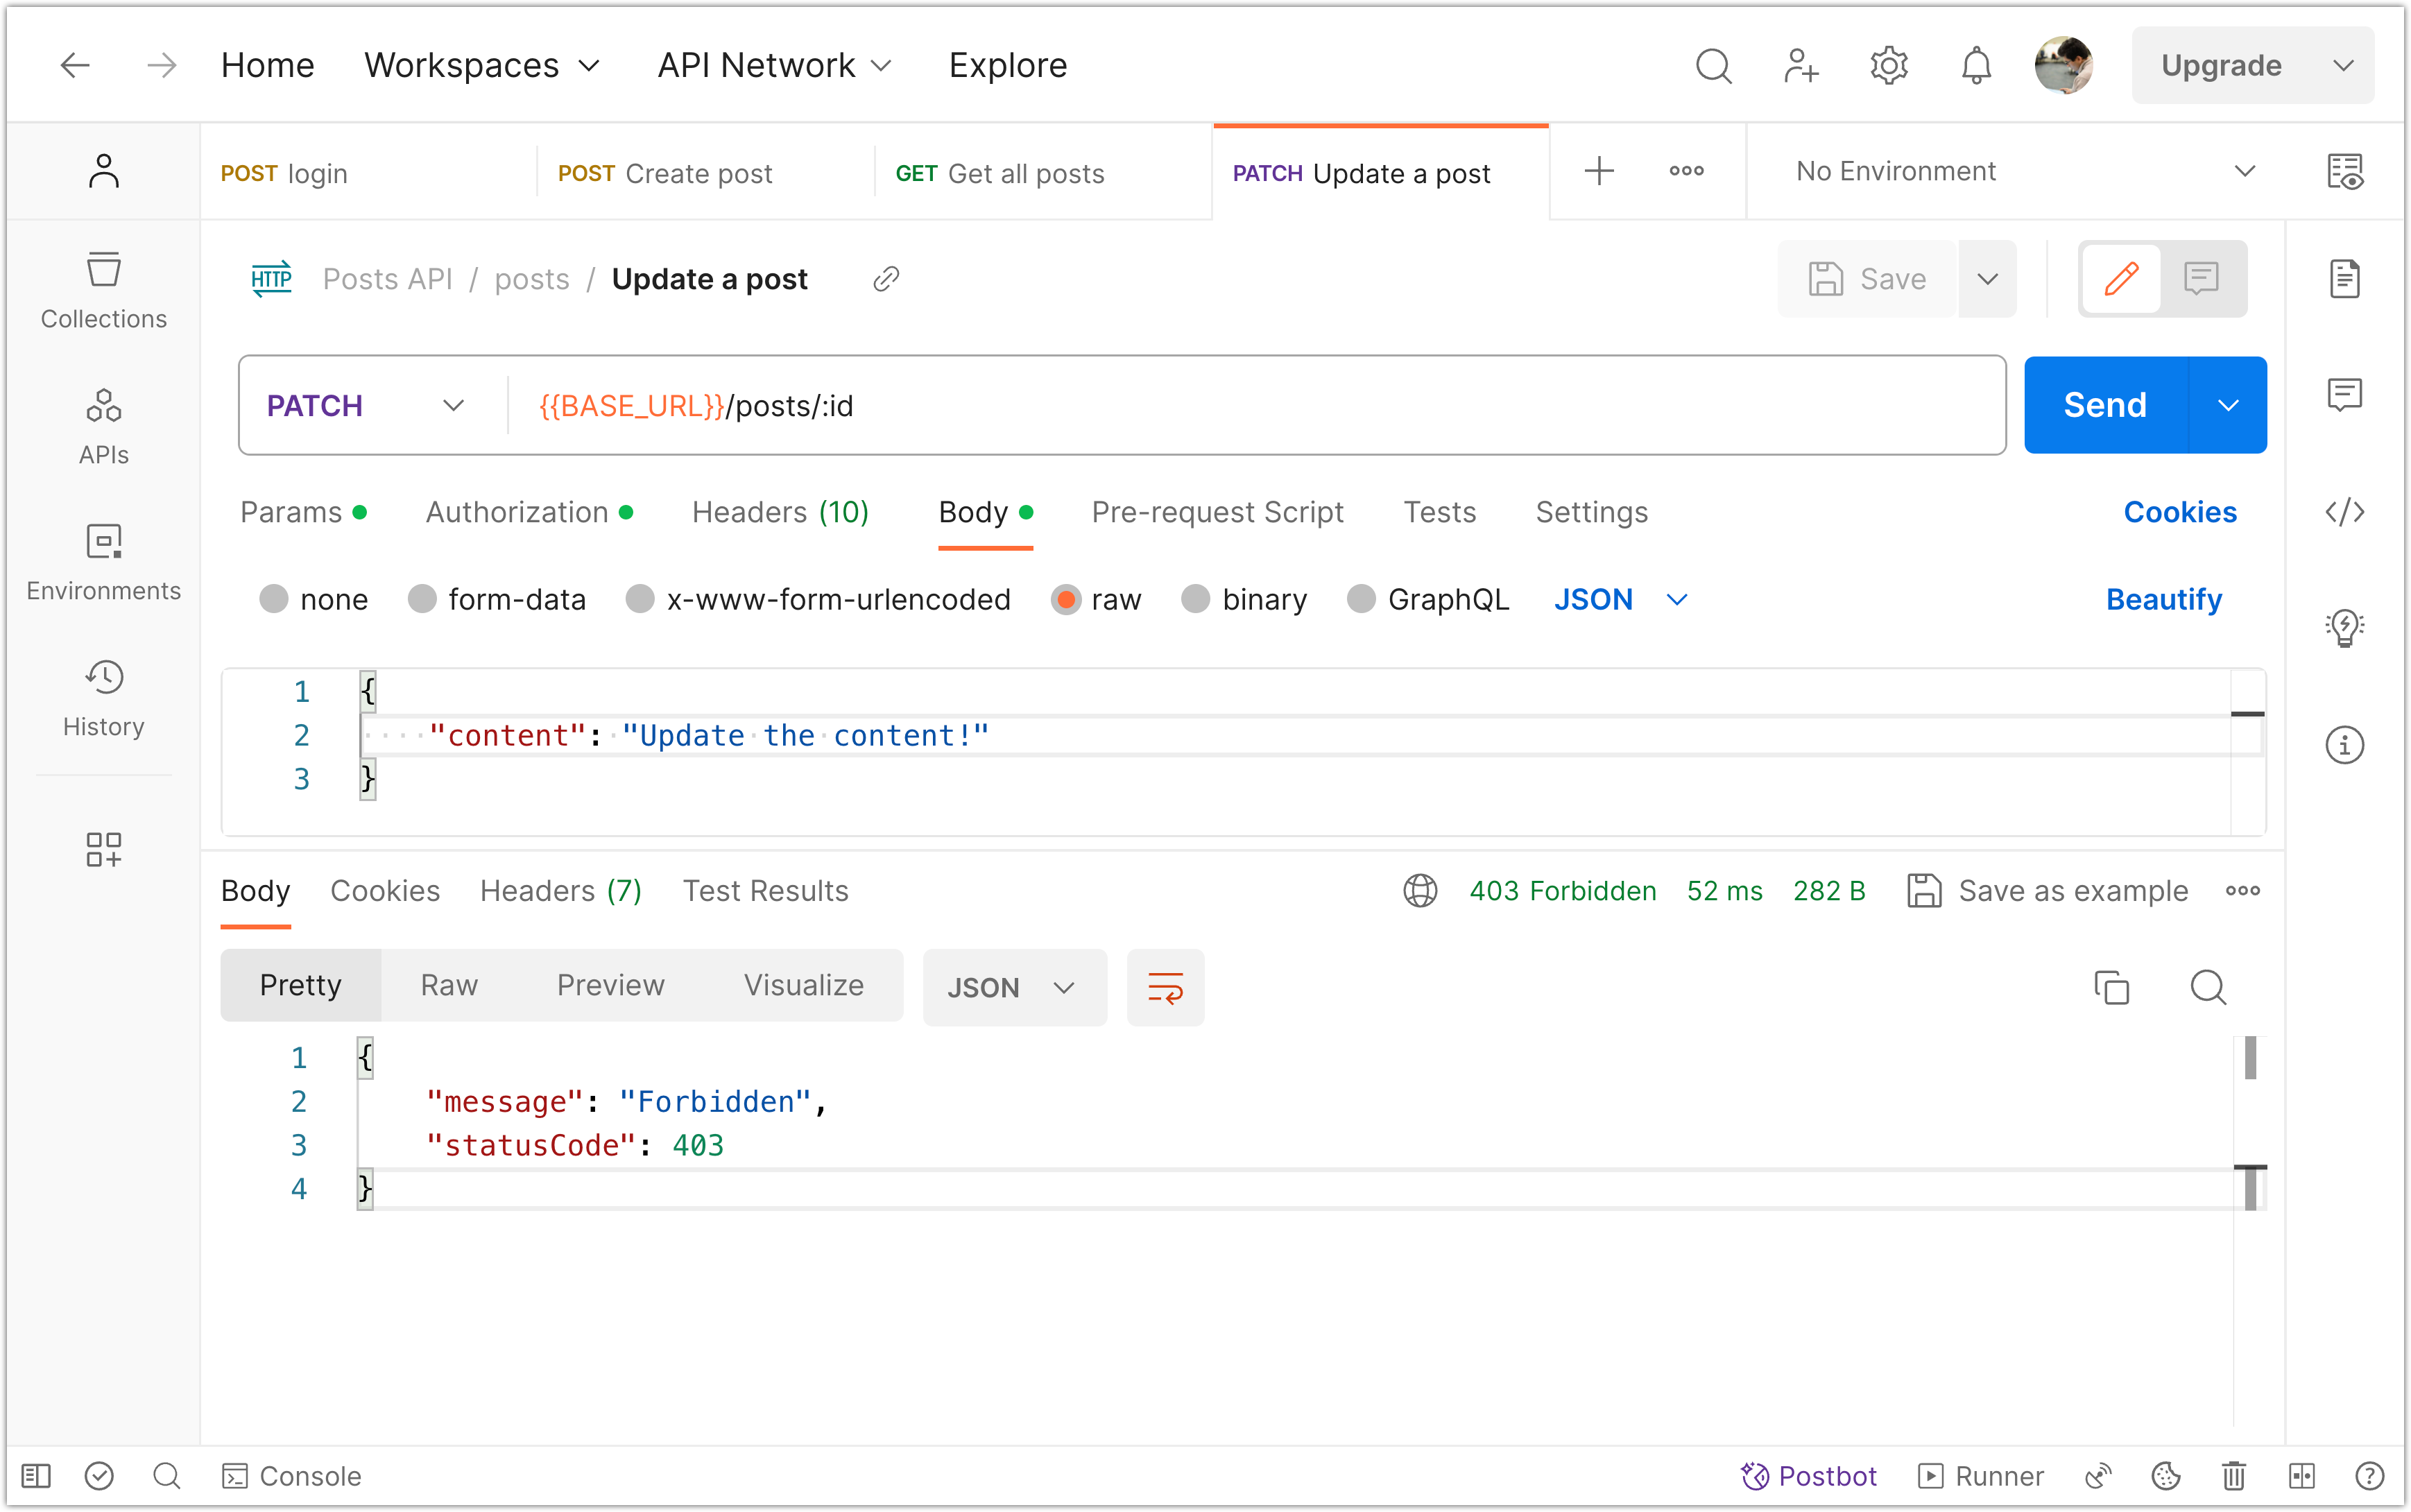
To test this behavior in Postman, try updating a post that belongs to another user. The response will be a 403 Forbidden status, indicating that the operation is not allowed.
By combining authentication with authorization checks, this code ensures that only authenticated users with the appropriate permissions can perform certain actions on posts. Unauthorized access attempts are prevented, enhancing the security of the application.
Step 8: Create an Authorization Guard
To perform authorization checks in a more elegant way, we can create an authorization guard.
💡 In Nest.js, an authorization guard is a technique used to restrict access to certain routes or resources based on user permissions or roles. It provides a clean and reusable approach to implementing authorization logic.
To create an authorization guard, follow these steps:
- Inside the
guardsfolder, create a file namedpost-owner.guard.ts. - Open the
post-owner.guard.tsfile and add the following content:
import {
  Injectable,
  CanActivate,
  ExecutionContext,
  BadRequestException,
  NotFoundException,
} from '@nestjs/common';
import { Reflector } from '@nestjs/core';

import { RequestWithUser } from 'src/decorators/user-id.decorator';
import { PostsService } from 'src/posts/posts.service';

@Injectable()
export class PostOwnershipGuard implements CanActivate {
  constructor(
    private reflector: Reflector,
    private postService: PostsService,
  ) {}

  async canActivate(context: ExecutionContext): Promise<boolean> {
    const request = context.switchToHttp().getRequest();

    // Get the user id from the request object
    const user = (request as RequestWithUser).user;
    const userId = user.userId;
    // The JWT strategy will throw an error if it fails to validate the token

    // Get the post id from the request params
    const postId = request.params.id;

    // If postId is not provided
    if (!postId) {
      throw new BadRequestException('Invalid or missing post ID');
    }

    const post = await this.postService.findOne(postId);

    // If post does not exist
    if (!post) {
      throw new NotFoundException(`Post with ID ${postId} not found`);
    }

    // Check if the post belongs to the user
    return post.userId == userId;
  }
}
In the code above, the PostOwnershipGuard class implements the CanActivate interface. This interface requires the implementation of the canActivate() function, which determines whether the current request is allowed to proceed.
The PostOwnershipGuard constructor injects two services:
Reflector: Used for metadata reflection (not directly used in this guard).PostsService: A service used to interact with post data.
The canActivate method receives the ExecutionContext, which provides details about the current request. From this, the method extracts the user ID and post ID. It then performs the necessary checks and returns a boolean value indicating whether the post belongs to the user who is accessing it or not.
Step 9: Apply the Authorization Guard
Let's apply the authorization guard to the PATCH and DELETE handlers:
@UseGuards(JwtAuthGuard, PostOwnershipGuard)
@Patch(':id')
async update(
  @Param('id') id: string,
  @Body() updatePostDto: UpdatePostDto,
): Promise<PostResponseDto> {
  const post = await this.postsService.update(id, updatePostDto);
  delete post.userId;
  return post;
}

@UseGuards(JwtAuthGuard, PostOwnershipGuard)
@Delete(':id')
async remove(
  @Param('id') id: string,
): Promise<{ statusCode: number; message: string }> {
  await this.postsService.remove(id);
  return {
    statusCode: 200,
    message: 'Post deleted successfully',
  };
}
To test the behavior of the app in Postman, try updating or deleting a post that belongs to another user. The response will be a 403 Forbidden status, indicating that the operation is not allowed. Then, try updating and deleting a post that belongs to the user. The response should be a 200 Ok.
Please commit your changes to version control:
git add .
git commit -m "Create and Apply Authorization Guard"
Step 10: Test Auth Guard with Postman
To ensure everything is working correctly, follow these steps to test the application using Postman:
- Stop your Docker container and delete it.
- Start the Docker container again by running
pnpm docker:up. - Start the API server by running
pnpm start:dev. - Register three users with the usernames
user-1,user-2, anduser-3. - Log in with each user one by one and create a post on their behalf. Use a content such as "A post from user-1" to identify which user the post belongs to. Remember that you need to provide your authentication token through the authorization header in order to create a post.
- After logging in with each user, choose one of the users (e.g.,
user-2) and log in on their behalf. - Make a GET request to
/postsin order to retrieve all the posts. You should be able to do this without including any authorization header. - Select one of the posts (preferably not by
user-2) and copy its ID. Then, make a GET request to/posts/:id, where:idis the ID of the post you just copied. You should be able to access this post without any issues. - Try to update a post that belongs to another user (e.g.,
user-1). You should not be allowed to perform an update even with a valid JWT bearer token. - Try to delete a post that belongs to another user (e.g.,
user-3). You should not be allowed to perform a delete operation even with a valid JWT bearer token. - Try to update and then delete your own post. You should be able to do both of these operations successfully.